Odoo OpenERP Localization Database provides the accounting characteristics corresponding to that country, i.e. Country Currency, chart of accounts, journals, and localization specific reports such as trial balance, balance sheet, profit & loss report, income statements, etc.
Install the Italy localization package from odoo apps or one can choose the country as Italy while creating the database.

The two modules for Italy accounting includes:
Italy-Accounting ( l10n_it ): for basic accounting features and chart of accounts for the localization
Italy-E-Invoicing ( l10n_it_edi ): for e-invoice implementation
In the initial stage, one should configure the company, contacts, accounting, etc. And to test and use the e-invoice, data must be genuine and not a constructed one. Then only the revenue agency system can recognize the shared information.
Configuring Company
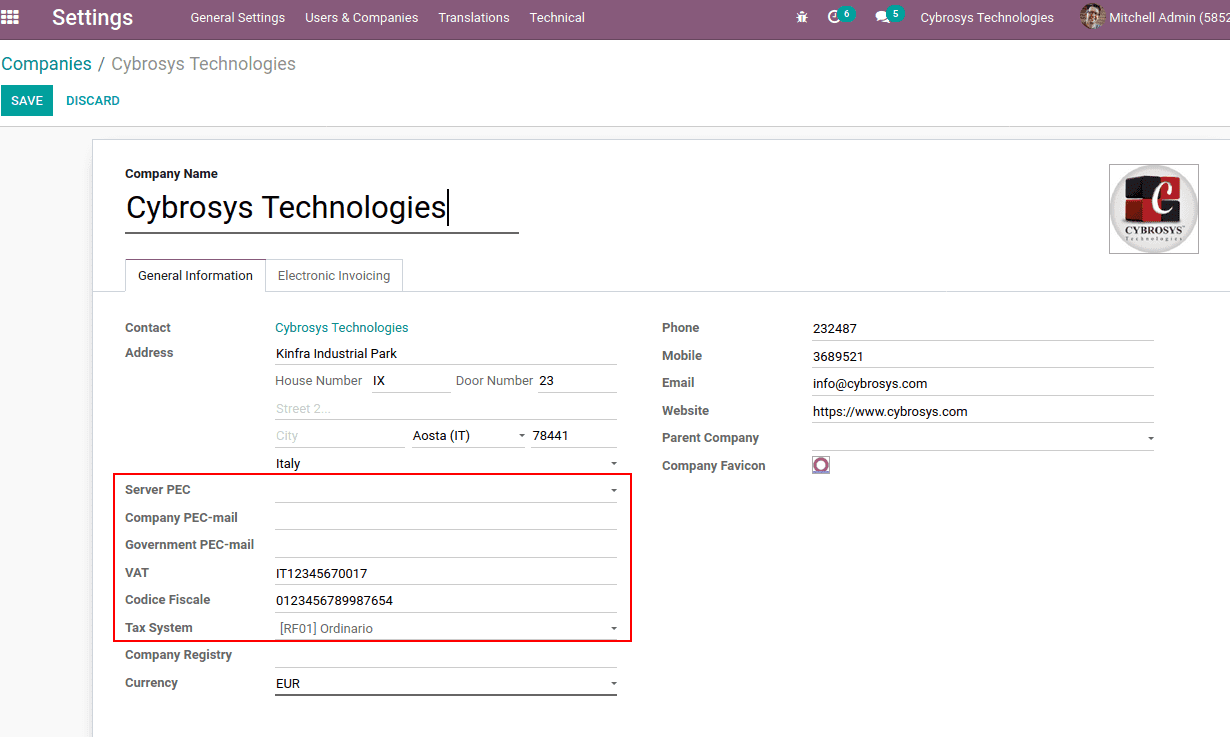
Company details can be configured from Settings > Users & Companies > Company. Choose the company and edit the company details for which you want to configure the e-invoicing.
There are extra fields like server PEC, Company PEC mail, Government PEC mail, etc while entering company details which are necessary to support the e-invoicing.

Let us look at what is PEC…
PEC is the short form of “posta elettronica certificata” means the certified mail, which is used in Italy. It is similar to traditional registered mail but provides a legal validity for the mail sent. The address will be like “yourcompany@pec.mail.it”
Later the sender receives some electronic message which certifies the time, date, e-mail address of the recipient, reference, and confirmation after having sent the email. Actually, this tool is used for writing and sending official documents for public administration and private companies.
Server PEC: Configure the PEC mail server to send electronic invoices. The server details will be supplied by the ministry.
Company PEC-mail: One can add the company PEC mail here. To avail of the electronic invoicing facilities, this address must be the same address registered with the Revenue Department.
Government PEC-mail: Add the government PEC mail.
Codice Fiscale: Fiscal code of the company
Tax System: the tax system can be chosen from the dropdown list
The data needed for the use of the electronic invoicing tool is as follows:
– The PEC server added in the company configuration should be the same as the PEC server detail provided by the ministry
– The company’s PEC address, registered with the Revenue Agency for the use of electronic invoicing services, must be the same.
– The Revenue Agency’s PEC address is the email that will be given when your PEC is registered with the Revenue Agency. This can be changed by the revenue agency upon notice.
– For the electronic invoicing to work properly, you have to fill VAT number and tax code correctly. It is important to select the tax regime to which the Company is prone by selecting from the pre-filled list given by Odoo. The company can depend on the accountant to identify the right tax regime.
– Registration number in the commercial register.
Configure the settings for Electronic Invoicing
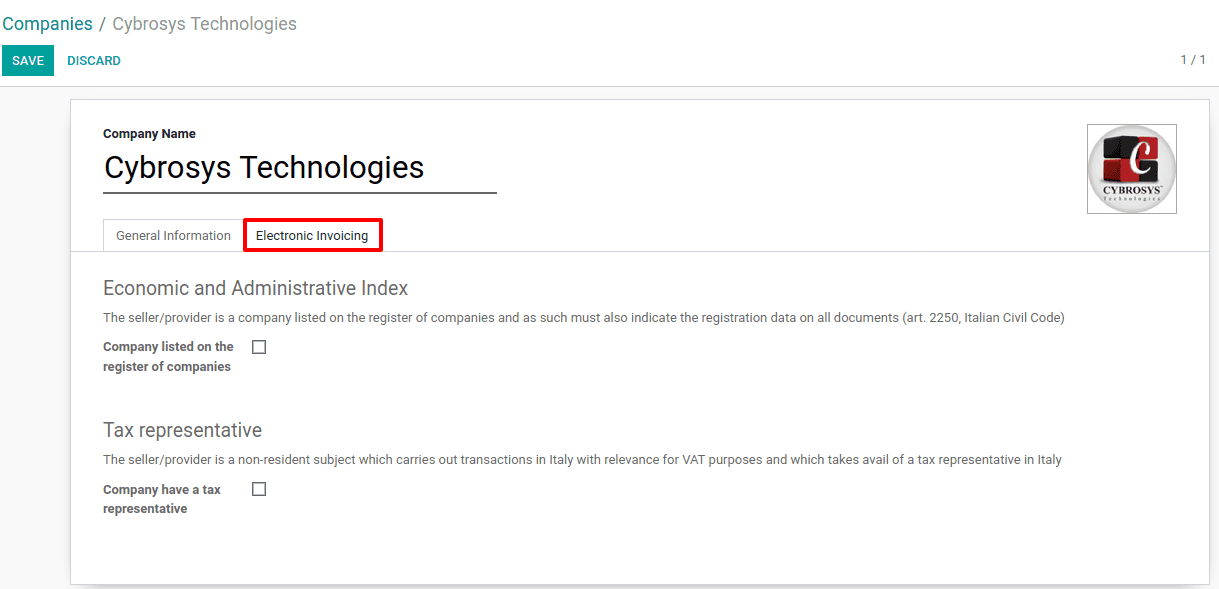
Under the electronic invoicing tab, one can enable ‘Company listed on the register of companies’ if the vendor is a company listed on the company registry and, as such, the registration details must also be indicated on all documents (art. 2250, Italian Civil Code).

Also, enable ‘Company has a tax representative’ if the vendor is a non-resident entity that carries out VAT-relevant transactions in Italy and makes use of a tax representative in Italy.
Configuring Partners
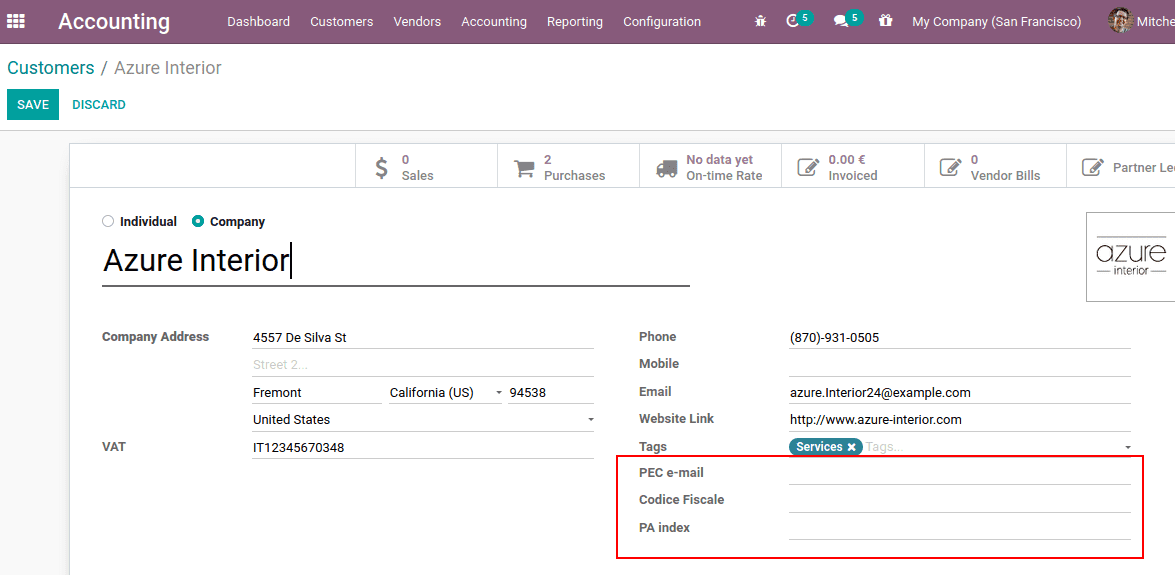
The necessary legal information also added to the customer and vendor forms to use the e-invoicing application properly.

Add the PEC e-mail, Tax code, and PA index to the partner form. PA index is a 6-7 character code and is required for invoice electronic communication.
The Billing Process
By following the application instructions one can proceed to issue the invoice. The moment at which the formal sending of the invoice is decided is the moment at which the ‘Valid’ option is chosen. The invoice is then sent: the user will be informed of the status of its delivery via a pop-up on the beginning part of the invoice screen. The messages that appear include:
Invoice invited: waiting for accepting
Sending failed: The invoice may be altered and submitted again.
The invoice has been correctly sent and accepted by the recipient.
The different phases of the shipment and receipt of the invoice are also evident in the form of icons in the list of invoices, next to the ‘Status’ column in the accounting application.
Red Icon: Sending failed
Yellow Icon: Invoice invited and waiting for acceptance
Green Icon: Invoice sent and accepted by the recipient
To send an invoice through PEC and create an XML file, simply click the send button. In the attachments, the document would then be attached.
[wpcc-iframe loading=”lazy” src=”https://www.youtube.com/embed/4sscVpX9ub4?rel=0″ style=”border: 0; top: 0; left: 0; width: 100%; height: 100%; position: absolute;” allowfullscreen=”” scrolling=”no” allow=”encrypted-media; accelerometer; clipboard-write; gyroscope; picture-in-picture”]


