Each country has its payroll structure, and the business enterprises need to follow the law and regulations based on the rules implemented by the government officially. The UK is the island nation found in the corner of Western Europe and contributes to the three hundred years old of four separated states like England, Scotland, Wales, and Northern Ireland. The UK is the historic oceanic country that implemented international exposure and colonization to move forward with the British Empire and attributed the country to the modern-day global influence. As with its international exploration, the UK has its capital city, London, the world’s busiest city and the financial core of the region where trade and commerce occur explicitly.
The UK has a well-structured wages legislation assembly for different kinds of business industries with excellent exemptions. It must provide the workers’ wages based on the employment contract with enterprises. The wages legislation has fixed a minimum wage for different age groups. In the UK, all people undergoing employment are mandatory to pay the income tax based on their personal earnings and National insurance to get the region’s benefits.
PAYE (Pay As You Earn) is a scheme undergoing in the UK to receive taxes and national insurance from the UK government. Any business enterprise that appoints one or more employees must register all their details and payment details in the PAYE scheme. The PAYE system is administered by the UK HMRC (HM Revenue and Customs). Most employees get their salary monthly, but it can also be converted to weekly, depending on the company policy. But before the time of salary is scheduled for an employee, the employer must submit all the necessary documents to the PAYE to get the employee’s tax remittance. In the UK, through the PAYE system, all the basic salary and the other statutory payments like sick pay, maternity pay, paternity pay, and additional redundancy payments are carried forward to the employee rather than not maintained directly with the employer-employee relationship.
In the UK, the PAYE system imparts all payroll matters; the employer must pay all social security benefits to the employee. It is deducted from the employee’s basic salary, and the net income will be transmitted to the employee account. PAYE tax is 20 % of the basic salary, and it is deducted from the second month of the salary if an employee newly joined. Social Security contributions are known as National Insurance. Based on the UK payroll, the contributions must be paid by both employer and employee. The employer shall need to pay for national insurance fixed with a rate of 13.8% of all earnings, which is more than £732 monthly, and it is not deducted from the employee’s salary. But for employees, the national insurance or social security is remitted based on specific criteria as follows:
a)Employee who earns below £792 per month shall not get any income or payment.
b)Employees who achieve between £792 or £4167 per month shall provide 12% of income.
c) If employees achieve more than £4167, they can offer 2% of their income.
This blog gives you an insight into payroll localization in the UK with its laws and regulatory requirements mapping with Odoo 15 ERP and managing the payroll.
As moving to the Odoo 15, you will get the precise calculation within a few clicks. And you will not get any sort of errors like manually entering all the fields for the particular employees in your specific company.
Lets us see in detail how we can configure the salary for an employee based on their employment contract with certain conditions based on the labor law of the UK country or we can see the management of payroll in the UK.
We will configure an employee’s salary working in the UK, and the pay is computed monthly with the Odoo 15. The employee is 25. The employee will be forced to pay Student Loan Repayment based on UK law if he has undergone 21 or below 21. Otherwise, the employee is forced to give the tax, insurance, and pension to the UK government. In the UK, as per the law, an employee must work for a week maximum of 48 hours and a minimum of 40 hours.
For implying the Payroll in Odoo 15 ERP, we need to install the Payroll module, and with it, you can configure it to the country you require as now we need the UK, and we can follow the steps easily. First, you need to move the Dashboard and select the Configurations, and from there, you have to set your country’s rules by selecting the Salary Rules.
Payroll>Configuration>Salary Rules
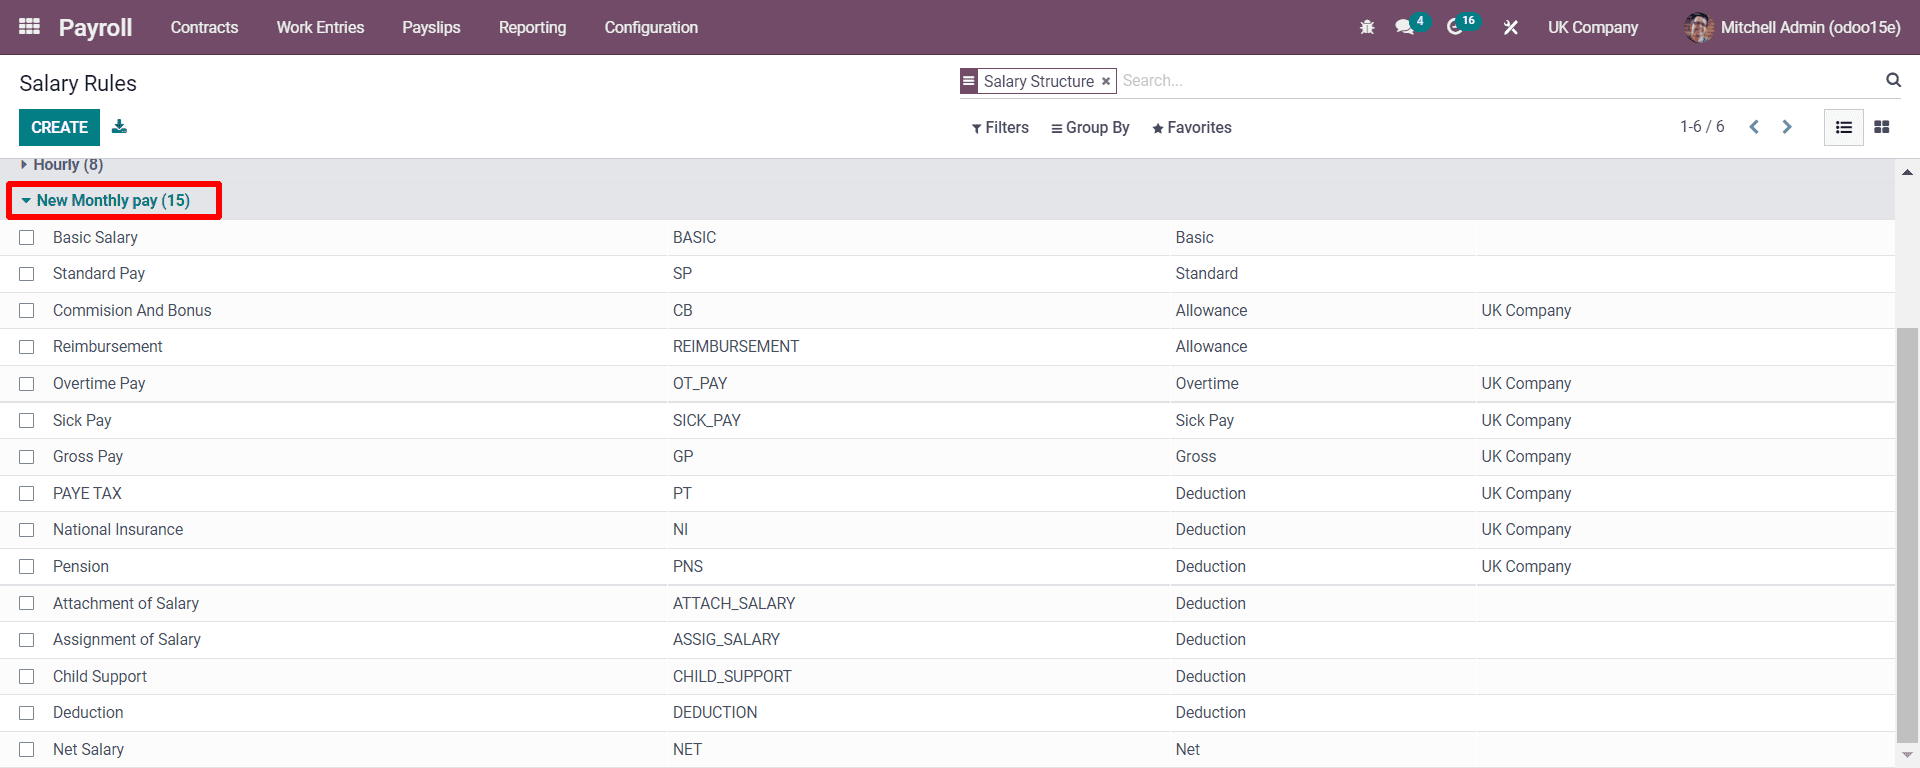
As seen in the above screenshot, a window appears by selecting the configuration’s salary rules. Here you can see a list of rules generated under the New Salary Structure as UK law. You can develop a salary rule per selected country by clicking on the CREATE button. For example, let us create a salary structure before creating a salary rule for the UK. You need to move Configurations and then to the Salary Structure.
Configurations>Salary Structure
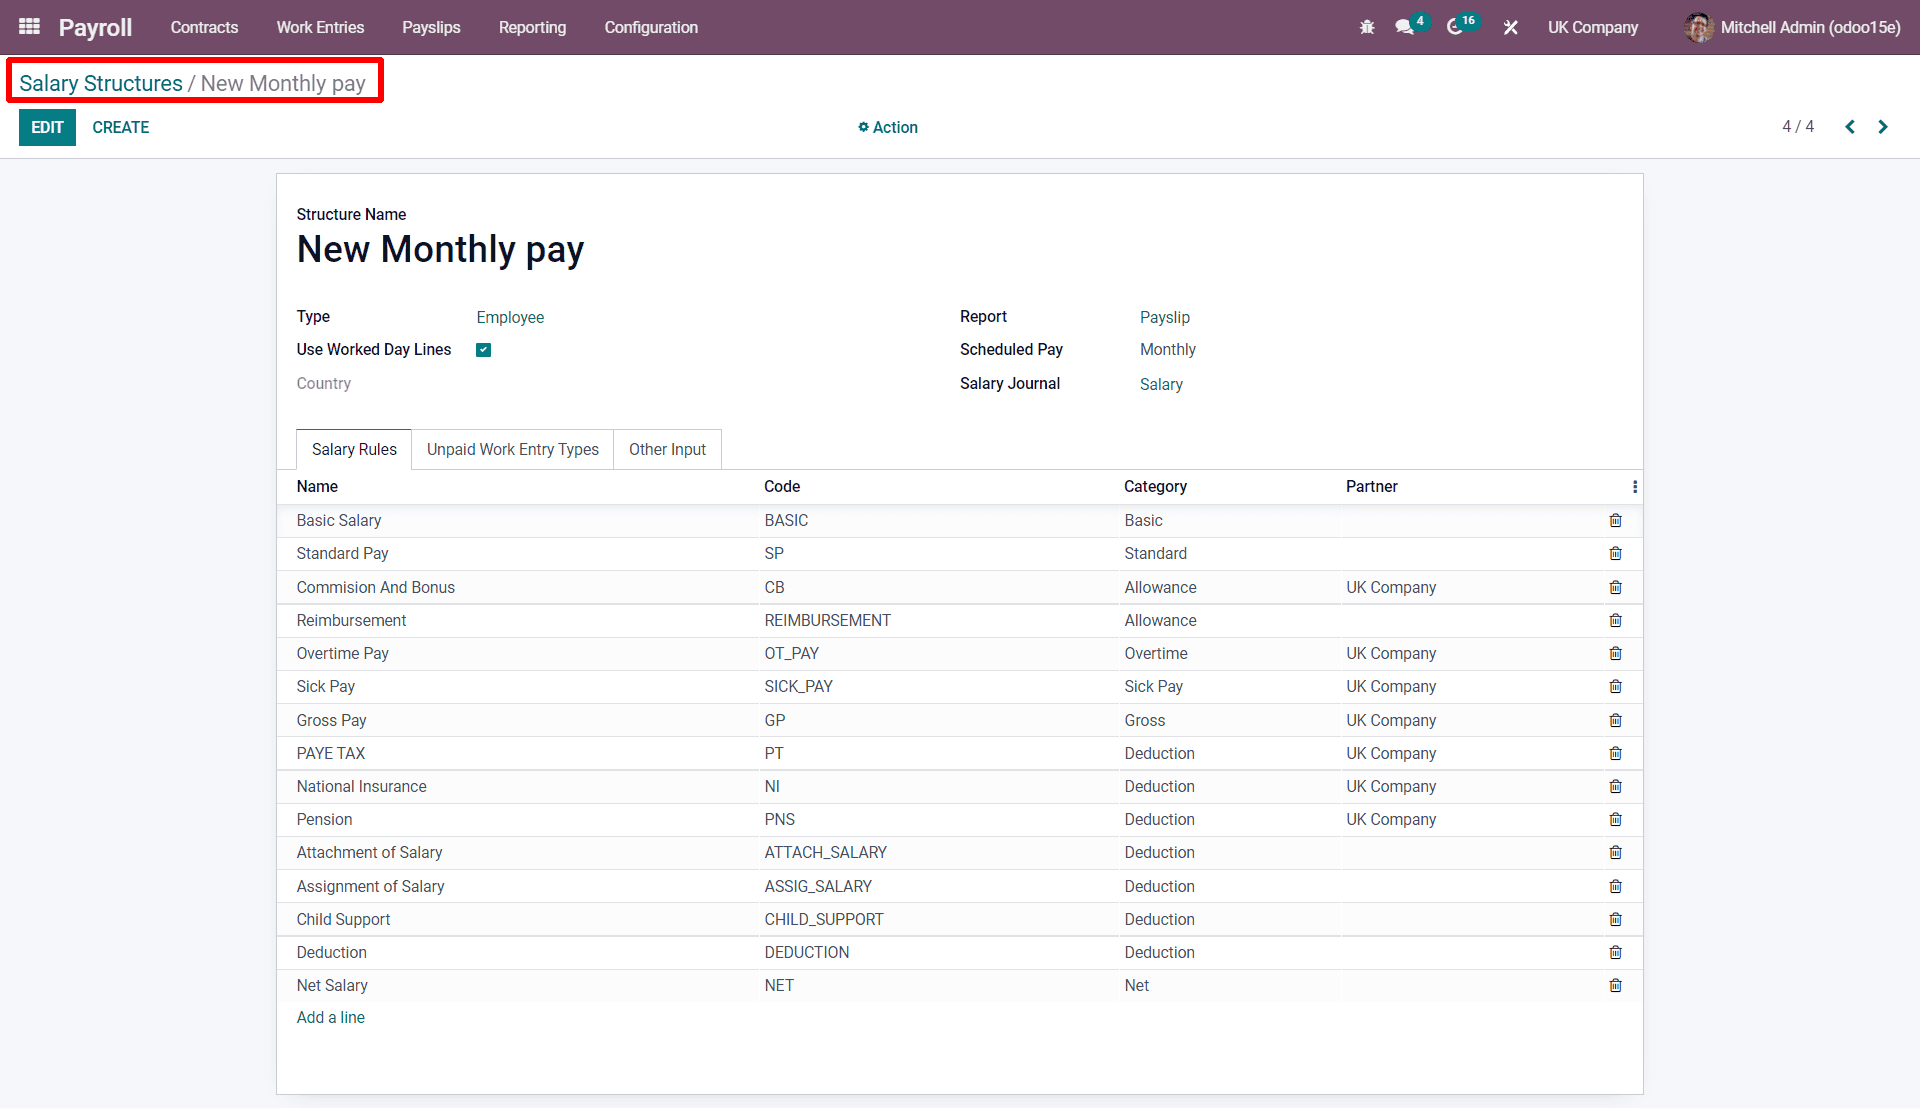
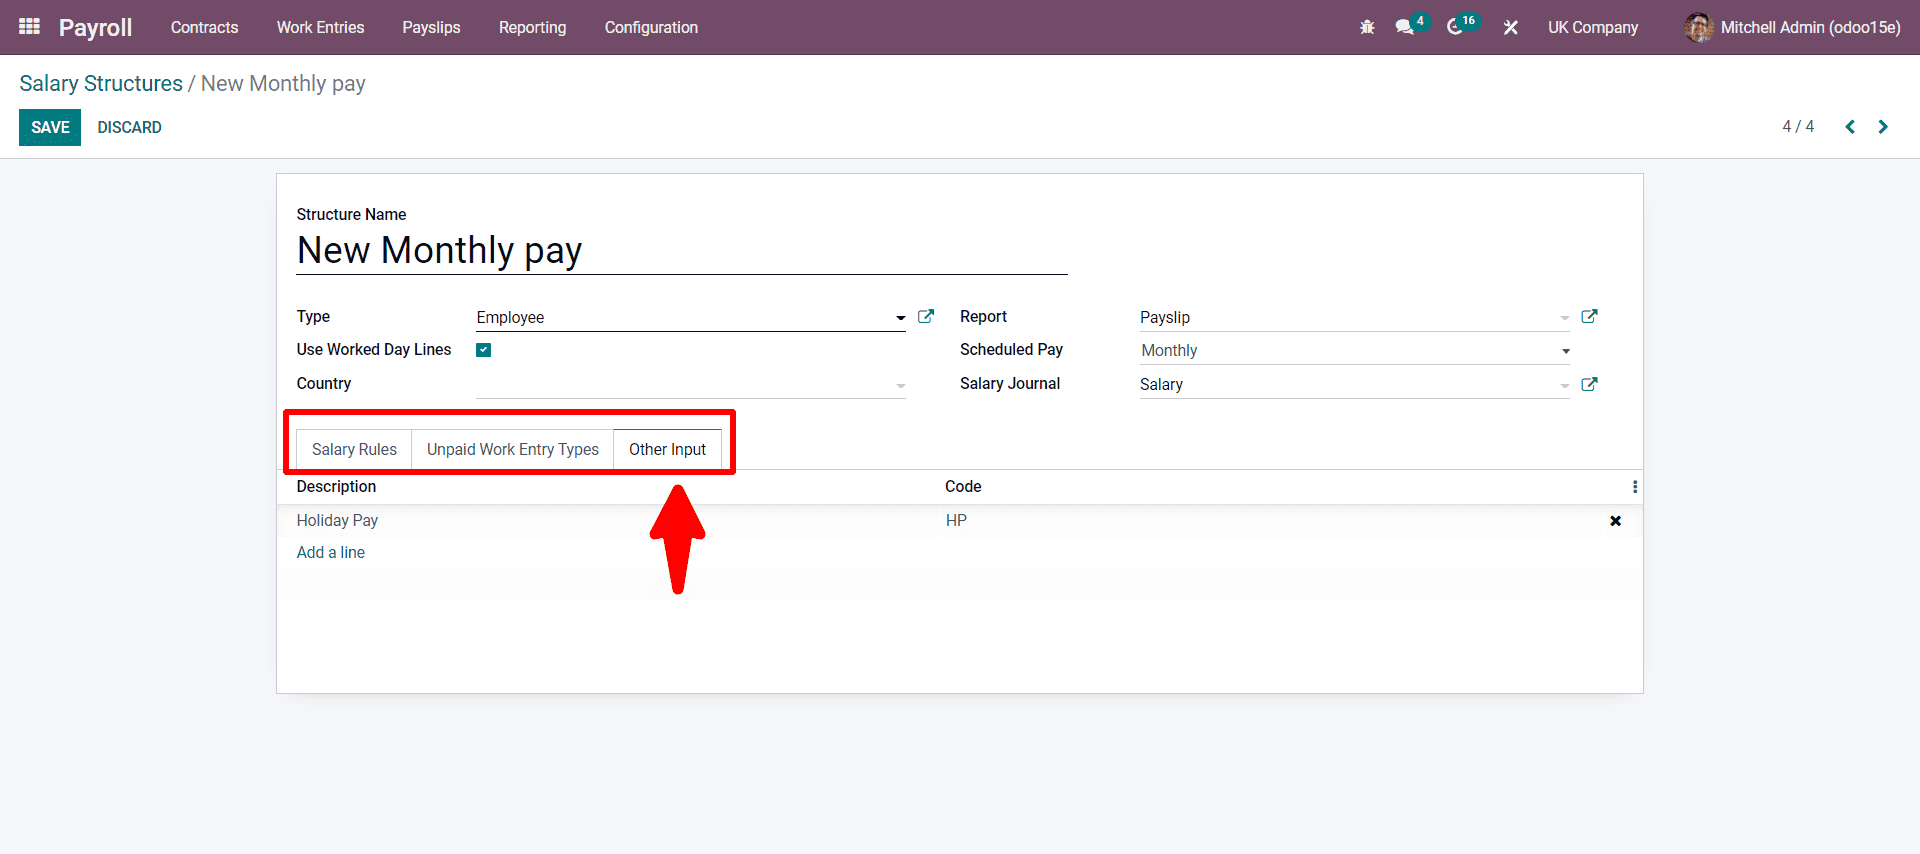
As the screenshot shows, you can click on the Save button after creating the salary structure with all details. Under Scheduled Pay, you will get a dropdown list where you can select how the salary payment is managed. There are monthly, weekly, quarterly, semi-annually, or bi-weekly options. Here we can choose the monthly. Here, you can see the three sub-tabs: Salary Rules, Unpaid work entry types, and Other Inputs. In Other Inputs, you can add the allowance which is not defined in the contract and if the employee is working additionally excluding the contract terms. And there you can also fix the salary for the extra allowance in the salary rules while arranging.
So here, the Holiday pay can be added in the Other Input, as seen in the below screenshot.
Now let us see how we can arrange the salary rule for each specification in the salary structure. For example, we can look at setting the Basic Salary first.
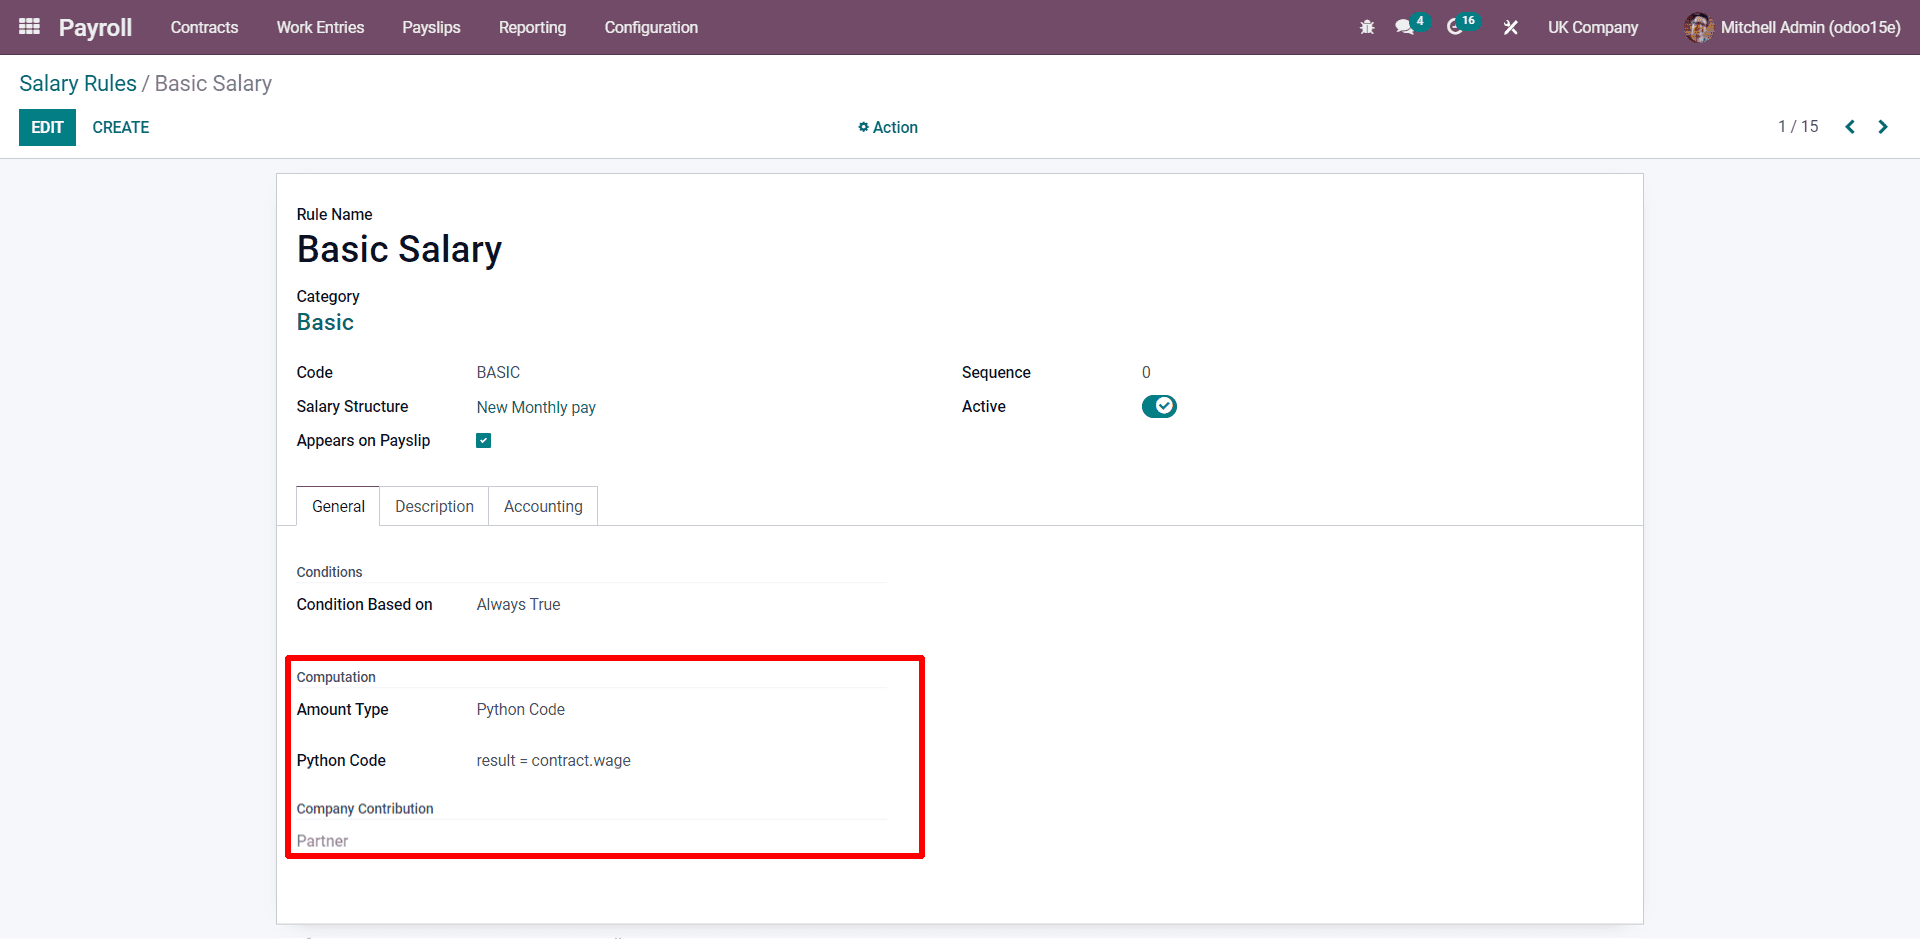
As seen in the above screenshot, the basic salary rule is configured based on the wage in the contract. The salary is computed and is in python code with the equation as highlighted.
Next, you can see the computation rule for Standard Pay.
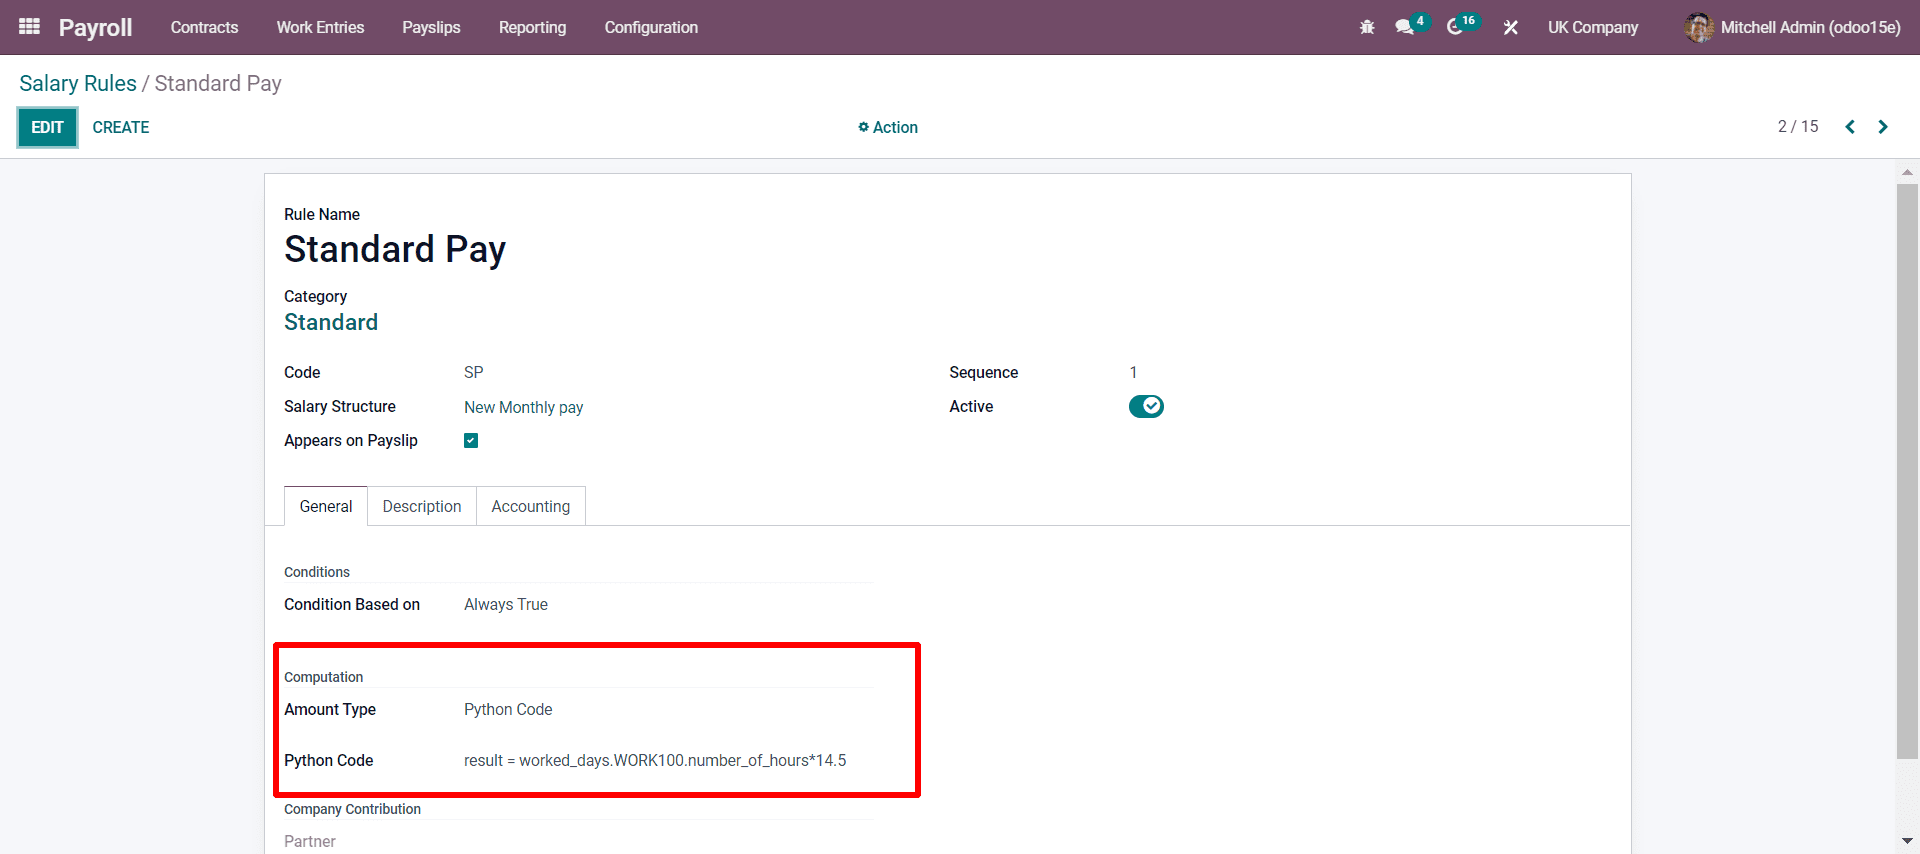
You can see in the screenshot the highlighted portion with:
result=worked_days_WORK100.number_of_hours*14.5
which is in the python code. This means the employee how many days and hours worked totally, which is calculated according to the payslip. By entering the payslip after the configuration of the rule, we can see the whole working days and working hours of the employee, which can be discussed later.
Now let us see the rule configured for the Commission and Bonus.
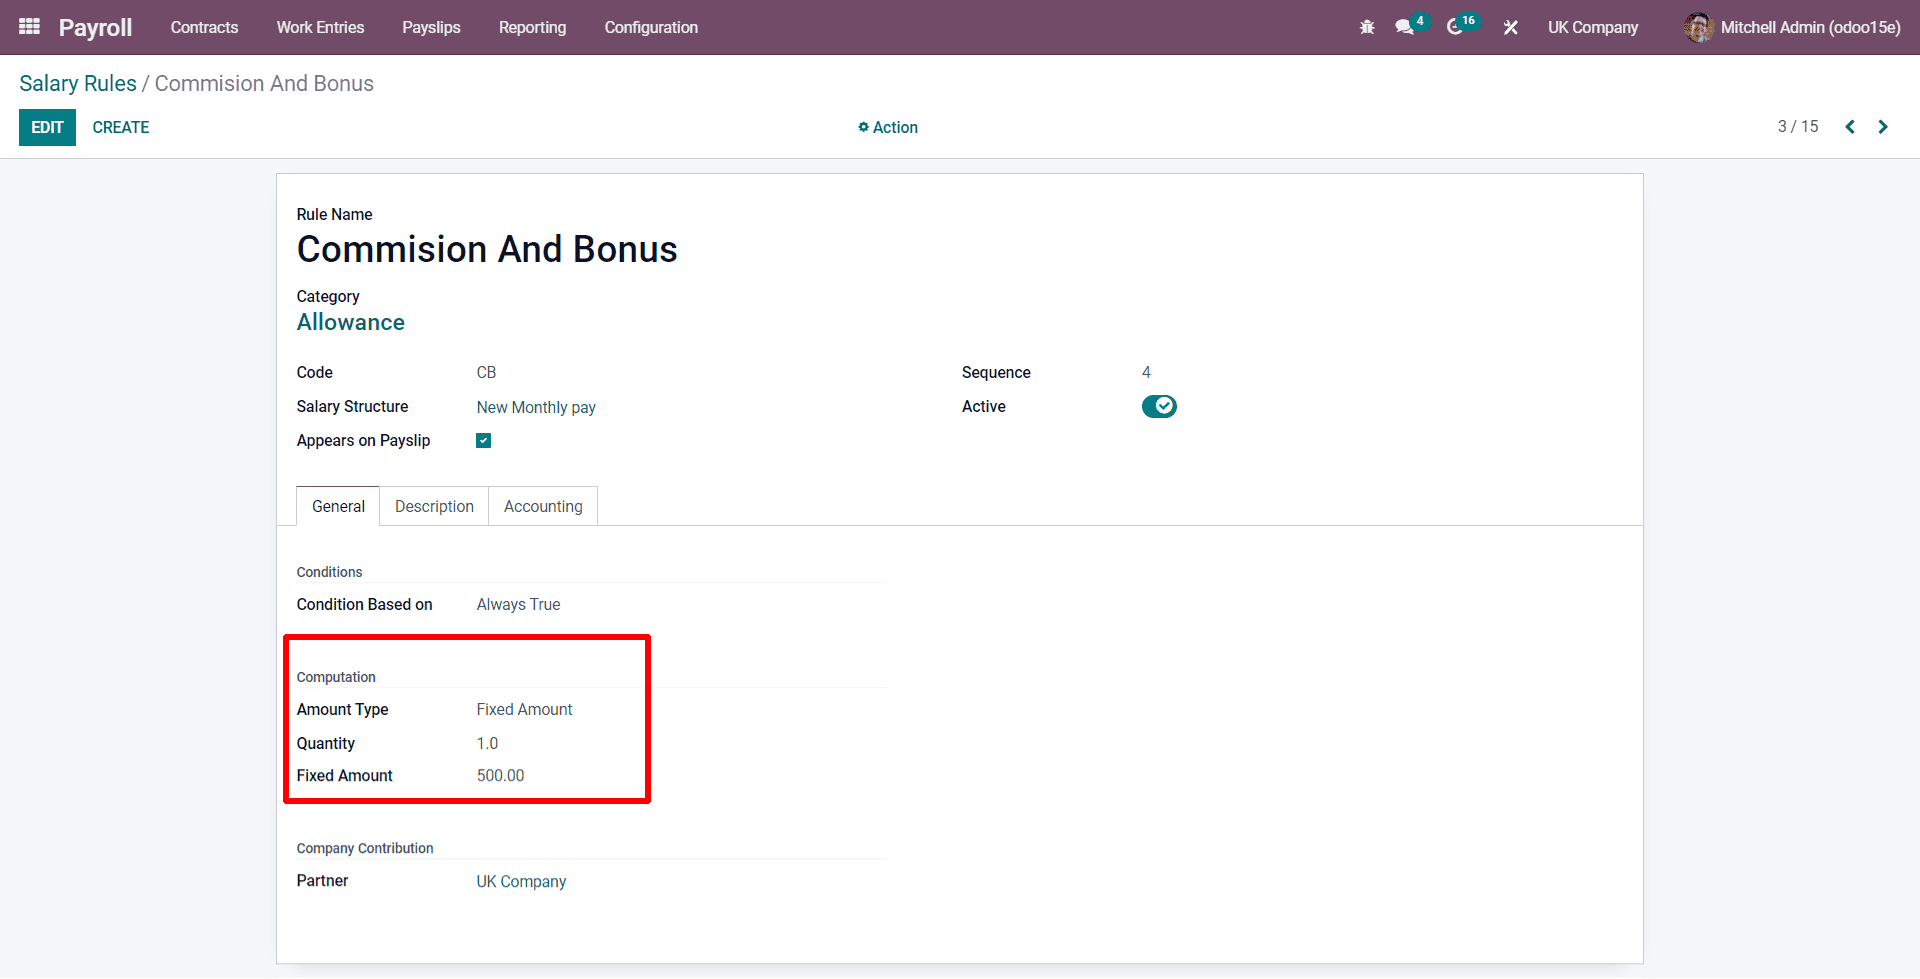
As seen here, no specific condition is mentioned in the contract. The employee at this rule, the company, gives a fixed amount as a bonus.
Next, we can see the Reimbursement rule.
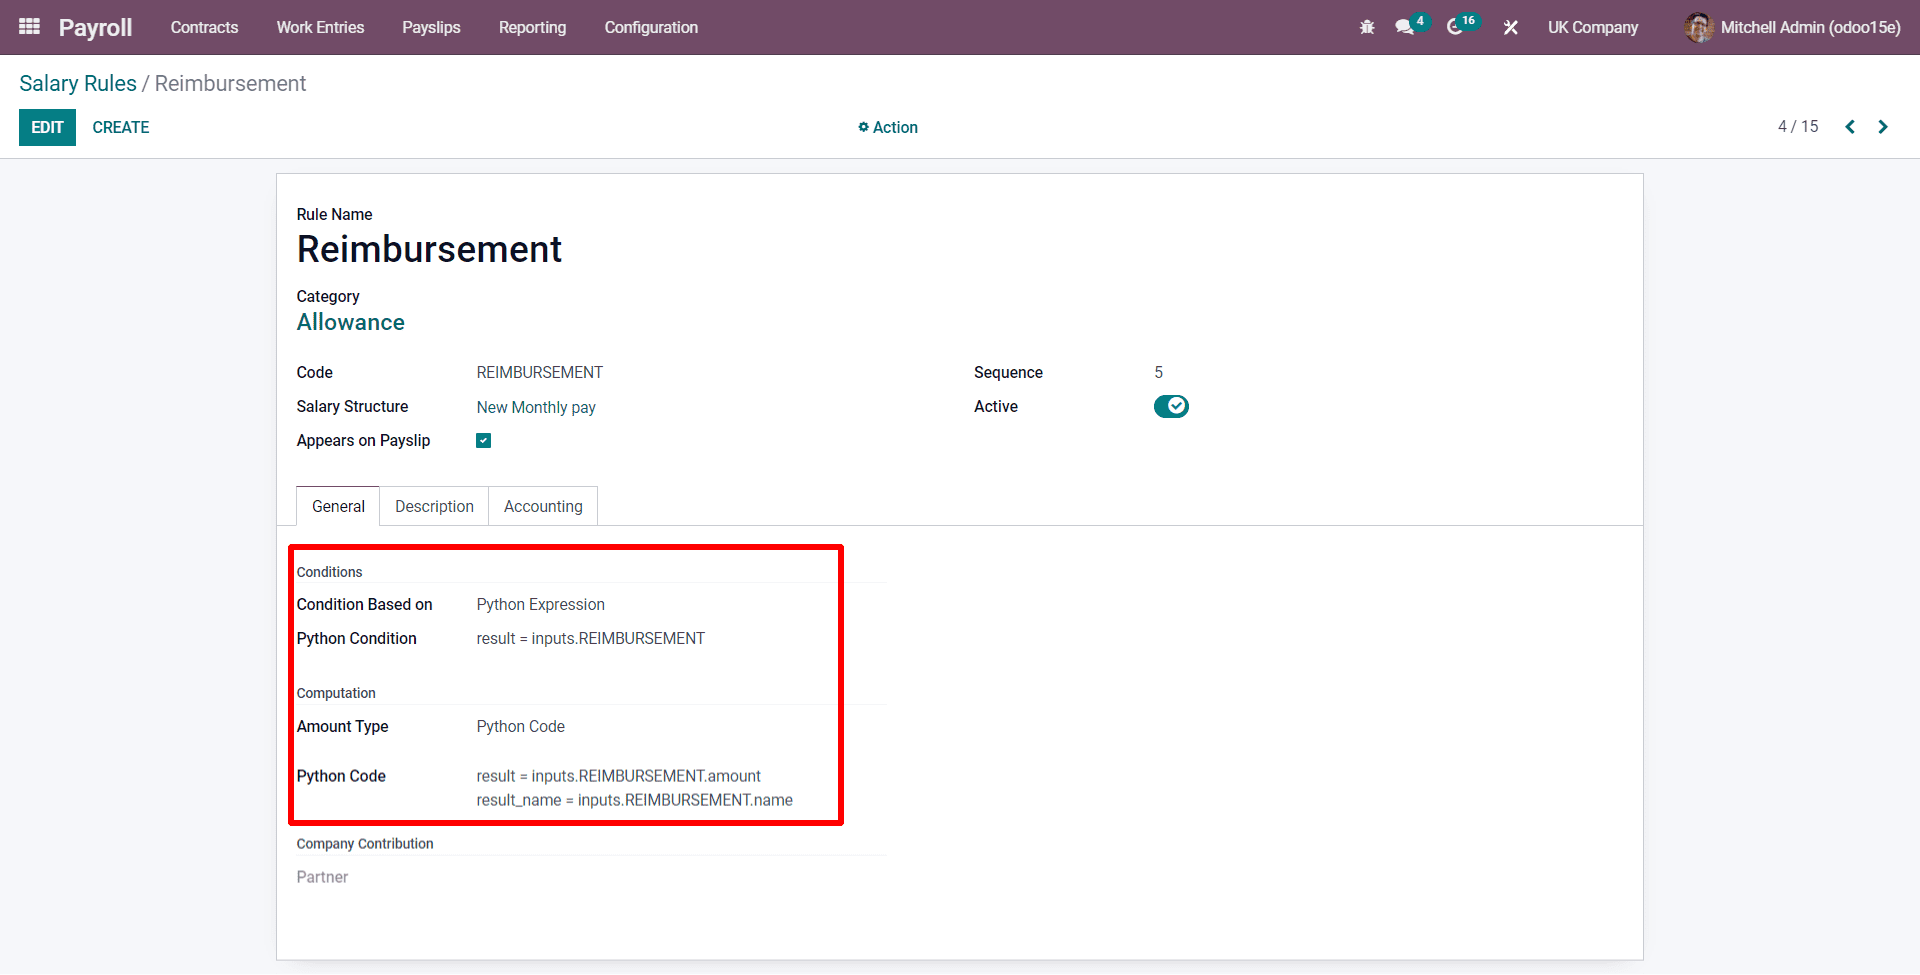
Here the rule is configured based on when the company reimburses an amount that the employee uses any expense of company like for example travel expense, petrol expense, etc, and the rule is provided based on it. That is if the employee uses an amount for the company expenses the company reimburses the amount through his salary time.
Here the condition is based on the python expression, and we apply the python expression with the python code.
Next, we can see the Overtime Pay.
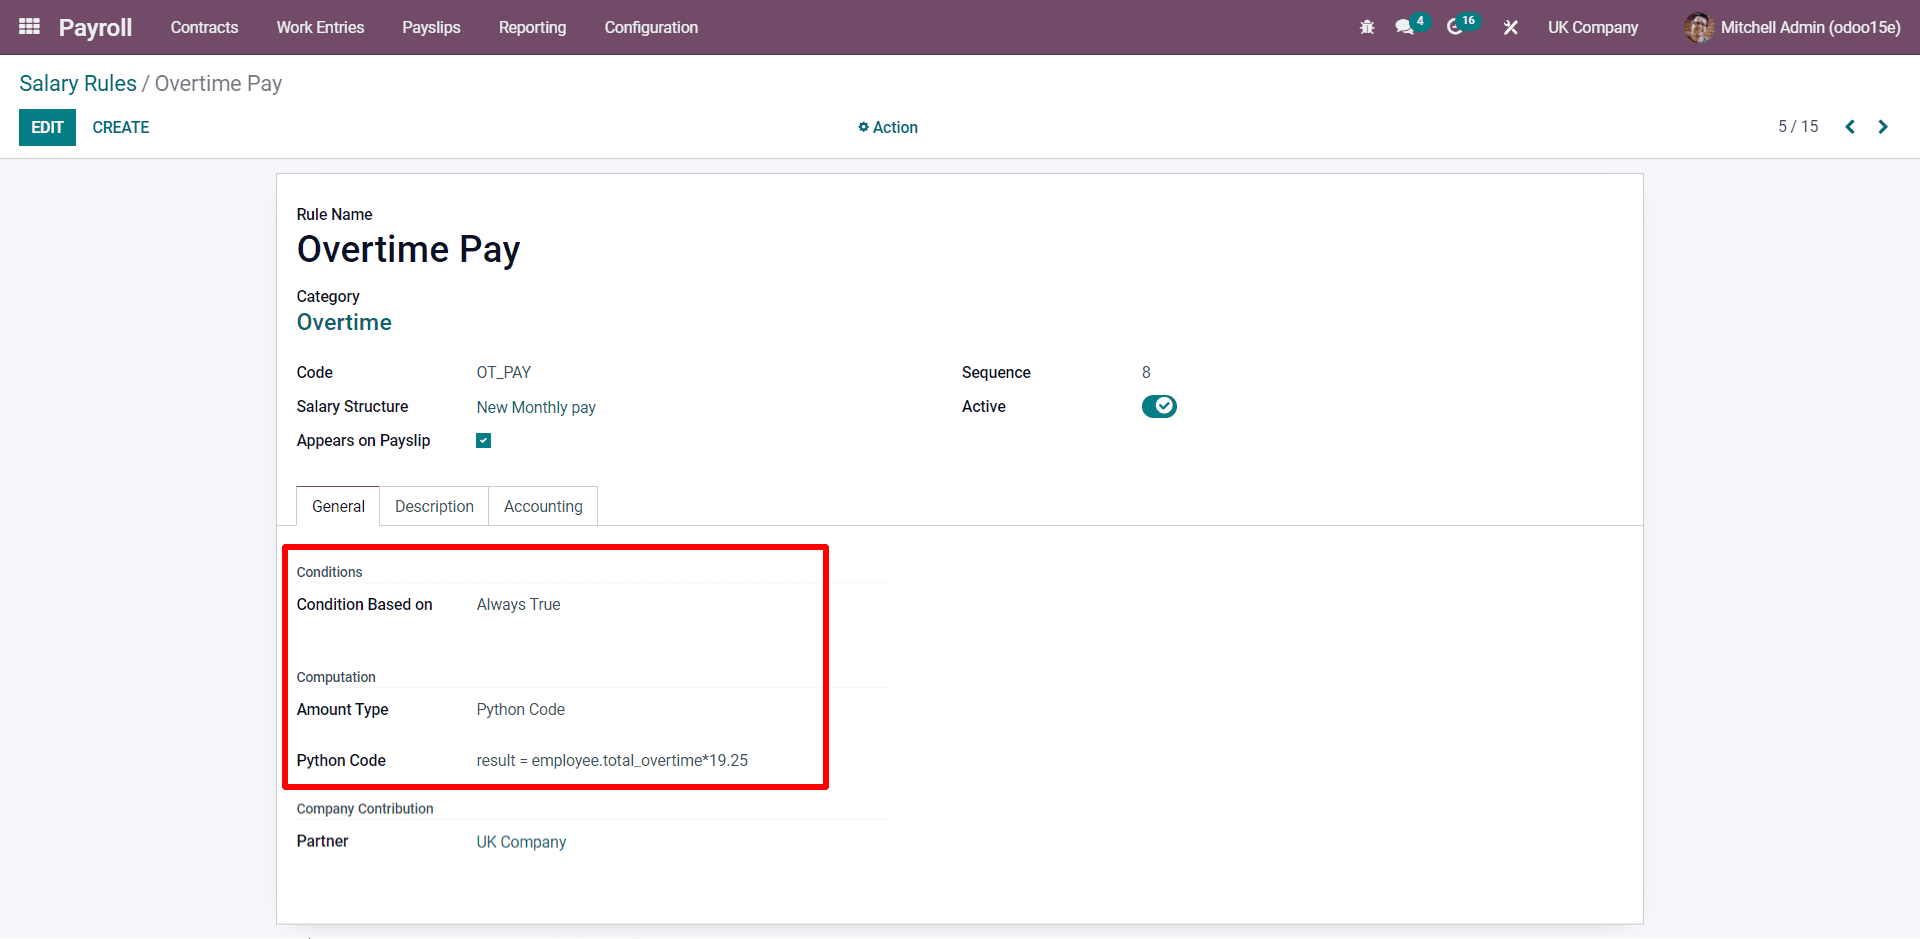
Here the overtime pay is based on if the employee takes any additional work hours. It is calculated as overtime with an extra amount of 19.25 pounds per hour.
Next, we can see the Gross pay.
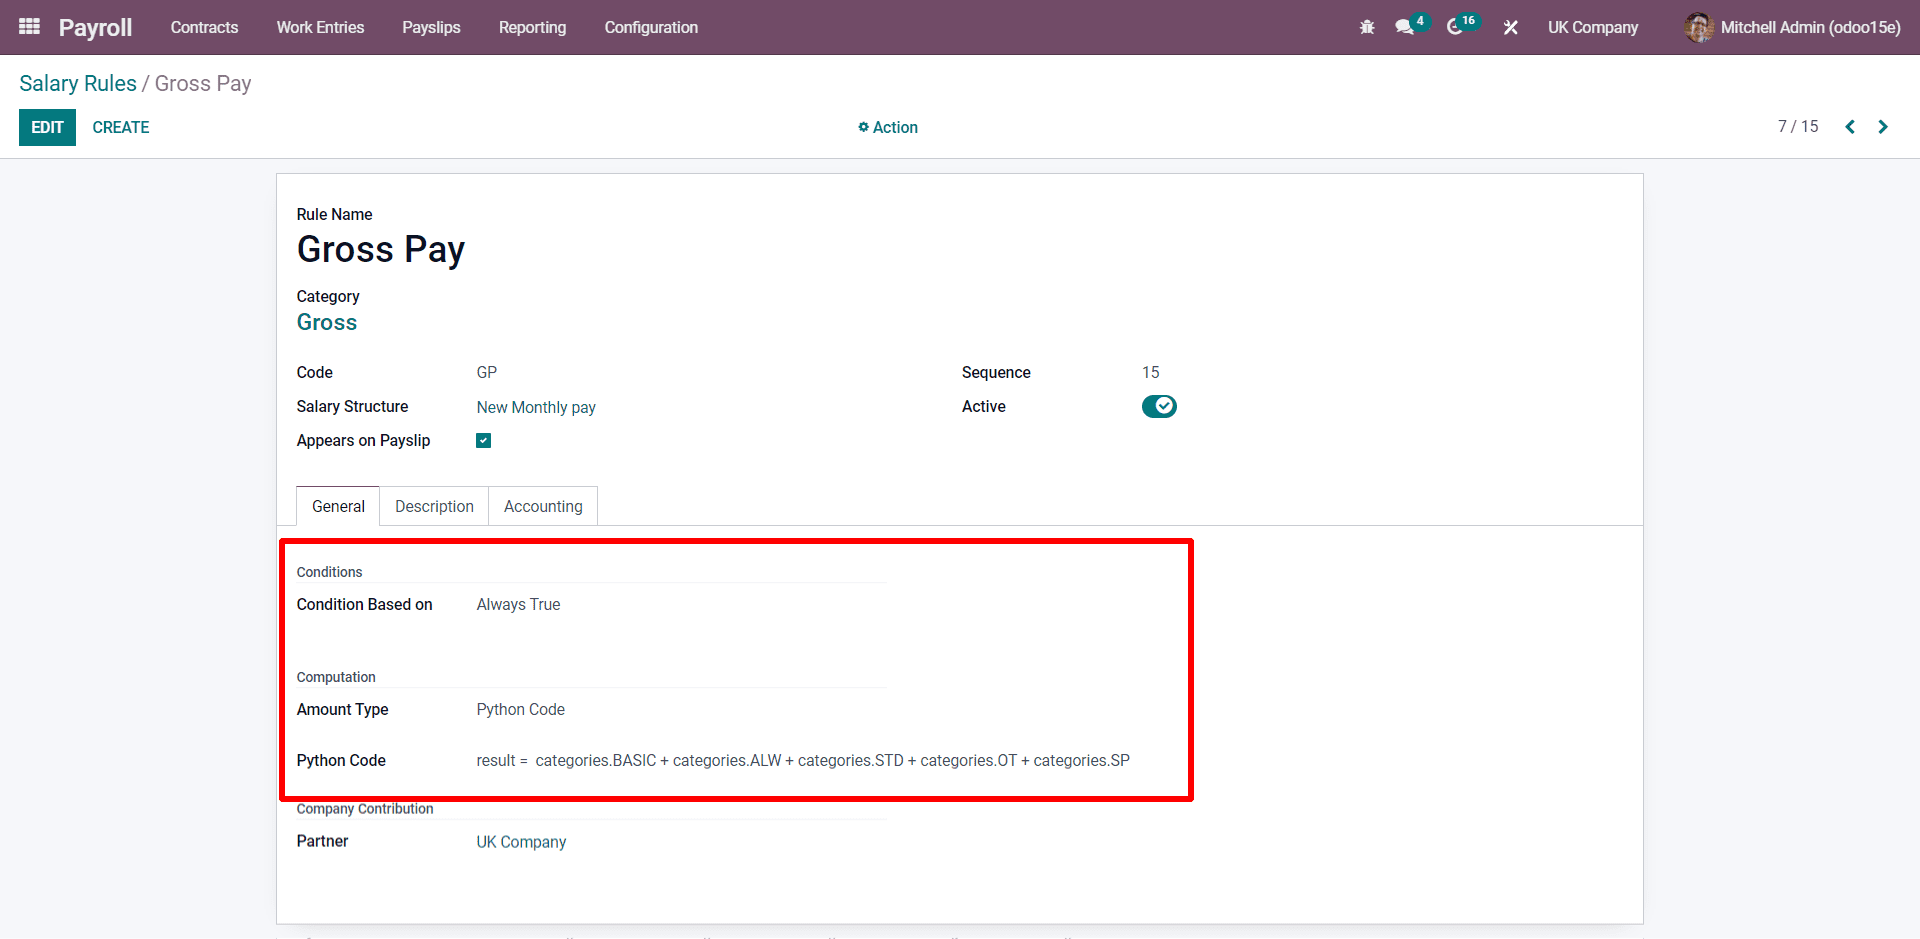
Here in the Gross Pay, you will be getting the total Basic salary, allowances, Standard Pay, and Overtime Pay. In some cases for some companies they will be giving any of the ones either Standard Pay or Basic Pay but here we have denoted with the company giving both the Standard and Basic pay. It depends on the company policy.
Next, you can see the PAYE TAX.
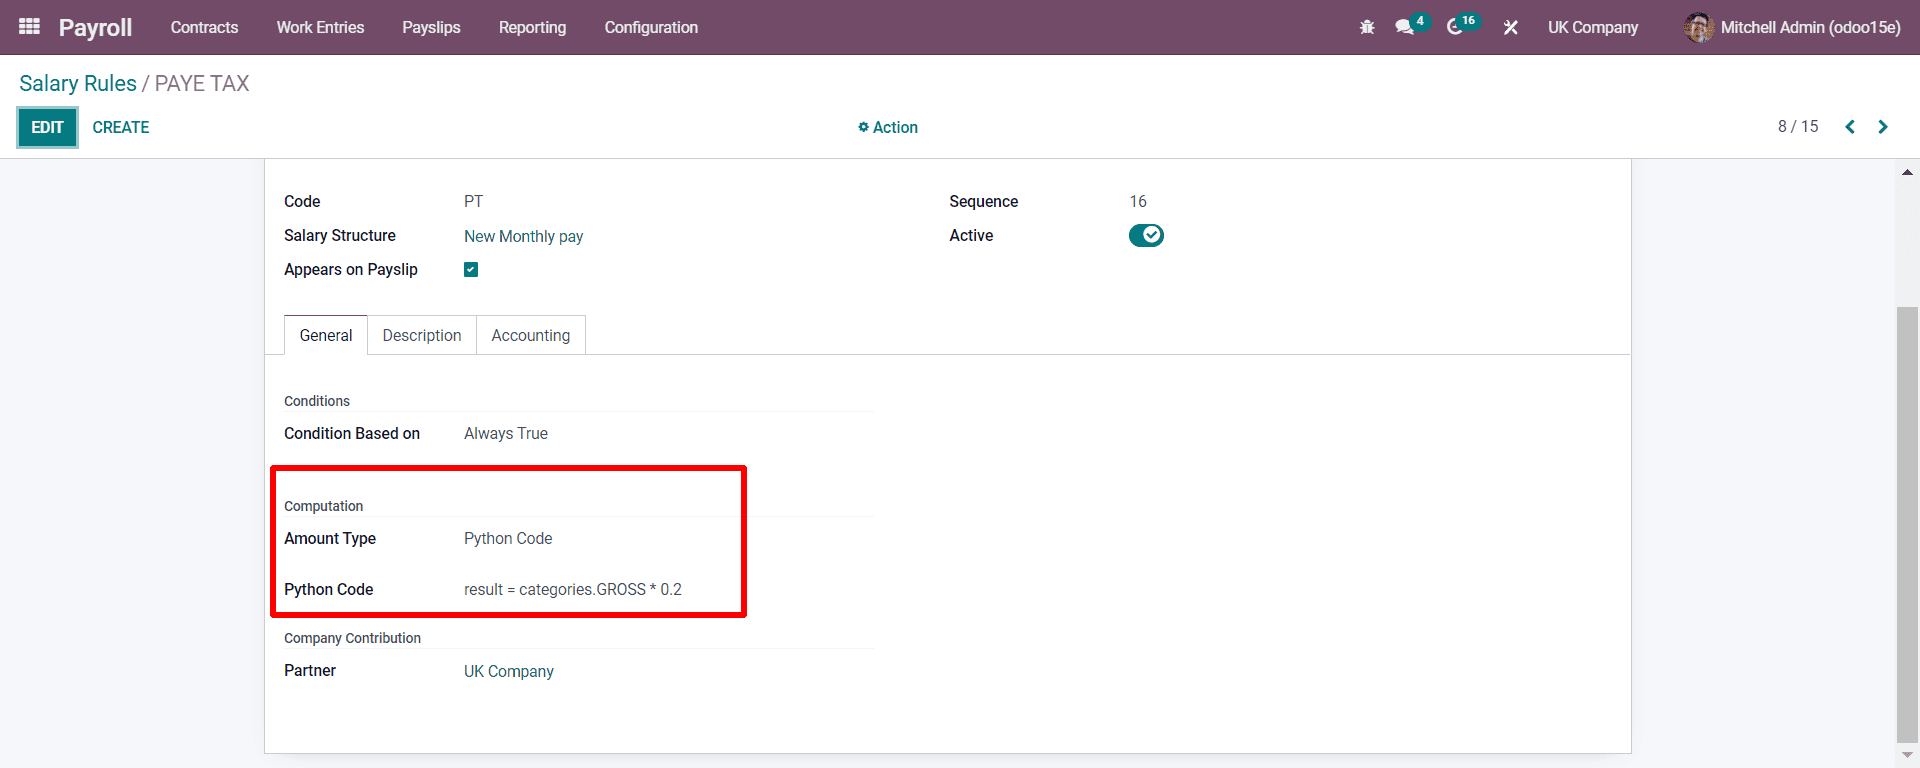
As discussed later, 20% of the basic salary is found as PAYE TAX. And it can be computed here with the condition.
Next is the National Insurance.
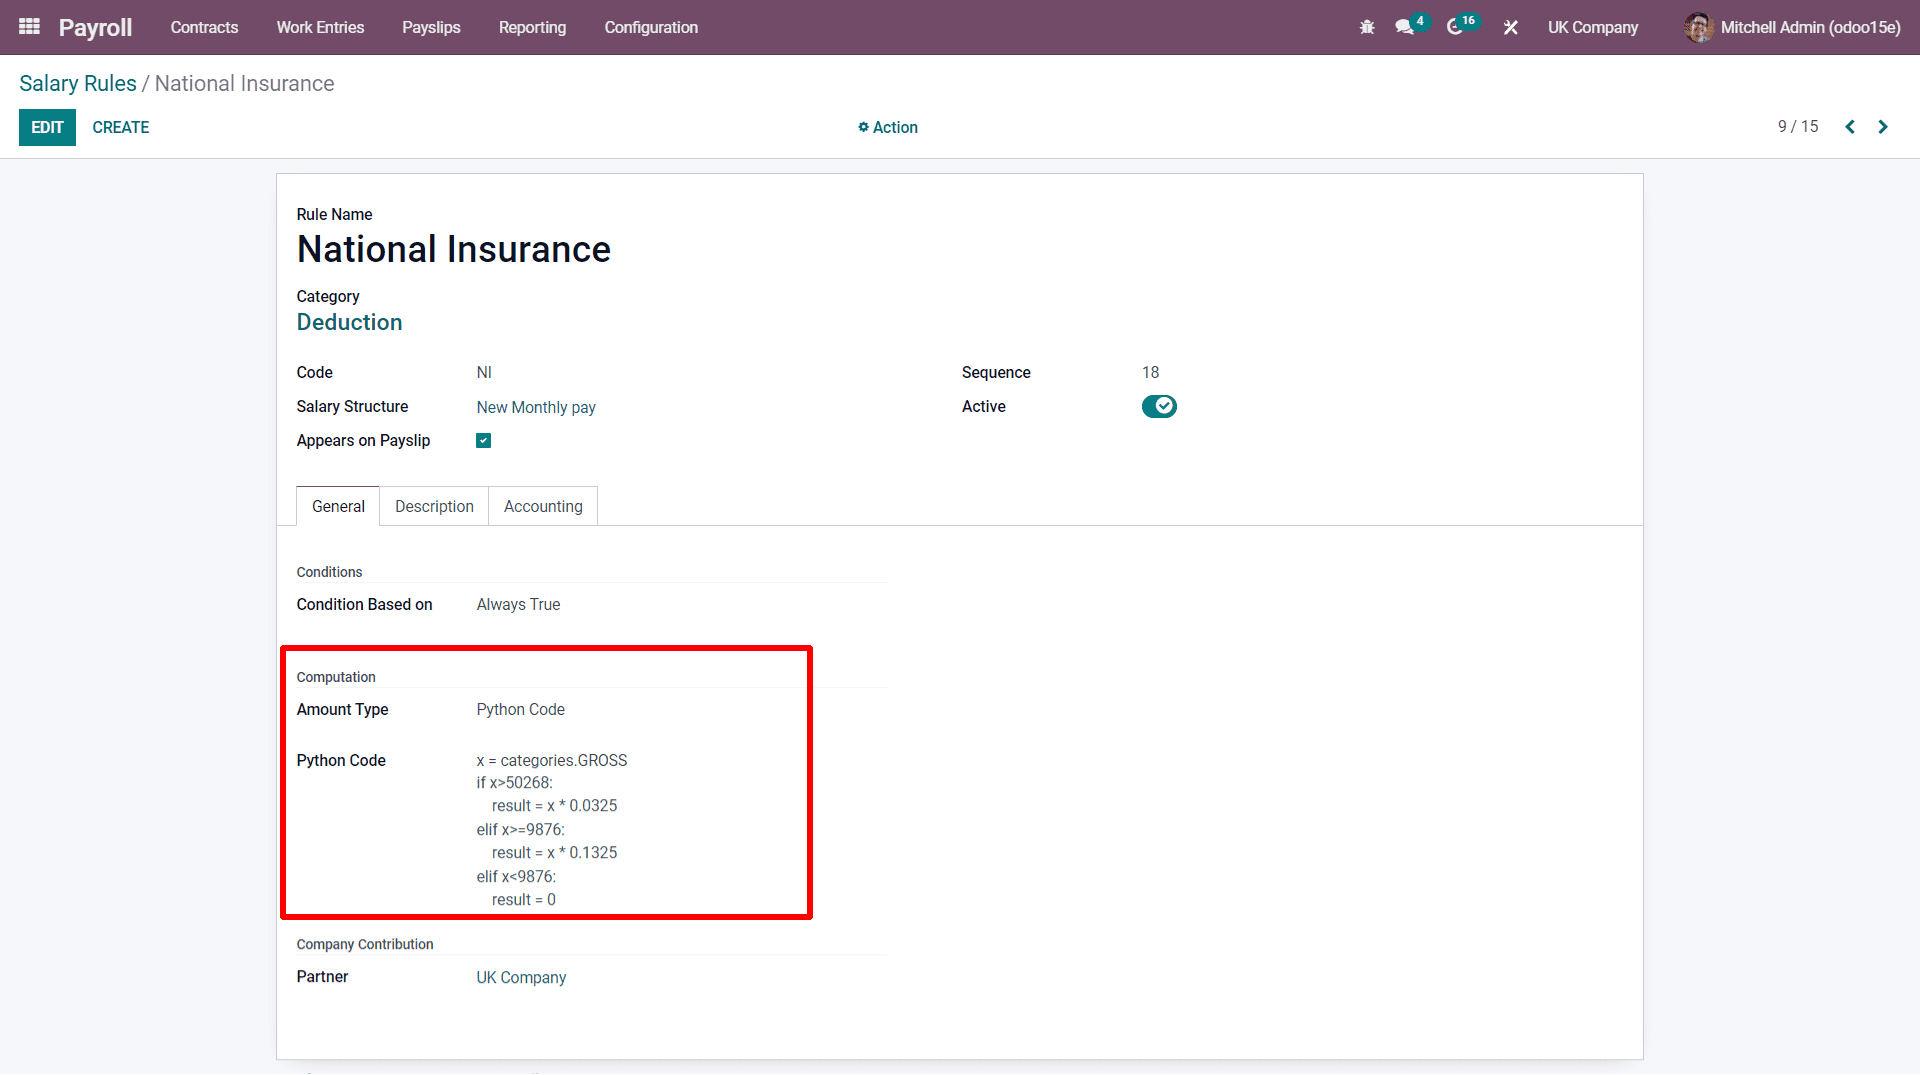
As discussed before, National Insurance is calculated with certain conditions, as seen in the highlighted portion. In this condition, if the employer earns more than 50268 he must give 13.25 % to the national insurance and if it is less than 9876 then the employer need not require to pay the amount for national insurance. And the amount is calculated based on the Gross pay.
Next, you can see the Net pay.
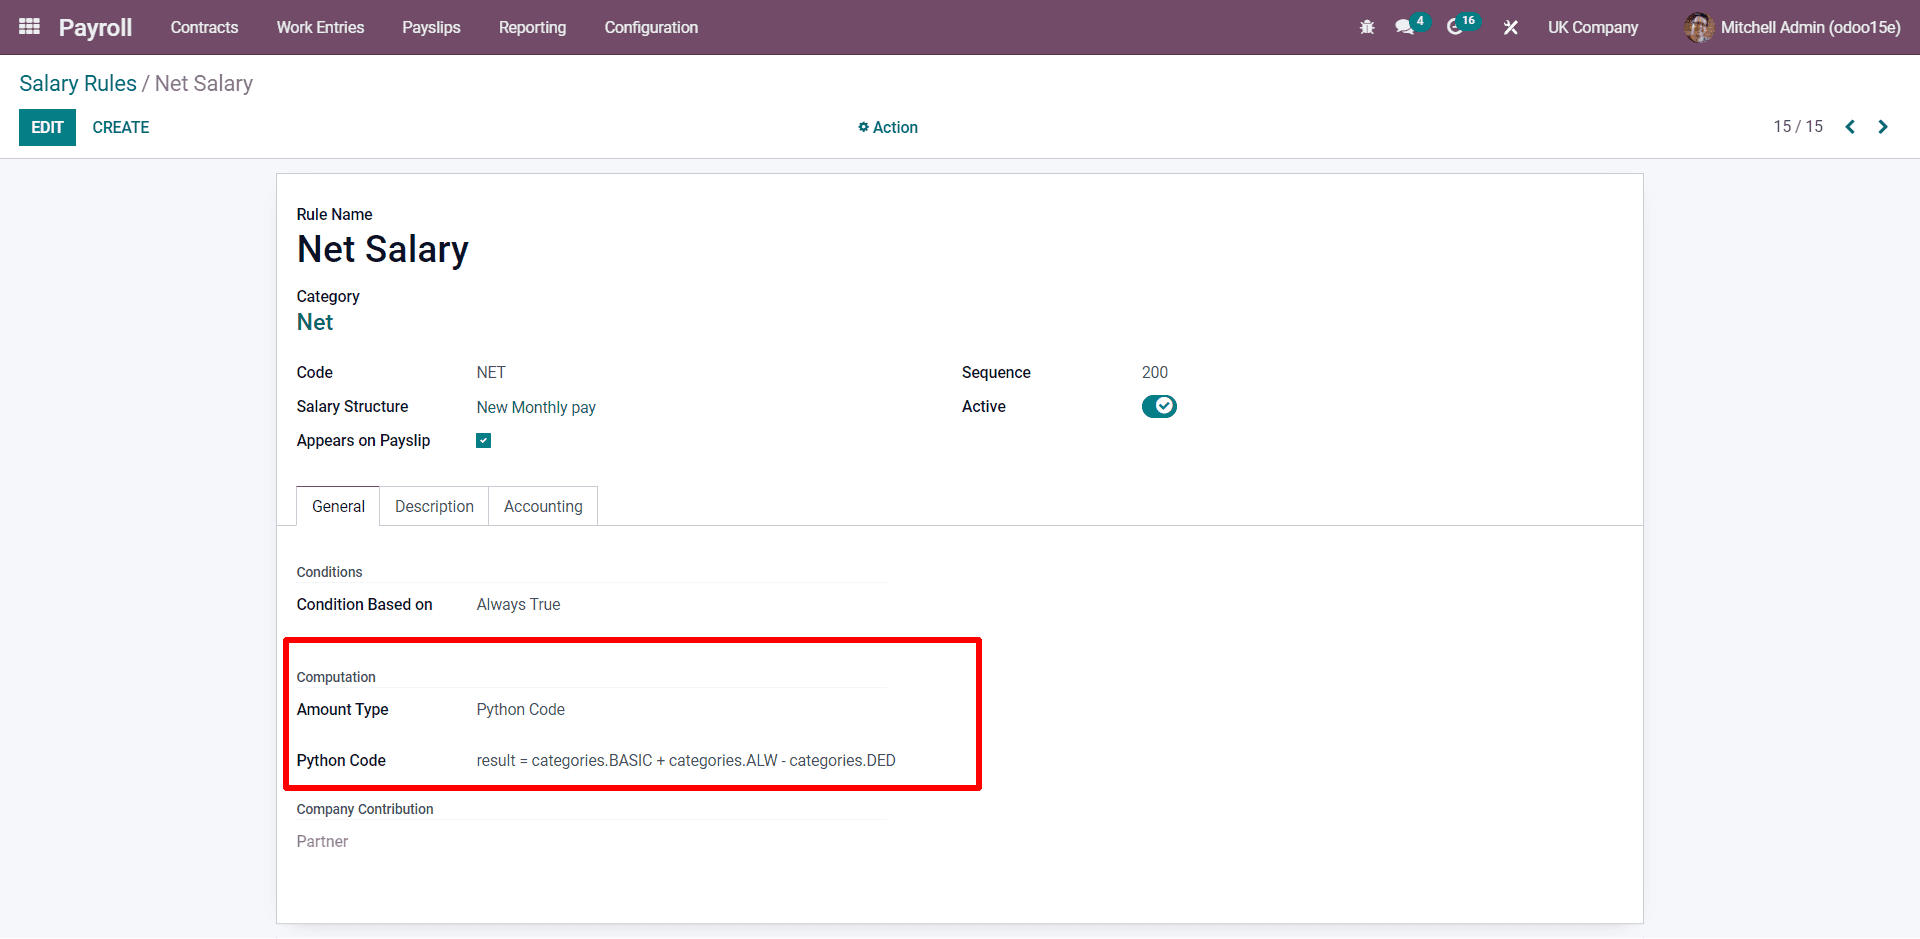
In the above screenshot, the net pay is included with the total of basic pay and allowances and subtracted from the value of deductions.
In these ways, you need to enter all the salary rules with the conditions and let us see how we can calculate the payslip by applying all these salary rules. Based on the salary rules assigned in the Odoo 15, you can get the calculation done in Odoo ERP with a few clicks and make your data and records archived in your Odoo ERP. And you can use it and access it based on the access control done by the user. You need to mark the python condition under the python expression as per your country’s rule in the formula section as denoted in the above screenshots.
Now let us set an employment contract with Odoo-15. We can proceed with the configuration of an employee’s contract with Odoo-15. For generating a contract, you need to go to the Contracts and from there to Contracts.
Contracts>contracts
Here are creating the contract for the employee Tom Steven with basic pay of £5000 monthly.
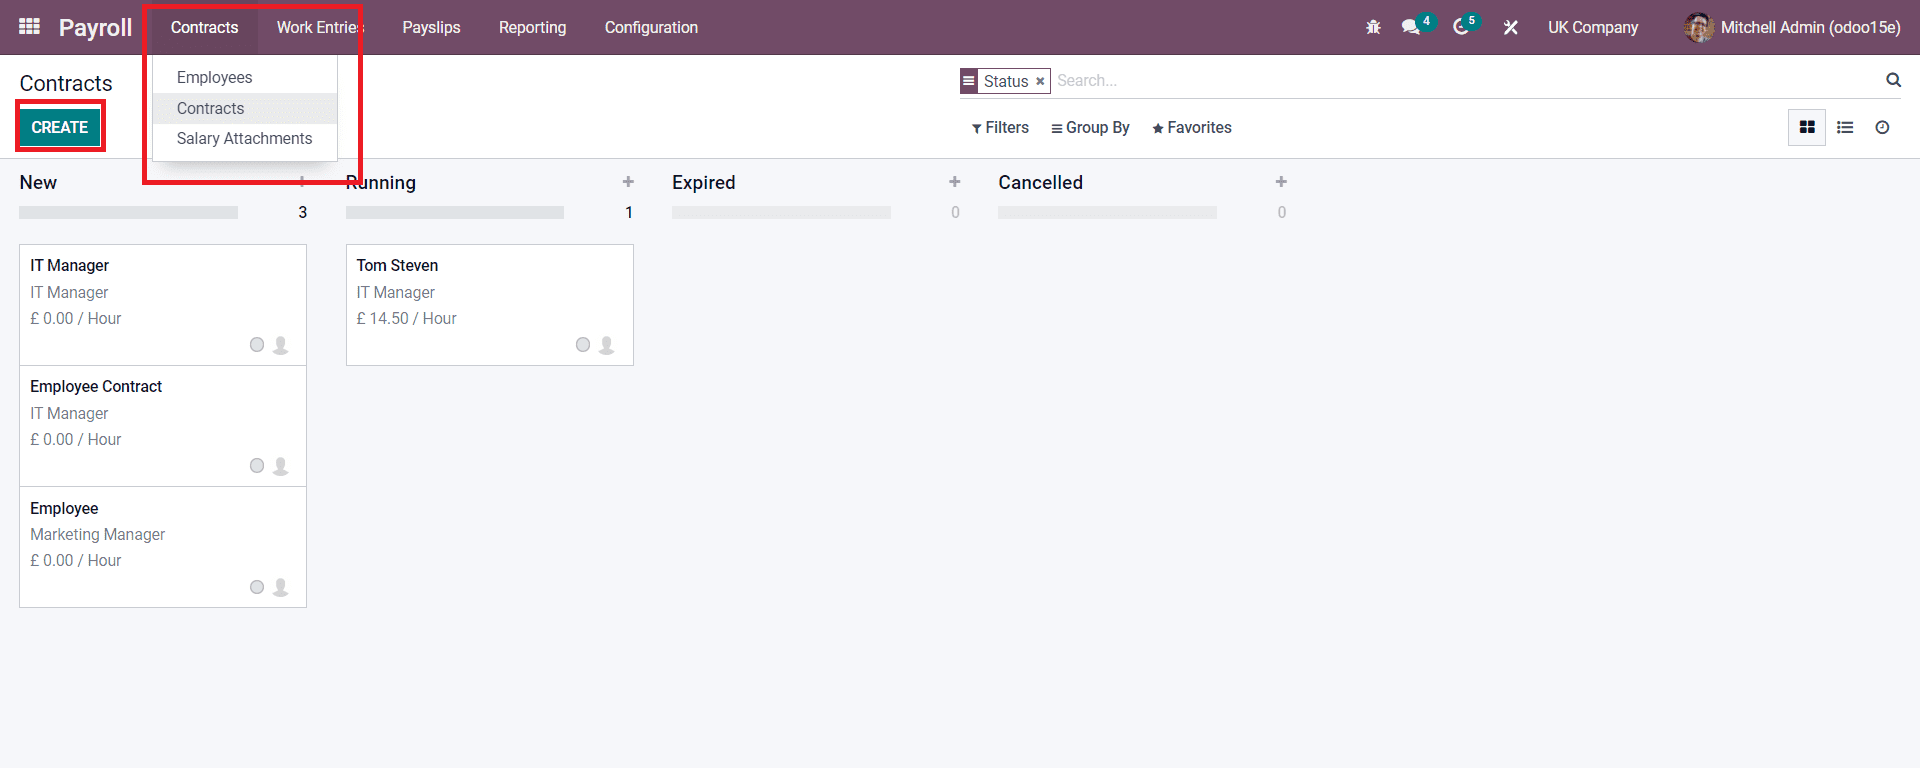
In the above screenshot, you can generate a contract for your employee by clicking on the Create Button. While clicking on the Create button, a window will appear.
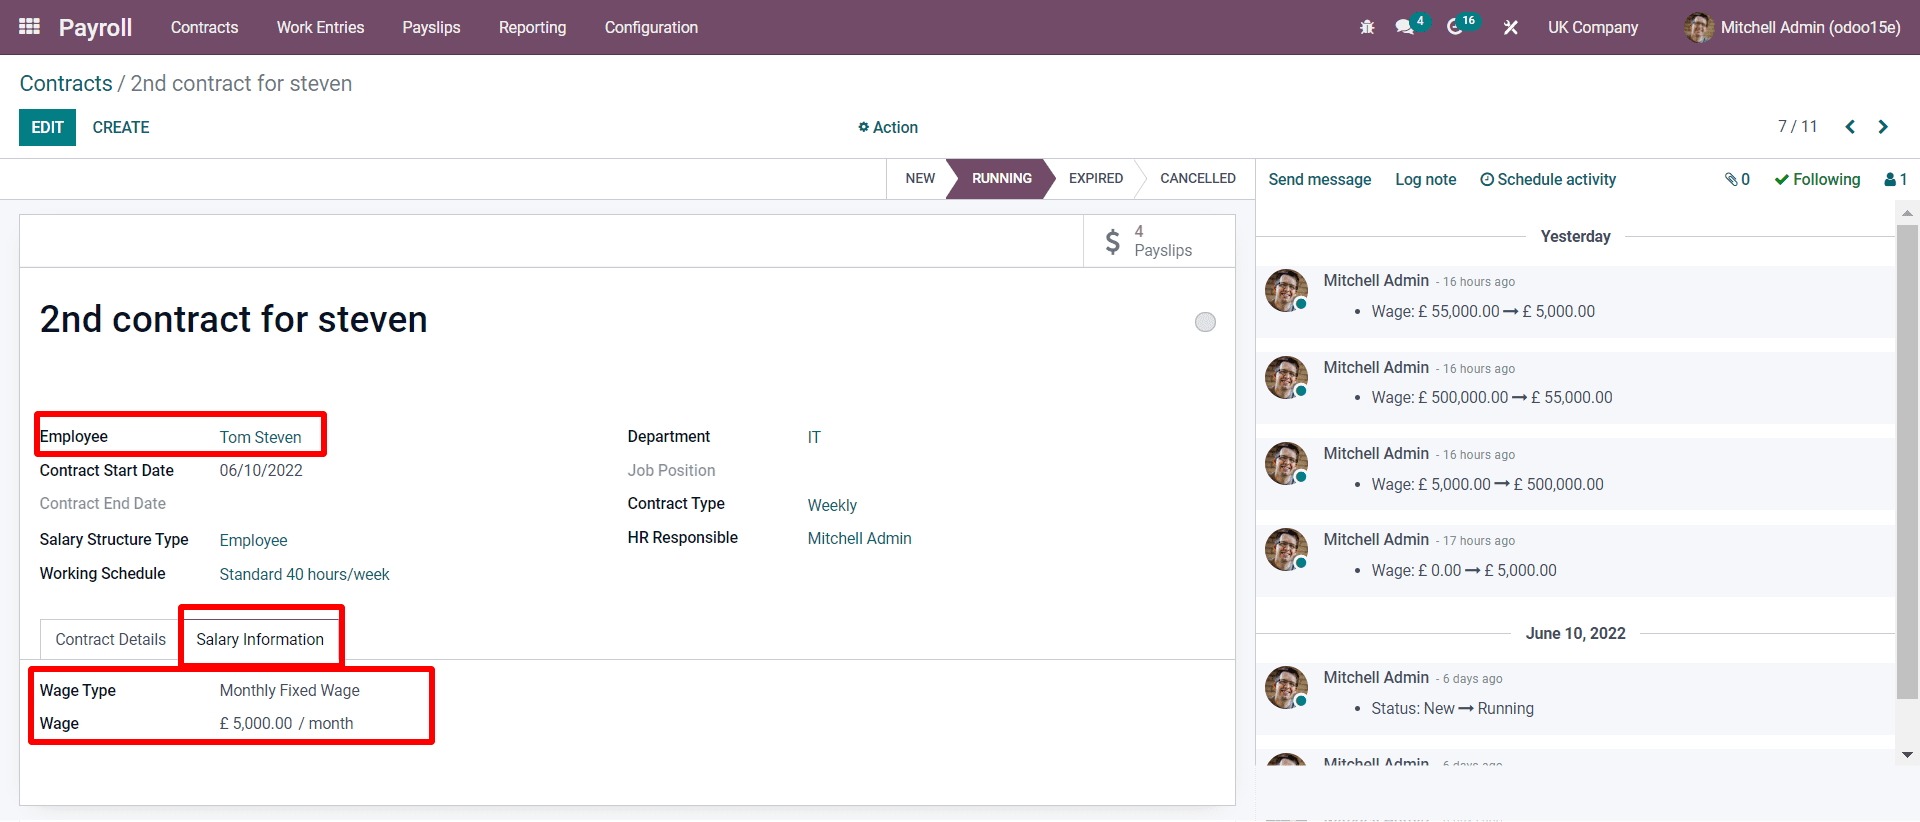
As seen in the above screenshot, you have to add the details. You must add the Employee Reference, Contract details, and Salary Information with the two sub-tabs. Here, at the Employee Reference, we have mentioned the second contract for Steven. At the Contract details, you can add the extra notes if you need to add to the contract based on the company policy, etc. And on the Salary Information, you need to add the basic salary as declared by the company. As mentioned, the company gives the salary monthly and is calculated per hour.
Let us see how the calculation and payslips are generated based on the contract of an employee.
Payslips >> To pay
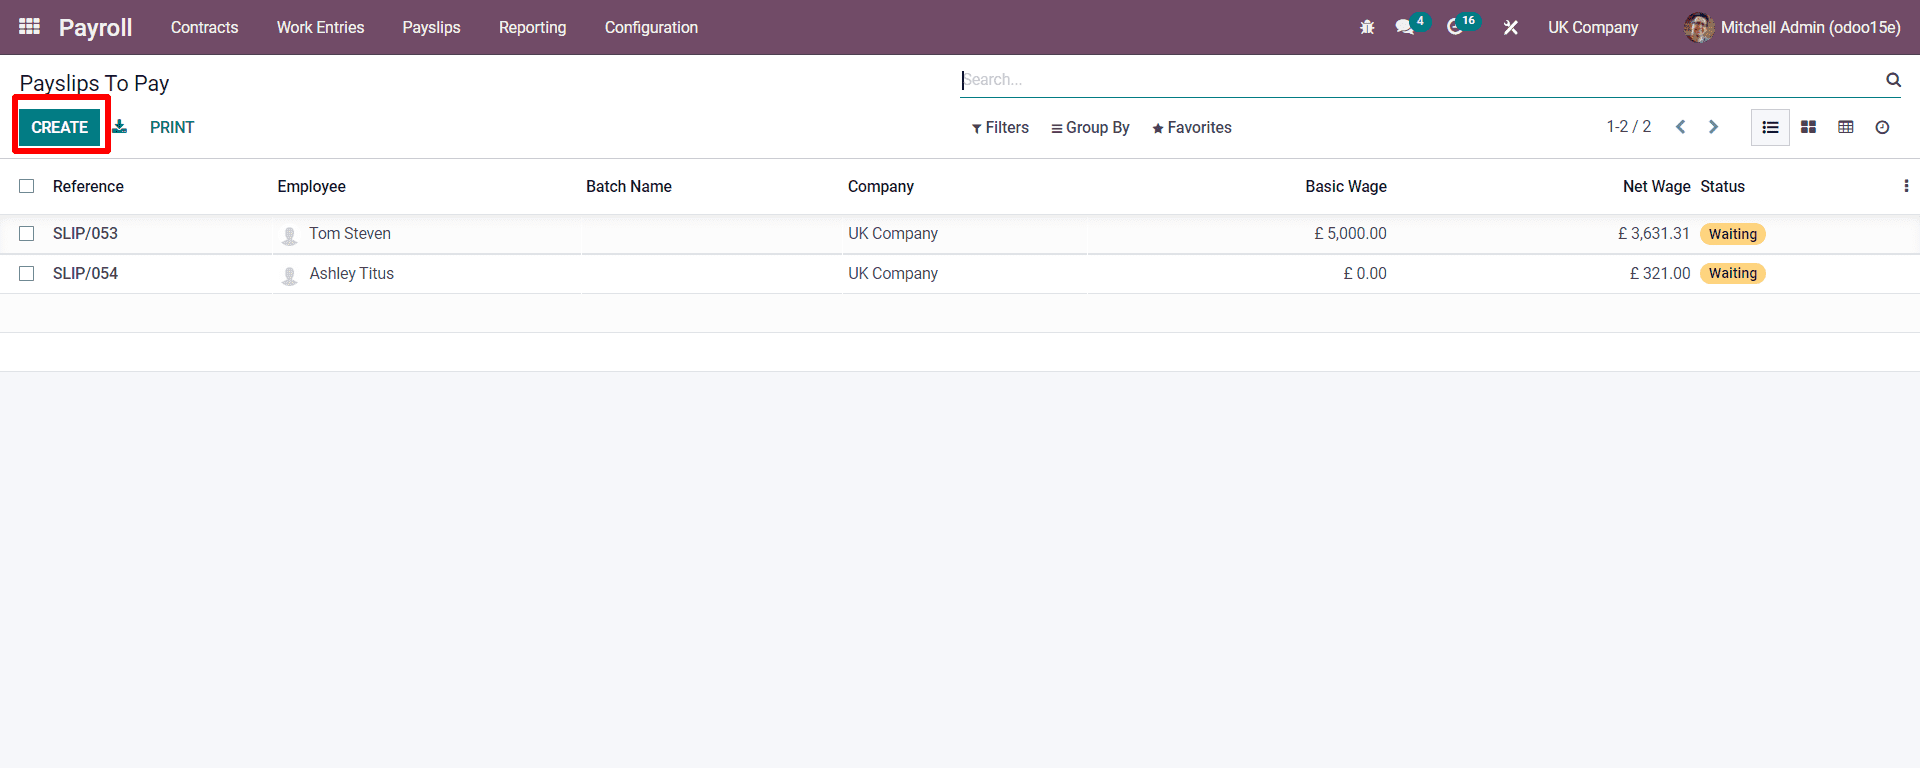
Now, as seen in the above screenshot, by moving the Payslips to To Pay, you will get a window where you can generate an employee’s payslip.
Payslips>To Pay
And by clicking on the Create button, you can form a payslip where a window will appear, as seen below screenshot.
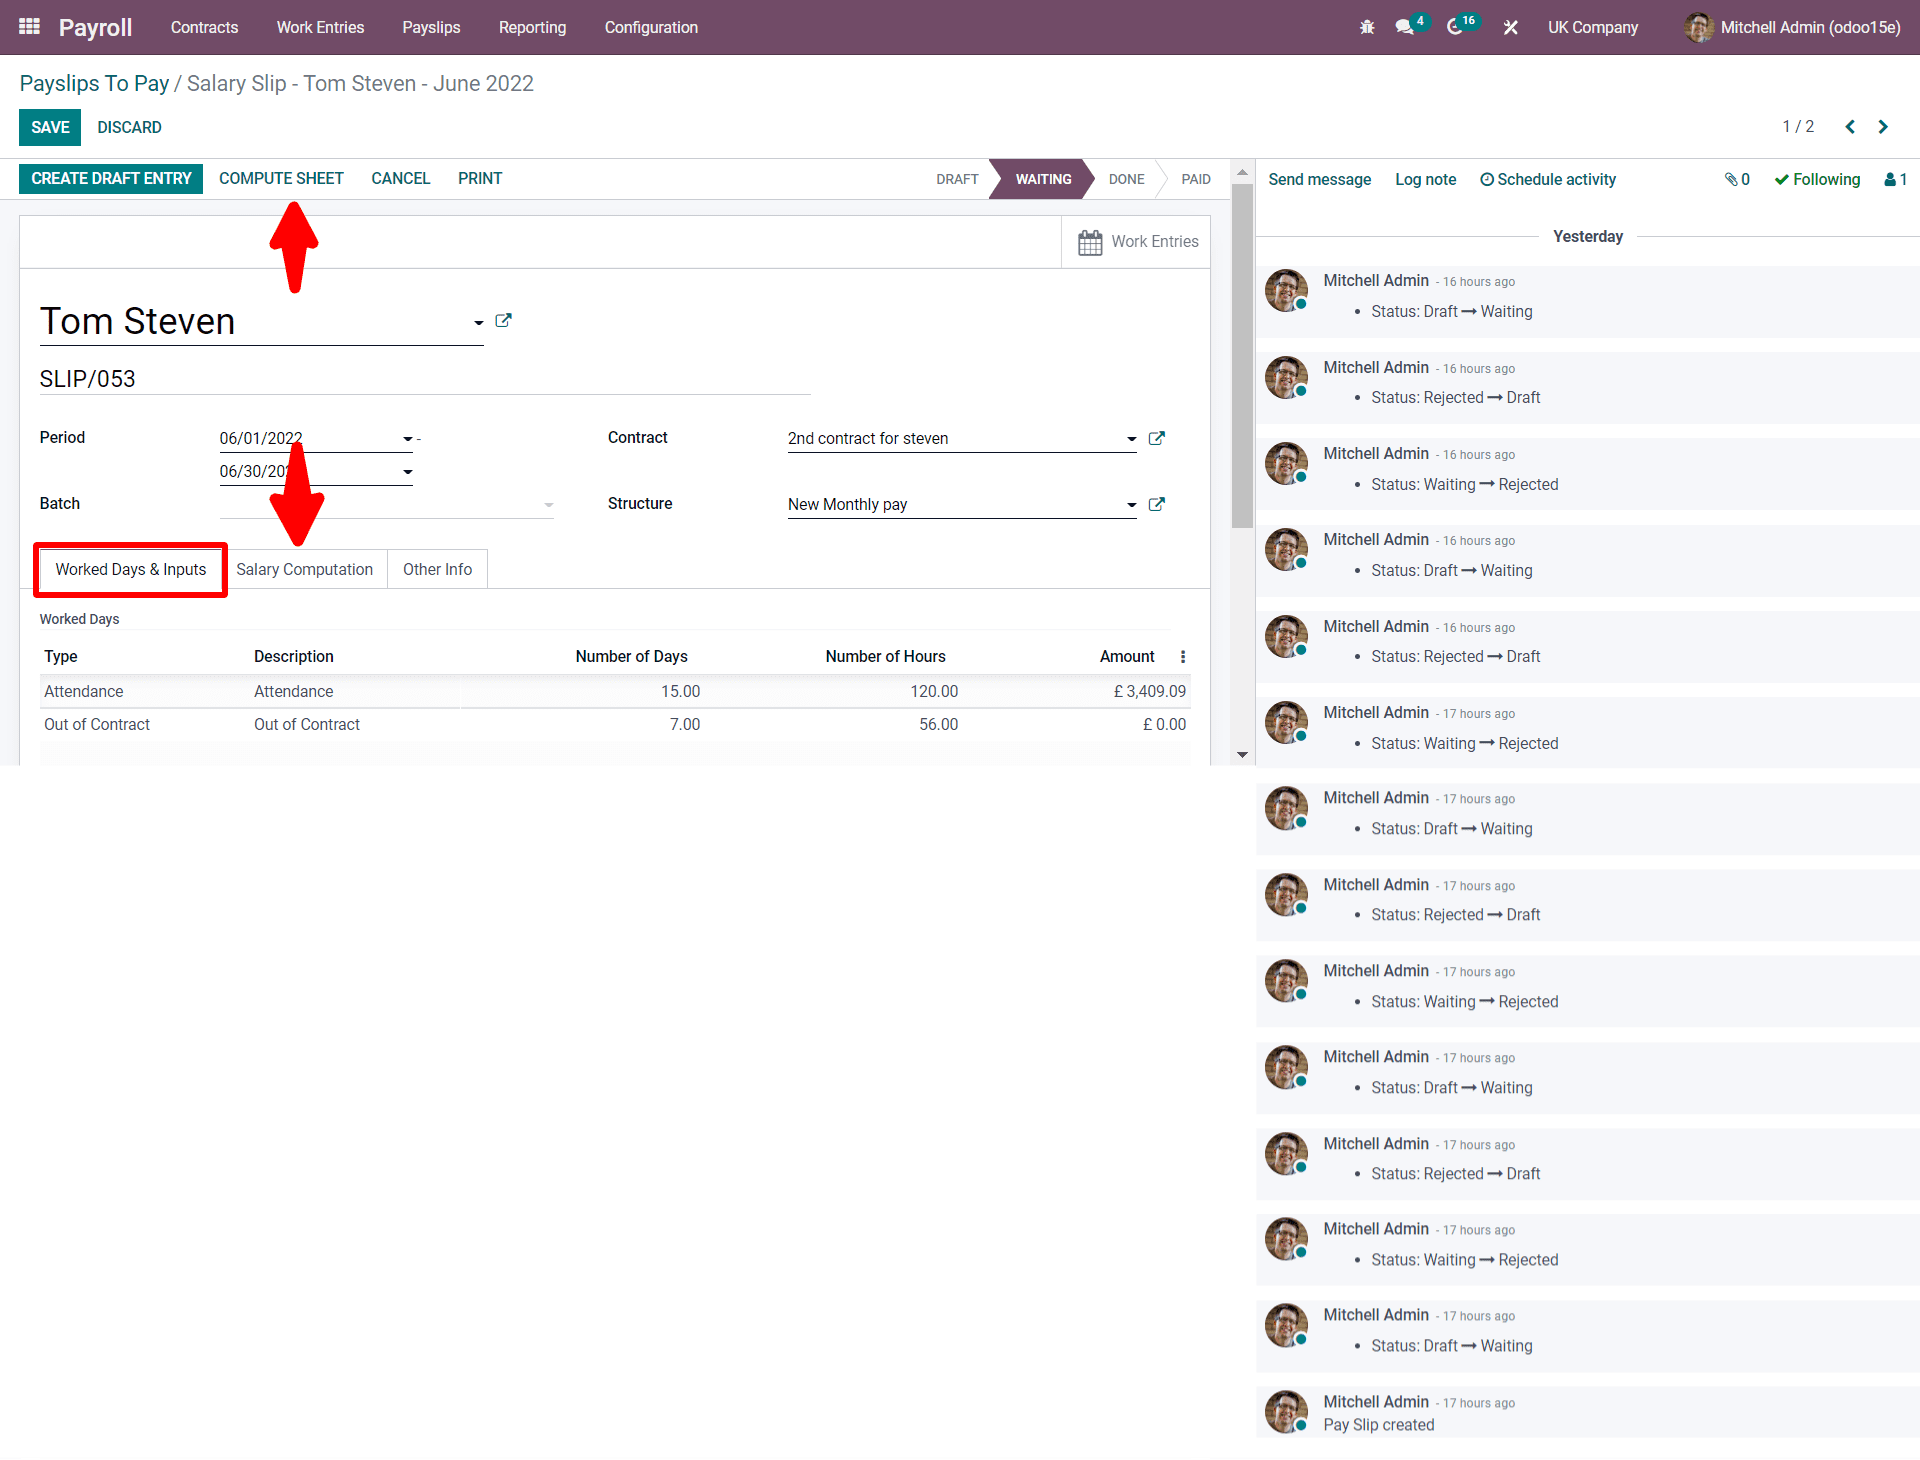
As seen in the screenshot, which is near the employee’s name, you can find an external link. By clicking on it, you will be redirected to another window where you can add the employee’s details, which are required for HR, for further requirements, as seen in the screenshot below.
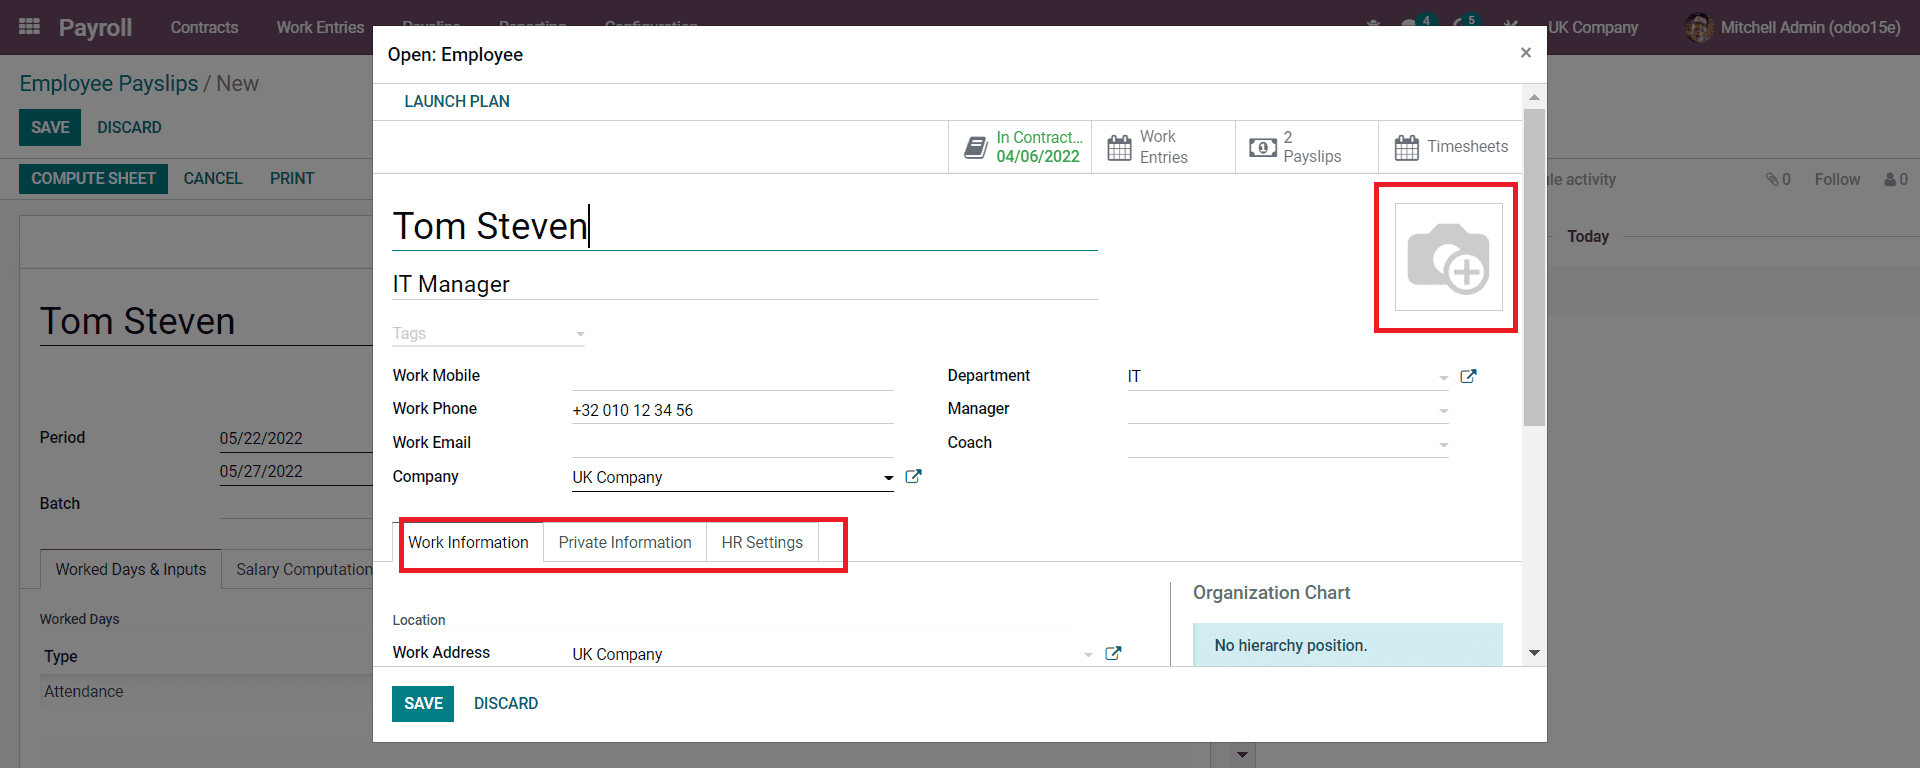
Here you can add the image of the employee and other personal details and work information where the employee is required to do as the job location and to whom he should report, and all can be mentioned in the WORK INFORMATION tab. And in the PRIVATE INFORMATION tab, you can allocate the employee’s personal information. And the HR SETTINGS tab can mention the Badge ID, Registration number, etc., where the employee is required while in the organization.
Again moving back to the payslip generation, we have to notice more other features by observing the screenshot below once more:
All the details such as the period of calculation, contract name, and Structure of payment should be mentioned. And from the Work Days And Inputs tab, you will get the employee’s attendance with the number of days and hours calculated automatically, as seen in the above screenshot.
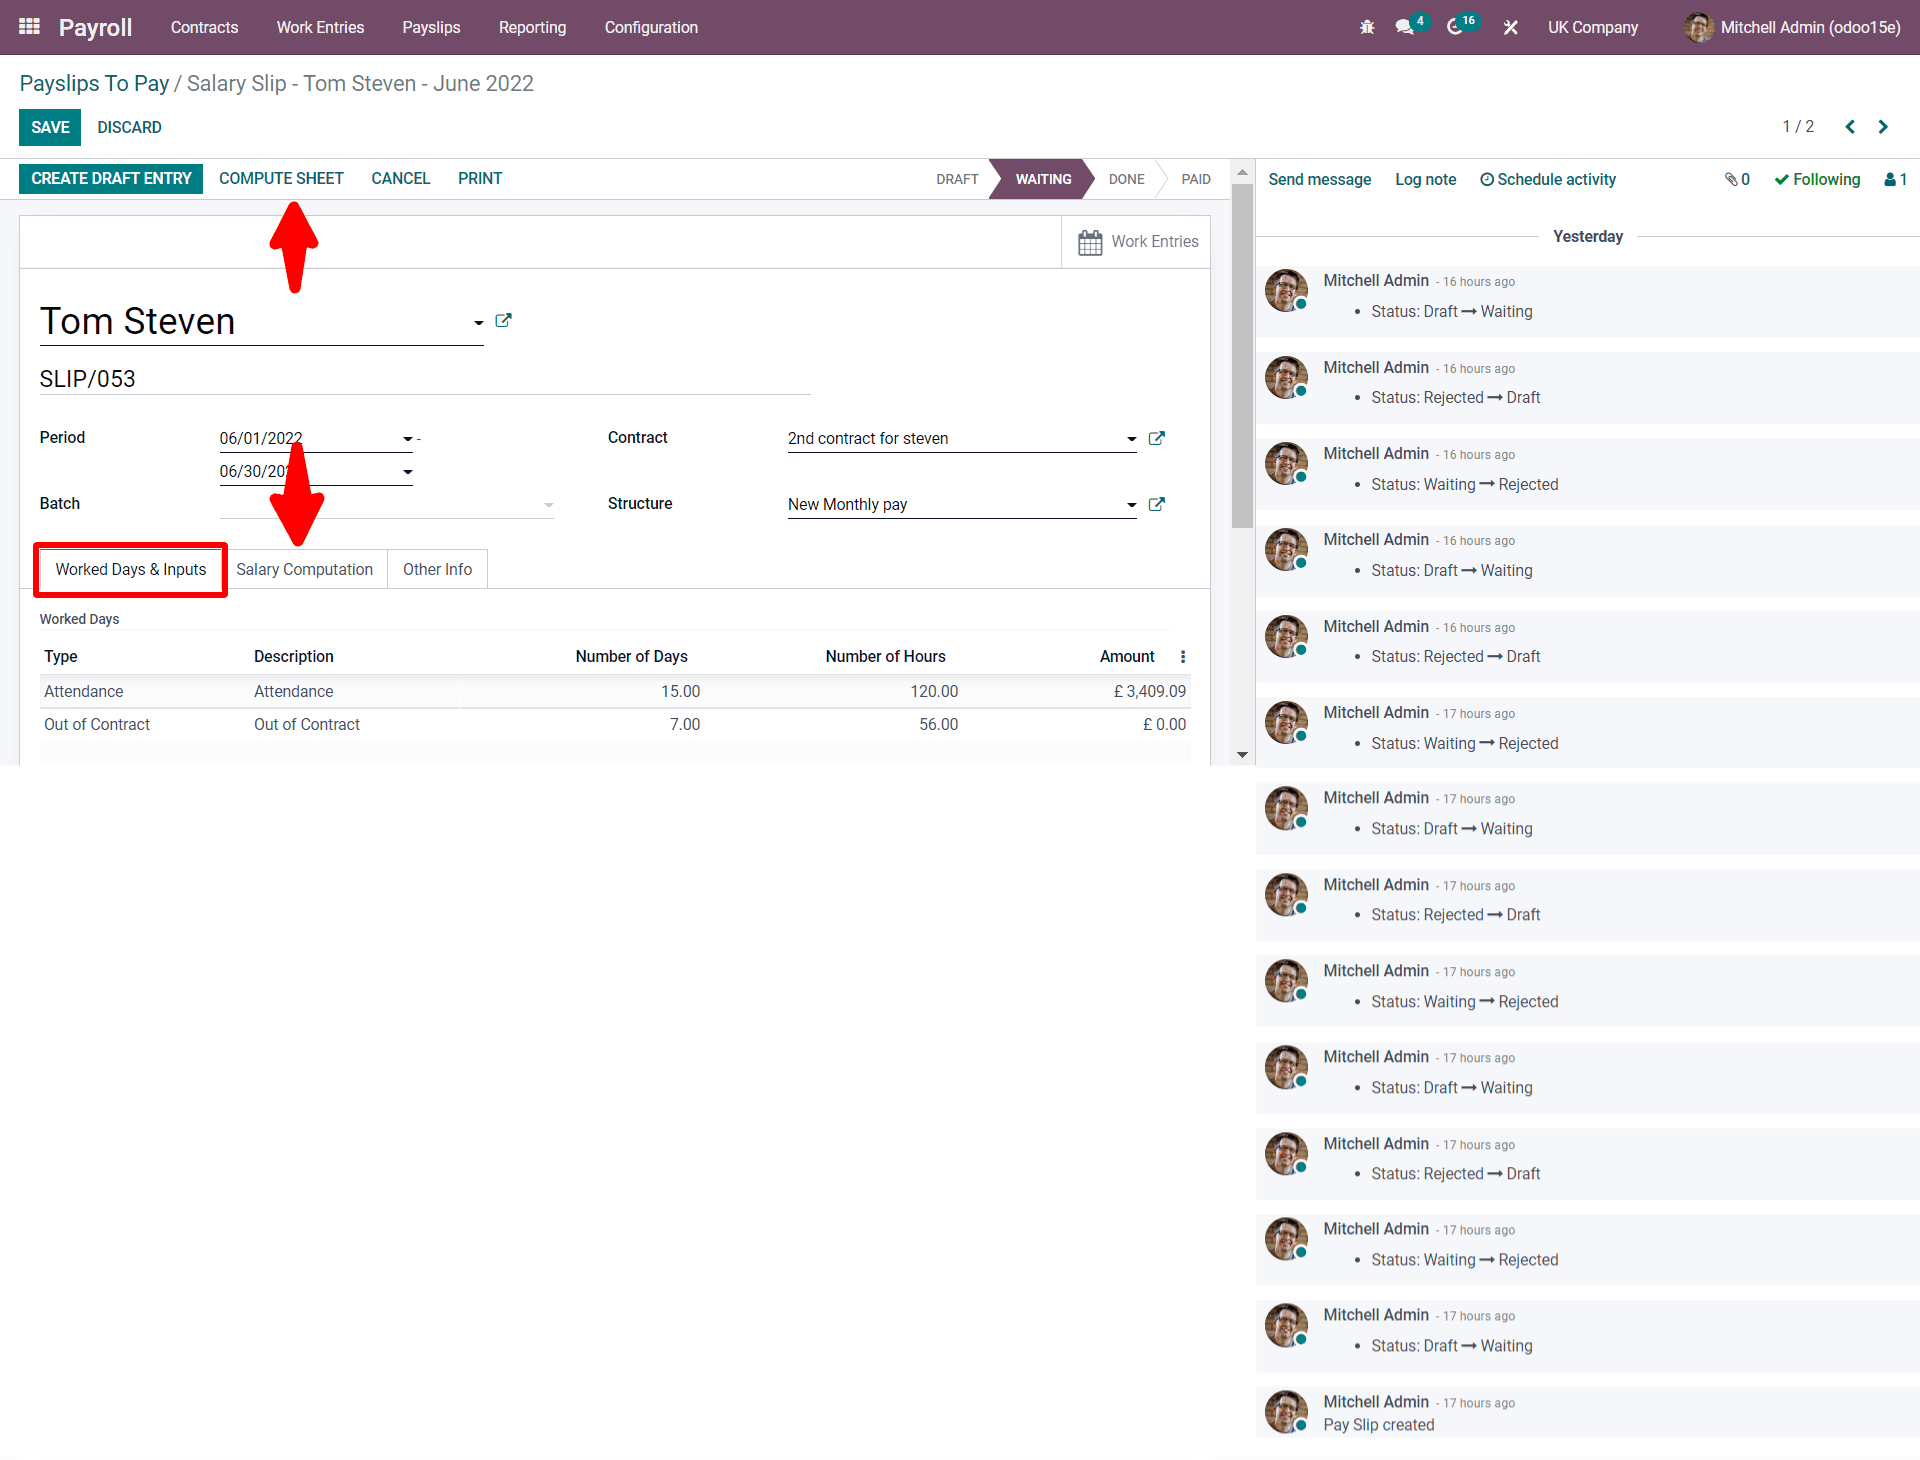
Now as seen in the screenshot, by clicking on the Salary Computation and in the Other Inputs section you can add a line option that is seen under Worked Days And Inputs as discussed later here we will add the Holiday pay with the amount.
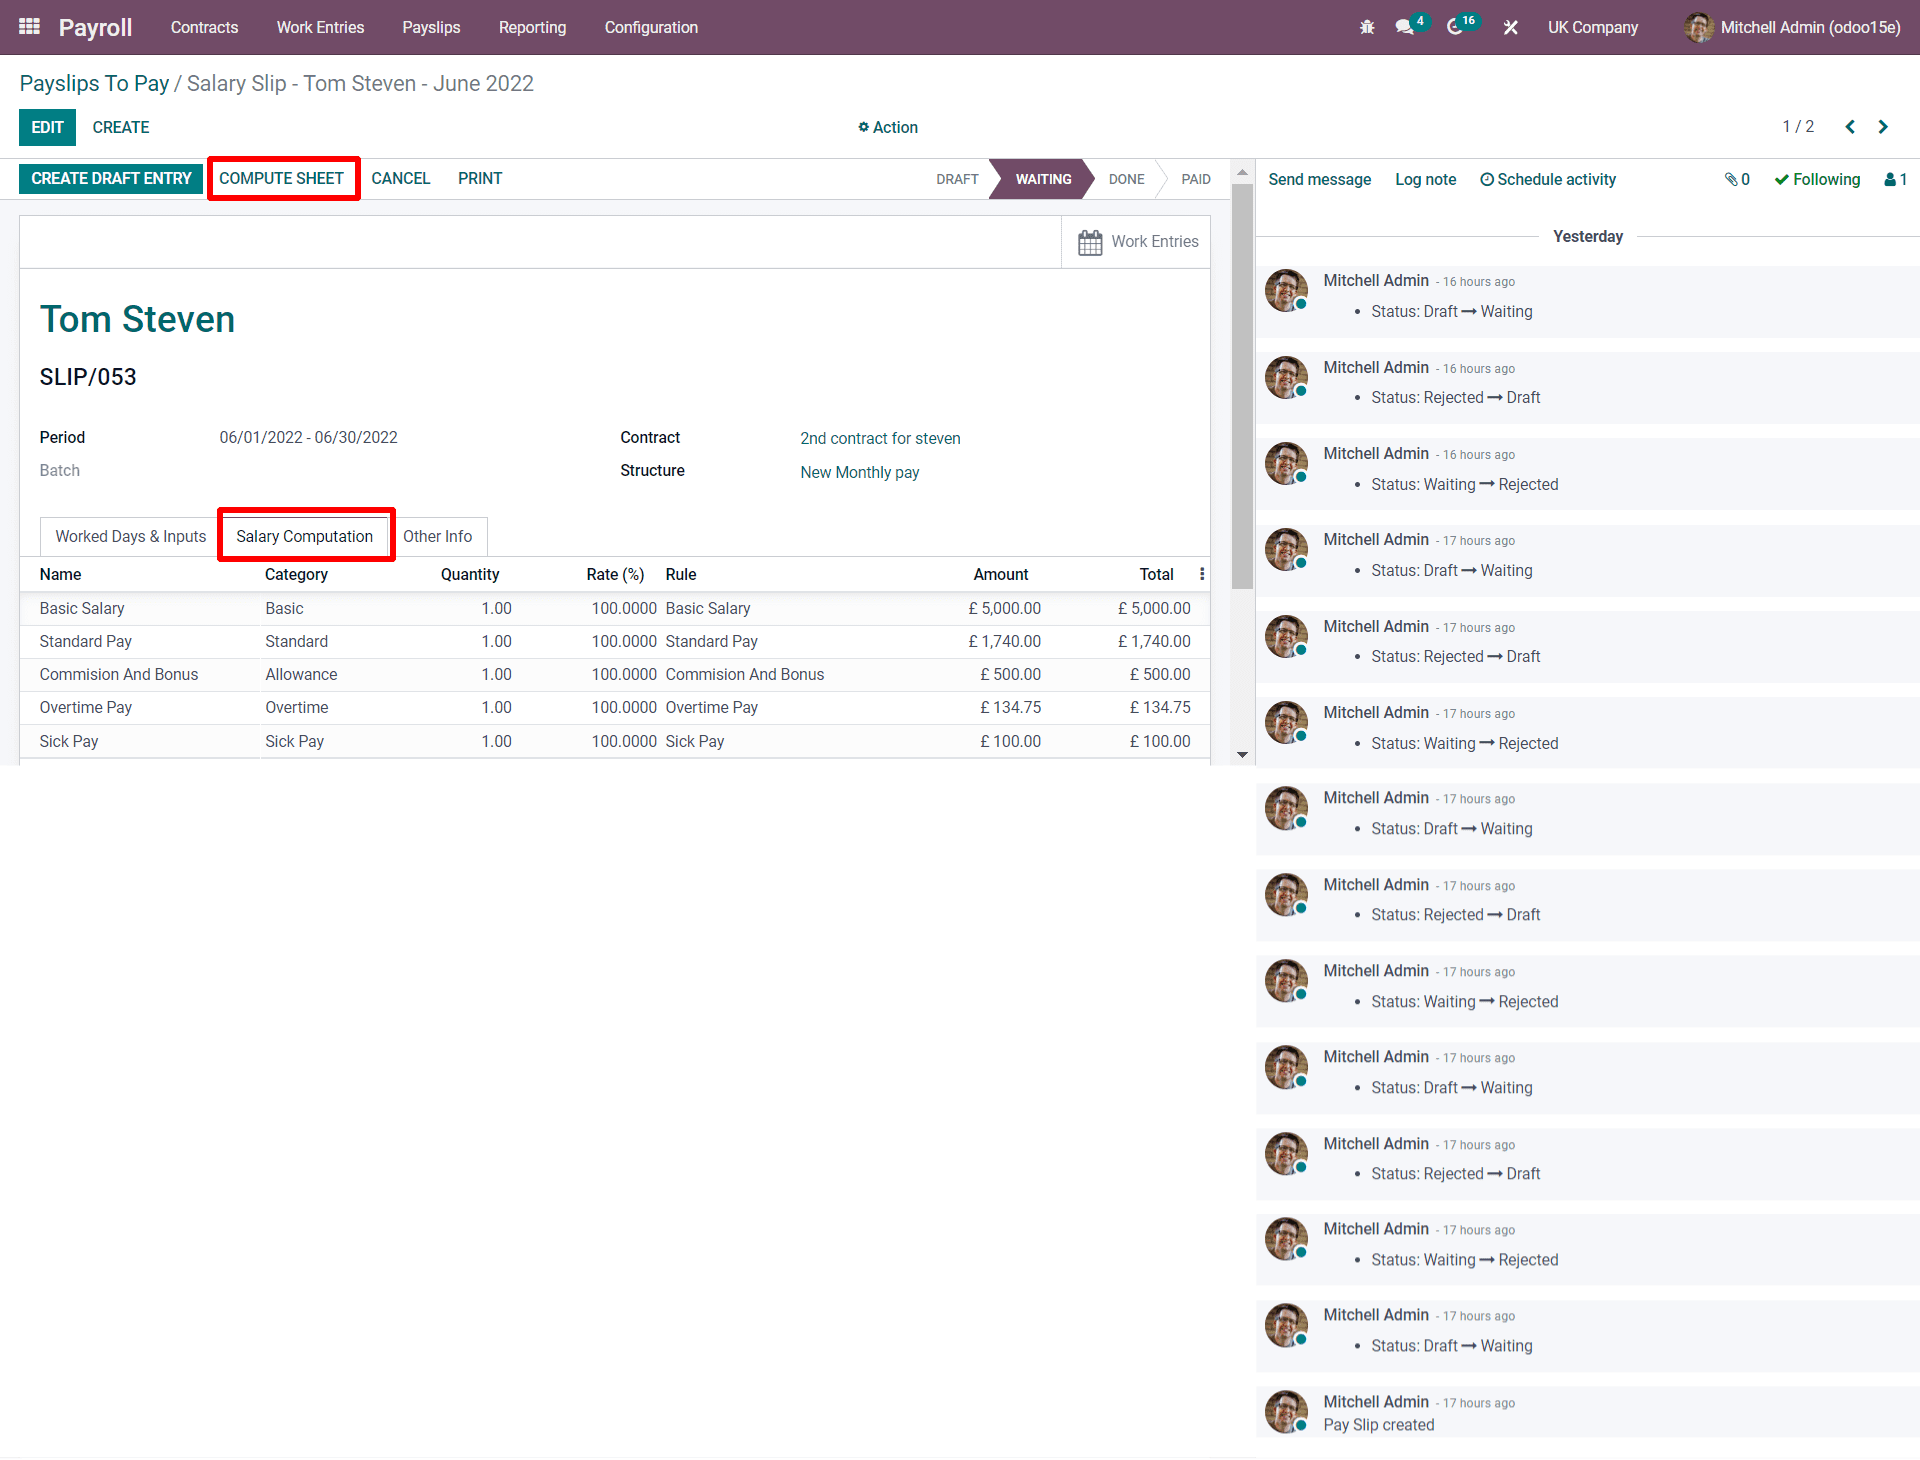
Now by clicking on the Salary Computation and the COMPUTE SHEET button, your salary will be calculated automatically, as seen in the screenshot below.
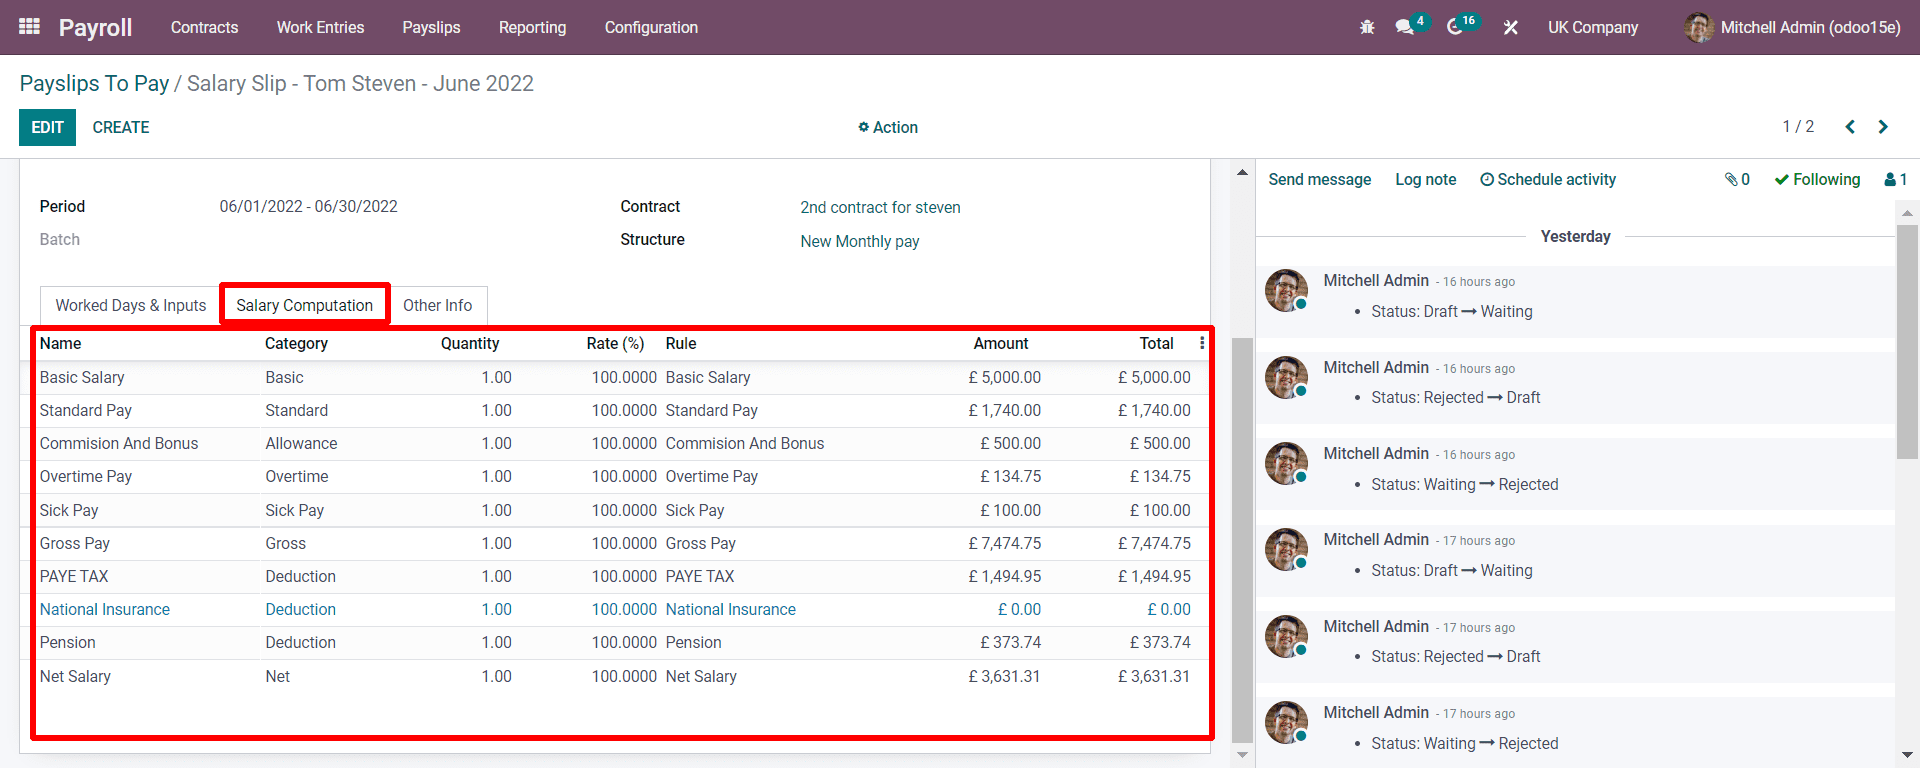
As seen in the above screenshot, by applying the Rules which we have generated the salary is computed for Tom Steven with a period of 6/01/2022-6/30/2022. The month of June 2022 is calculated where the 15 days of working days are calculated. It can be seen in the Other Info sub-tab that all the specific details are mentioned, as seen in the below screenshot.
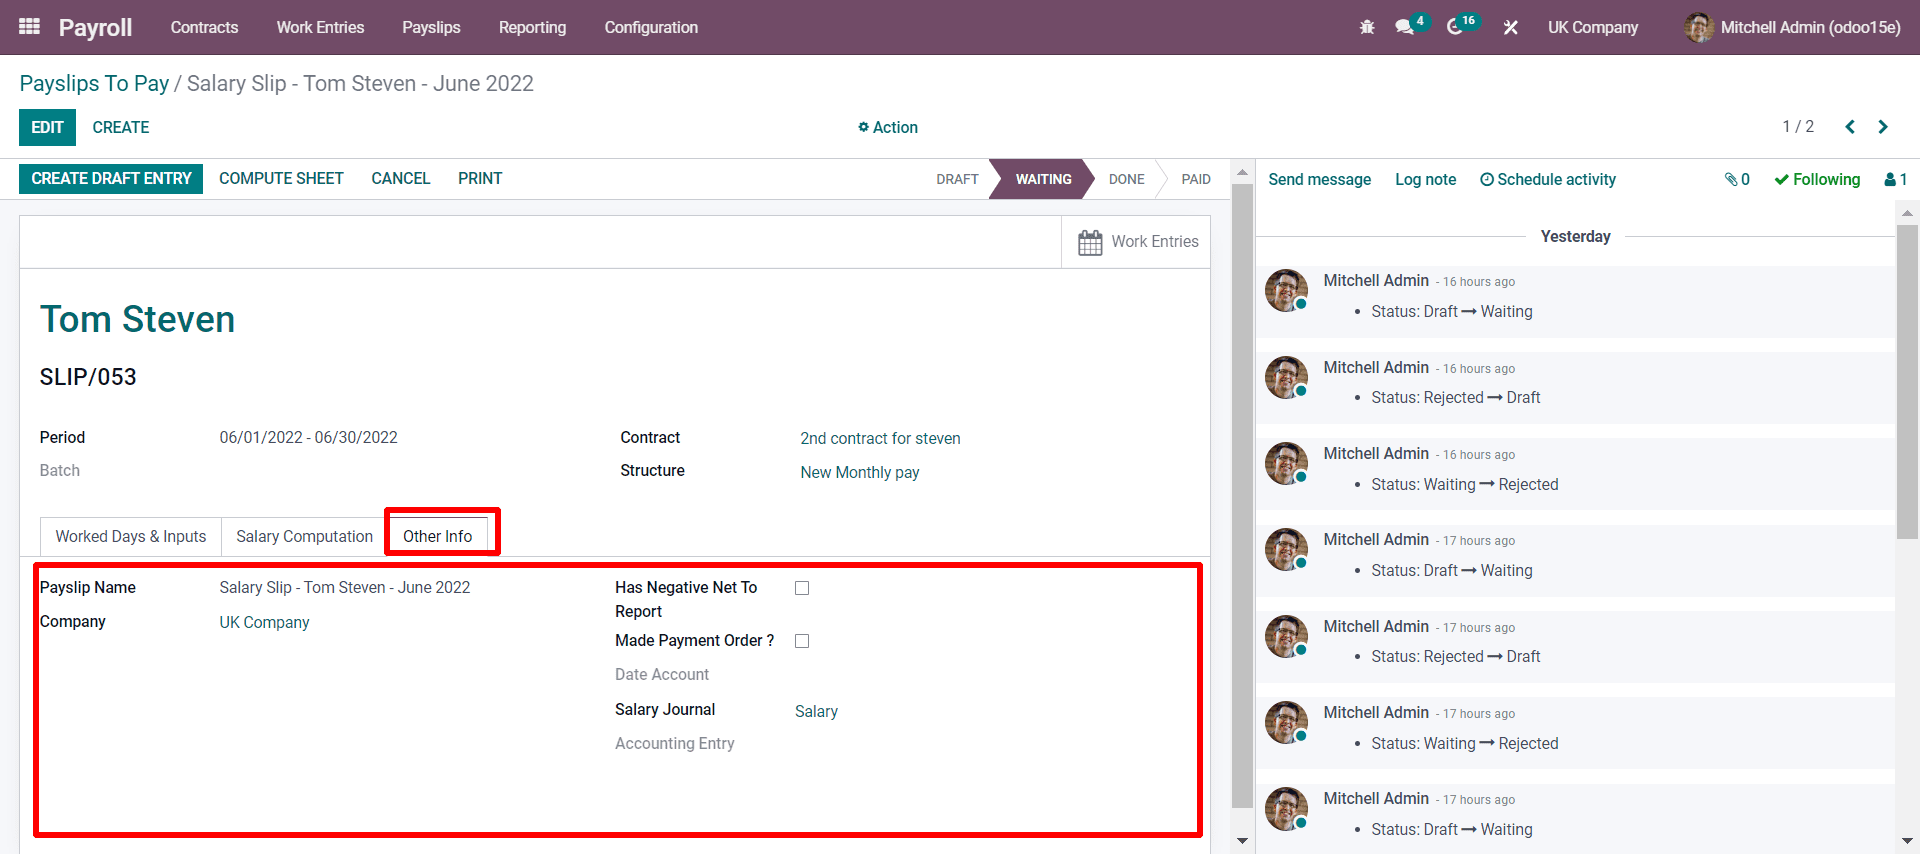
Now, if the authority verifies the computed sheet it can be kept in the draft entry by clicking on the CREATE DRAFT ENTRY as shown below.
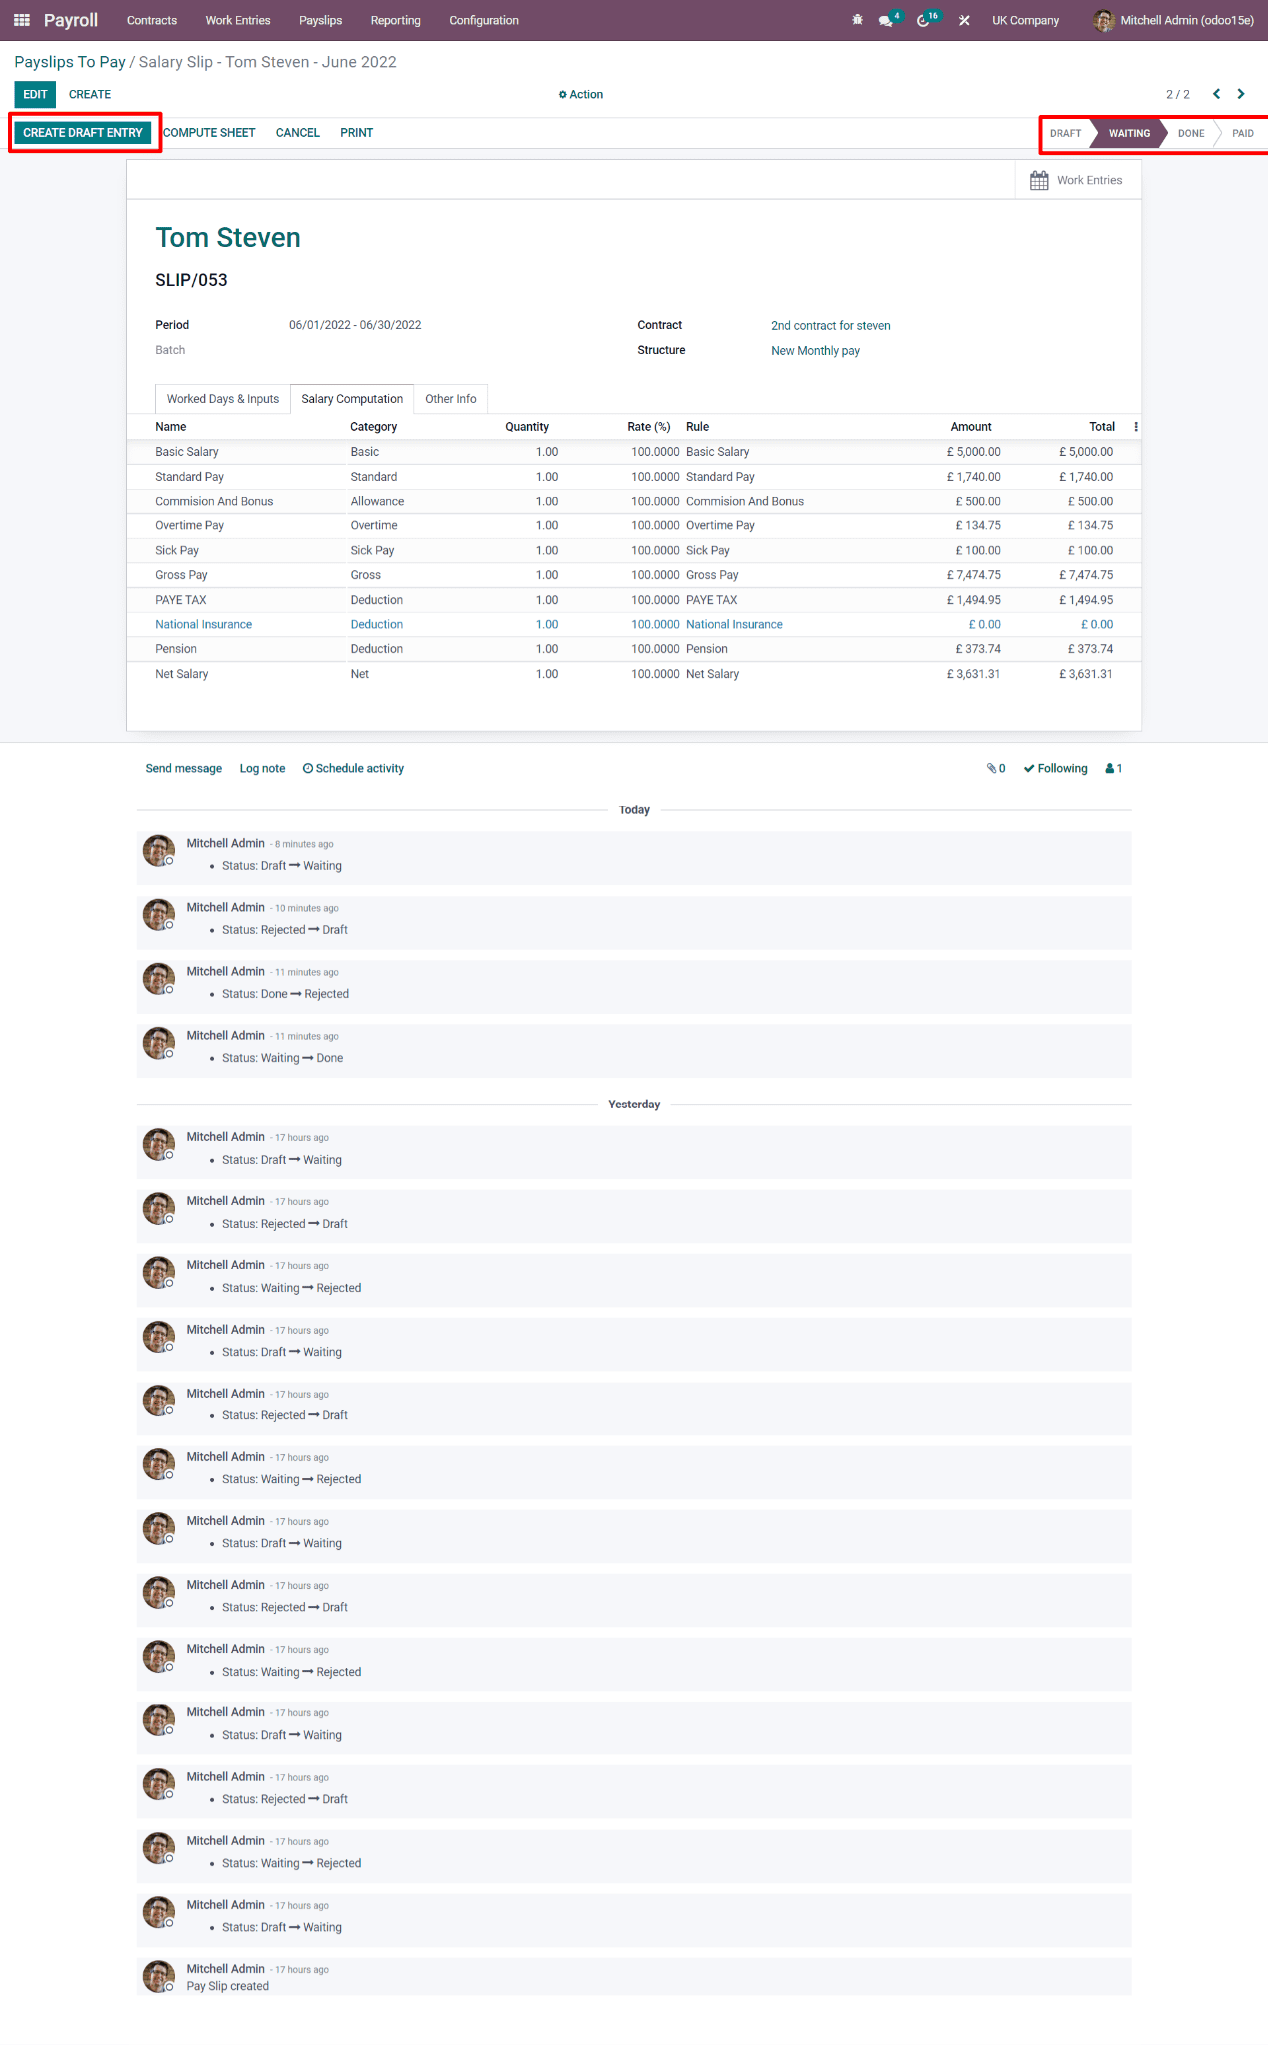
Now by clicking on the CREATE DRAFT ENTRY you will be redirected to another small window whether you proceed with the payslip you have to click on the OK button and then the stage will be moved to DONE in the pipeline.
Now, if you want to give a payslip in hand to the employee, you can tap on the PRINT button, and you will get a .pdf file where all the details are entered, as seen below in the screenshot.
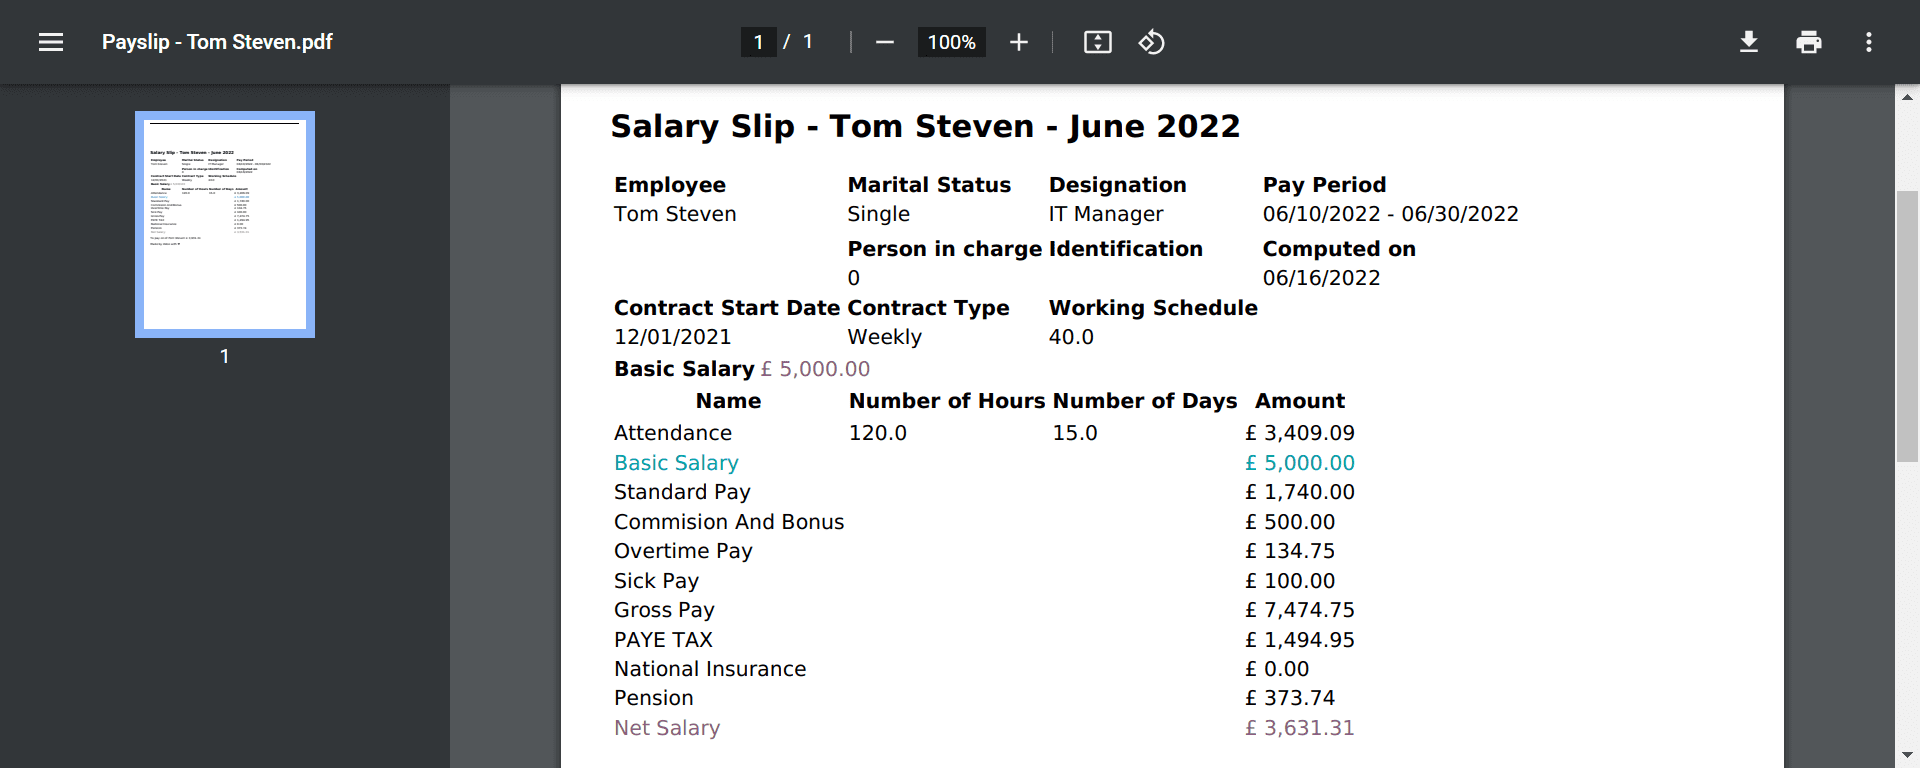
Now with all the specified details, the employee can understand on what basis the computation is done.
In a nutshell, the blog gives you a detailed view of how easily you can generate a payslip with Odoo 15 based on the country’s labor law. The only thing you need to do is be familiar with the rules on connecting with python code, and simply within a few clicks, you can follow the steps in Odoo and compute your salary promptly and precisely. For more information, connect with our experts and get advice on computing as per your country and start adding the payslip more easily.


