The module Point of Sale in Odoo provides a user-friendly and intuitive interface for managing sales transactions at retail locations. Creating a custom pop-up in Odoo 17 Point of Sale (POS) involves extending the functionality of the POS interface to meet specific business requirements. We can use a pop-up for various purposes, such as displaying important messages, collecting additional customer information, or prompting users for specific actions.
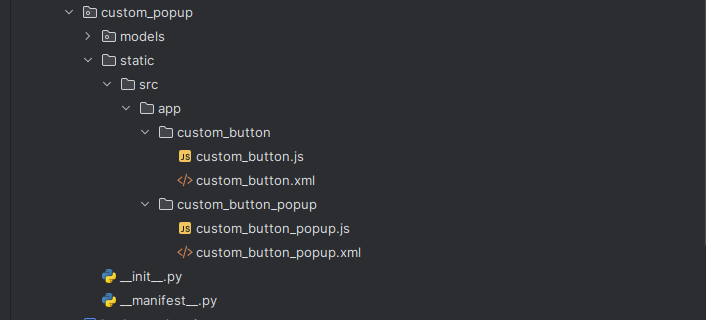
This blog will explain how to use OWL (Odoo Web Library), the most recent javascript framework from Odoo, to develop a custom popup in Odoo 17 POS. This will help you to add a custom popup to your POS. We have to first create a custom module. The custom module’s structure is shown below.

Next, a button needs to be added, which requires the XML and JS files.
The XML for the custom button:
<?xml version="1.0" encoding="UTF-8"?>
<templates id="template" xml:space="preserve">
   <!--   Custom button template  -->
   <t t-name="custom_popup.CustomButton" owl="1">
       <button class="control-button btn btn-light rounded-0 fw-bolder"
               t-on-click="() => this.click()">
           <i role="img" aria-label="Custom Button" title="Custom Button"/>
           Custom
       </button>
   </t>
</templates>
The JS for the custom button:
/** @odoo-module */
import { ProductScreen } from "@point_of_sale/app/screens/product_screen/product_screen";
import { CustomButtonPopup } from "@custom_popup/app/custom_button_popup/custom_button_popup";
import { useService } from "@web/core/utils/hooks";
import { usePos } from "@point_of_sale/app/store/pos_hook";
import { _t } from "@web/core/l10n/translation";
import { Component } from "@odoo/owl";
/**
* This class represents a custom button in the Point of Sale product screen.
*/
export class CustomButton extends Component {
   static template = "custom_popup.CustomButton";
    /**
    * Initializes the component and sets up necessary dependencies.
    */
   setup() {
       this.pos = usePos();
       this.popup = useService("popup");
   }
    /**
    * Handles the click event of the Custom button.
    * Opens a popup for adding products and updates the order.
    */
   async click() {
       const order = this.pos.get_order();
       await this.popup.add(CustomButtonPopup, {
           title: _t("Customer Details"),
       });
   }
}
// Adds the custom button to the ProductScreen controls.
ProductScreen.addControlButton({
   component: CustomButton,
   condition: function () {
       return true;
   },
});
After the class has been extended, the click of the corresponding button has to be specified. From here, we define the pop-up window that will be created.
The XML and JS files are required to create a popup.
JS for the popup:
/** @odoo-module */
import { AbstractAwaitablePopup } from "@point_of_sale/app/popup/abstract_awaitable_popup";
import { _t } from "@web/core/l10n/translation";
import { usePos } from "@point_of_sale/app/store/pos_hook";
import { useRef, onMounted } from "@odoo/owl";
/**
* This class represents a custom popup in the Point of Sale.
* It extends the AbstractAwaitablePopup class.
*/
export class CustomButtonPopup extends AbstractAwaitablePopup {
   static template = "custom_popup.CustomButtonPopup";
   static defaultProps = {
       closePopup: _t("Cancel"),
       confirmText: _t("Save"),
       title: _t("Customer Details"),
   };
}
The template for that pop-up is specified in the XML:
<?xml version="1.0" encoding="UTF-8"?>
<templates id="template" xml:space="preserve">
   <!--  button popup template  -->
   <t t-name="custom_popup.CustomButtonPopup" owl="1">
   <div class="popup custom_popup">
   <!-- Modal Header -->
       <div class="modal-header justify-content-center">
            <h2 class="modal-title">
               <t t-esc="props.title"/>
            </h2>
         </div>
       <!-- Modal Body -->
	<div class="modal-body custom-form-view">
       	<form>
           		<div class="col d-flex justify-content-between align-items-center p-3">
                  		<label class="form-label label" for="date">Date</label>
                   	<input class="w-75 form-control" name="date"/>
           			</div>
           			<div class="col d-flex justify-content-between align-items-center p-3">
                  	 	<label class="form-label label" for="customer">Customer</label>
                   	<input class="w-75 form-control" name="customer"/>
          			</div>
            			<div class="col d-flex justify-content-between align-items-center p-3">
                   	<label class="form-label label" for="customer">Notes</label>
                   	<input type="text" class="w-75 form-control" name="notes" />
           			</div>
      	 	</form>
 </div>
       <!-- Modal Footer -->
       <div class="footer footer-flex modal-footer justify-content-end">
            <div class="button cancel btn btn-lg btn-primary"
                    t-on-click="cancel">
               <t t-esc="props.closePopup"/>
            </div>
         </div>
       </div>
   </t>
</templates>
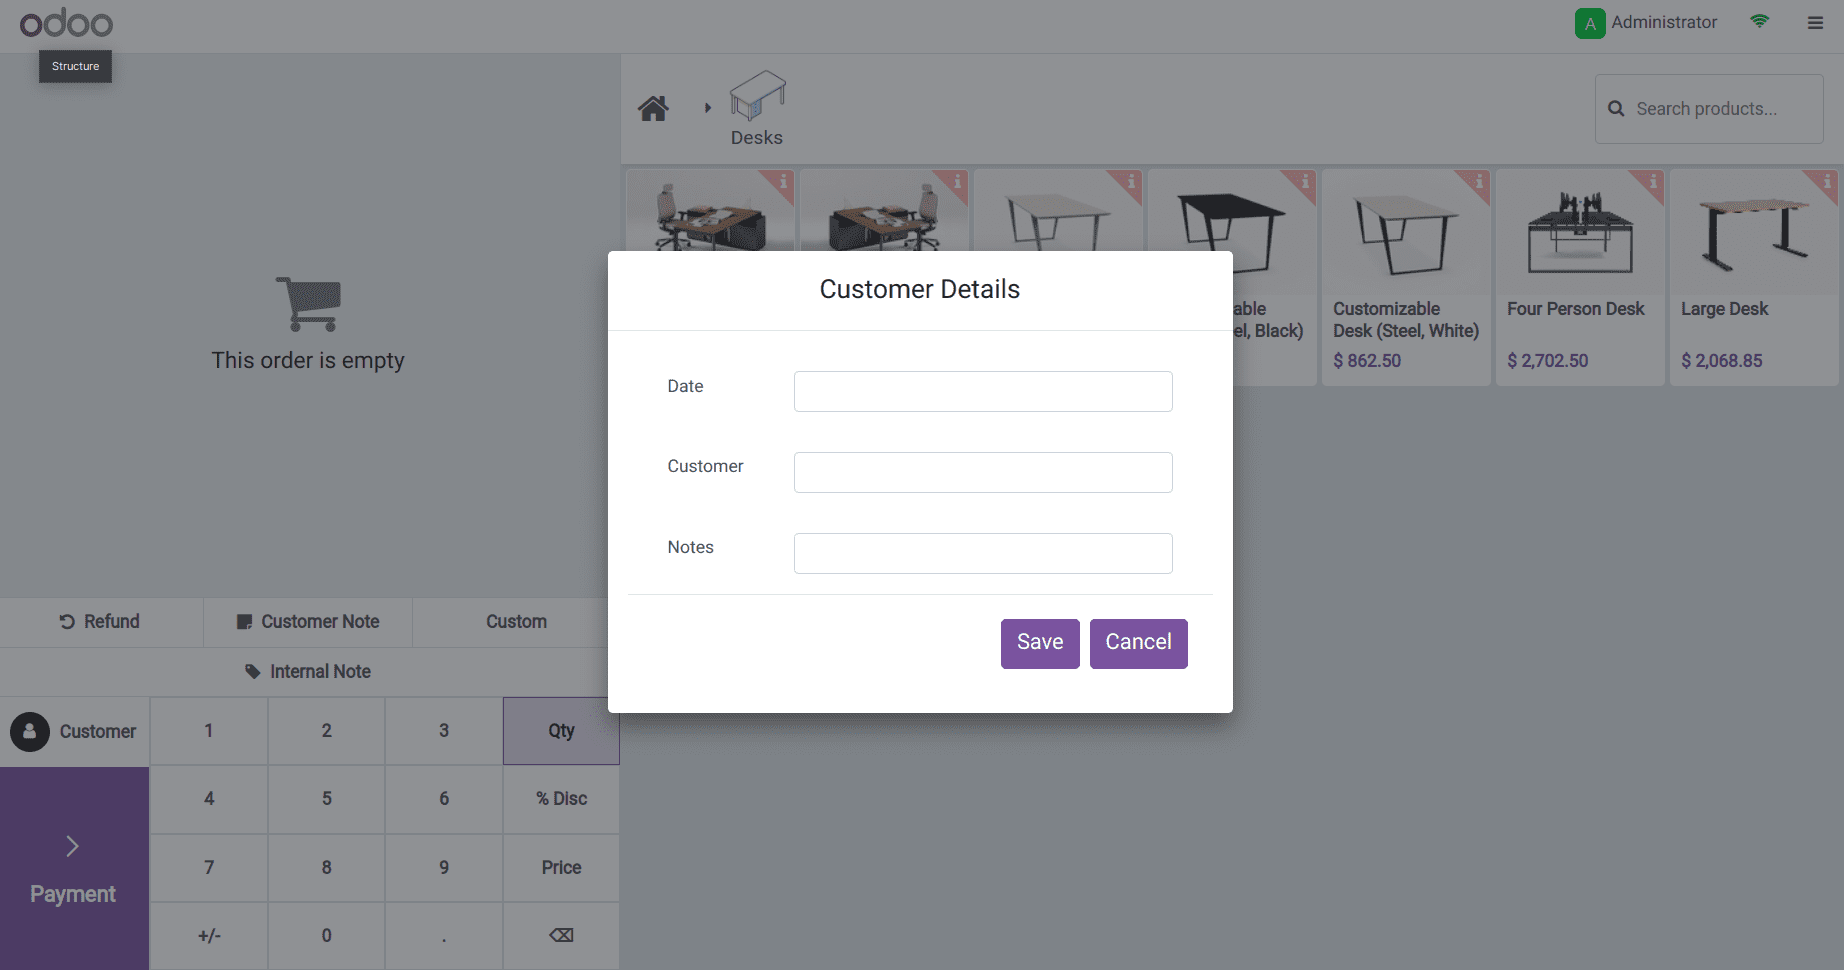
So once you click the button the popup will appear as shown below,

I hope you now understand how to make a custom pop-up by clicking on the button. To get additional details, view our blogs on How to Create a Custom Pop-Up in Odoo 15 POS Using OWL and How to Create a Custom Pop-Up in Odoo 16 POS Using OWL, which will help you create pop-ups in various versions.


