Organizations used to send messages and write emails in response to requests for leaves of Absence. In the age of technology, everything has been upgraded to be computerized, but managing employee leaves and taking care of their various Time-Off details are always quite an intricate process. Time off requests from employees must be handled methodically by HR departments. Thanks to the Odoo ERP system, employees can request time off through the same website, and management can approve those requests. The software database stores all of your employee details as well as their leave records without needing any other applications.
Manage all of your employees’ leaves and vacation time with Odoo 16’s all-inclusive solution. This software platform includes a unique feature set that necessitates a good leave management system. The Time Off module streamlines the process of submitting leave requests by displaying the time off that workers have taken, making it simple for HR managers to locate each employee’s leave history. Employees may submit a leave request using the dashboard, and the manager can accept or reject it.
Time Off and creating a new Time Off Request
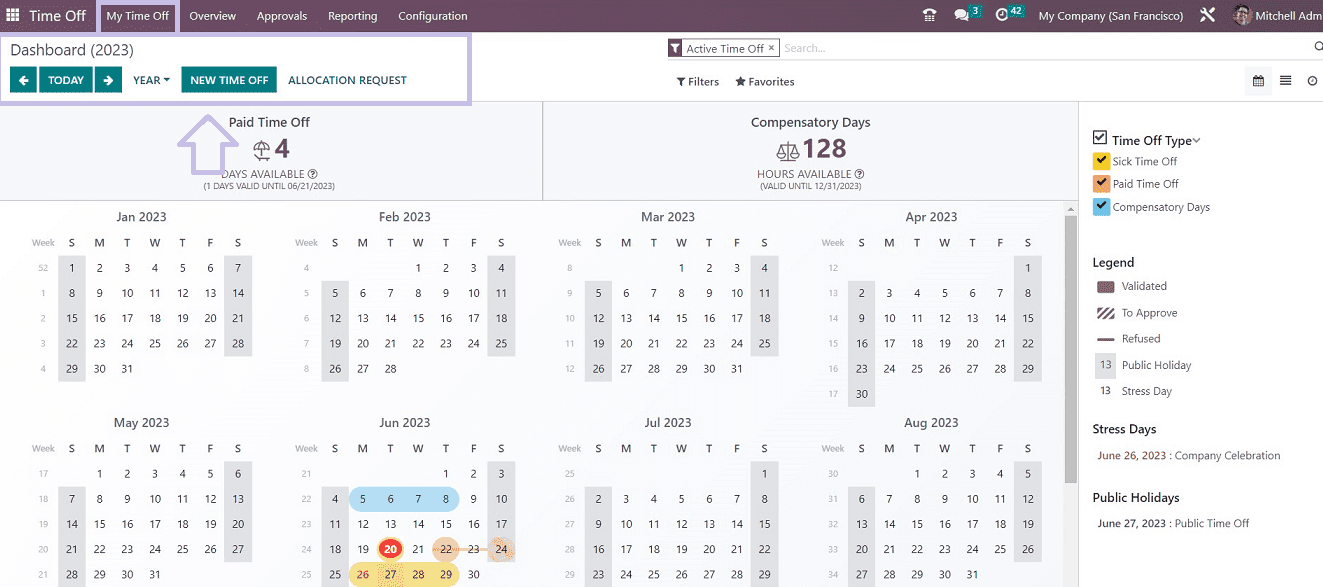
After opening the Odoo 16 Time Off Module, you can see the “Dashboard” page, as shown in the screenshot below, that contains a dashboard of every other time off request and its details created by employees.

This dashboard shows the employee time-off details in a calendar view. Users can easily understand their leave days in a Wee, Month, or Year. Additionally, you’re able to quickly see the remaining days of your annual “Paid Time Off ” and the total hours available in the “Compensatory Days” options. The sorting section on the right side will help you to choose the dashboard data, whether it is Time Off Type, Sick Time Off, Paid Time Off, and Compensatory Days. By looking at the “Legend” section, you are able to understand the calendar denotations. Under the “Stress days” and “Public Holidays” sections, important days in your company’s calendar and public holidays with leave possibilities can be viewed.
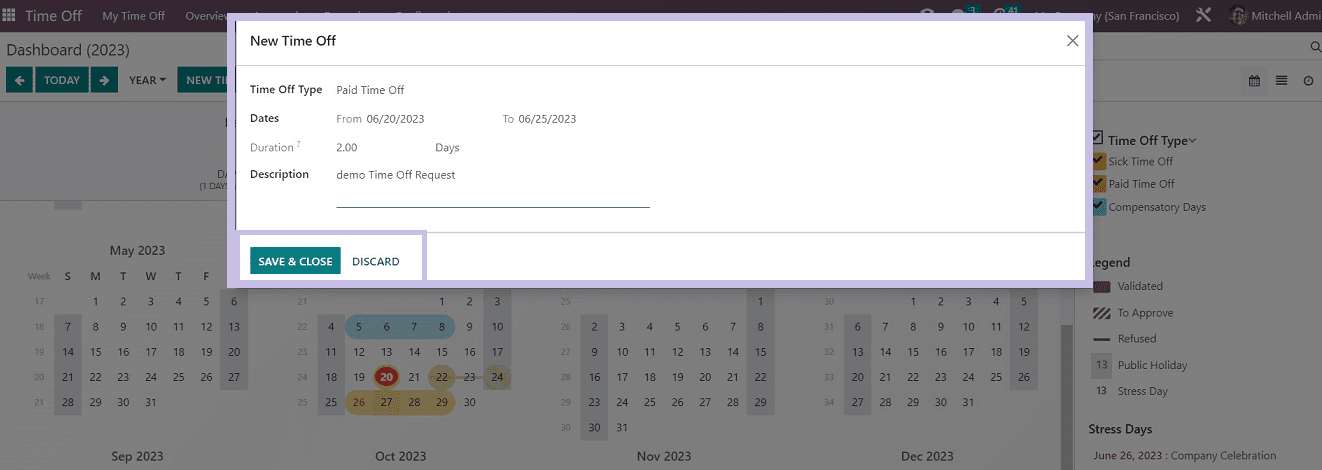
You can see the leave that an employee has taken in a year arranged as a calendar denoted by various colors. You can create a new Time-Off Request immediately from the “NEW TIME OFF” button situated on the page. When you click that, a pop-up box will appear where you can enter a new time off request.

The form page here allows you to enter the New Time Off Type. The appropriate “Time Off Type” can be chosen from the drop-down menu. You can choose the “Dates” for your vacation in the corresponding field, and the “Duration” of your vacation will then show based on the days you choose. In the “Description” section, you can include a description of the leave. When you press the “SAVE & CLOSE” button, the request will be sent to the appropriate management for approval. You can view and manage the request from the dashboard calendar itself.
Allocation Requests
With the aid of this choice, allocation requests may be submitted in unusual situations. If an employee needs more time off than what is allowed, they can make allocation requests to obtain special authorization.

You can submit an Allocation Request from the main dashboard page itself from the Time Off. Clicking on the “ALLOCATION REQUEST” button will open a new allocation form where you can enter the details regarding them.

My Allocation Menu
To manage your allocation requests, you can also go to the “My Allocation” menu from the “My Time Off” menu.

The time off allocations that have already been generated is all included in the “My Allocations” dashboard with the following information: Time Off Type, Description, Duration, Allocation Type, and Status. You can sort certain allocations using the options available in the “Filter,” “Group By,” and “Favorites” menus available on the page. Open a new allocation request by using the “NEW” button, as you can see from the screenshot below.

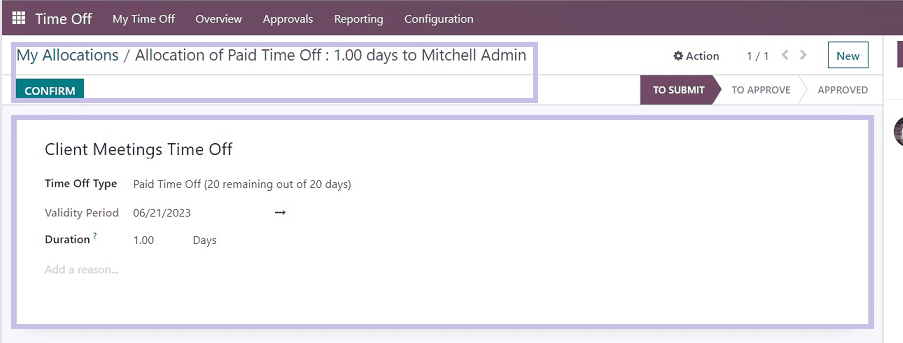
In addition to selecting the appropriate “Time Off Type” from the fields offered, you may also provide the name of the allocation request here. You can specify the additional days you need in the “Duration” section. Mention the justification for seeking more time off in the text field provided. And save the details.
The request is currently in the “TO SUBMIT” state. The “CONFIRM” button must be clicked to validate the request. When you press the “CONFIRM button, the request’s status will change to “TO APPROVE.” This shows that the management has been notified of the request for approval. From the Approvals page, the manager can now accept or reject the request by checking them.
The functions Time Off Request and Allocation Requests offered by the Odoo 16 Time Off Module have been covered in depth. Within this single platform, employers can simply handle all parts of their employee’s leave requests, and employees can request their leaves and time off and keep track of them.


