There are multiple pricing options and features available in the Odoo 14 PoS module. The pricing features allow you to have an active business management environment around your customers by giving them offers and discounts on your products and services.
This blog will give you an idea of the Pricing features of the PoS module in Odoo 14
Applying discounts
Offering discounts is the most traditional and the most effective way to boost your business. Discounts play an important role in business; it not only helps to boost your business but also enables you to have a massive and effective community outreach allowing your customers to have direct contact with your business and your products prompting them to buy your products. With the most advanced features of the Odoo, you can easily manage and strategize your Discount offers.
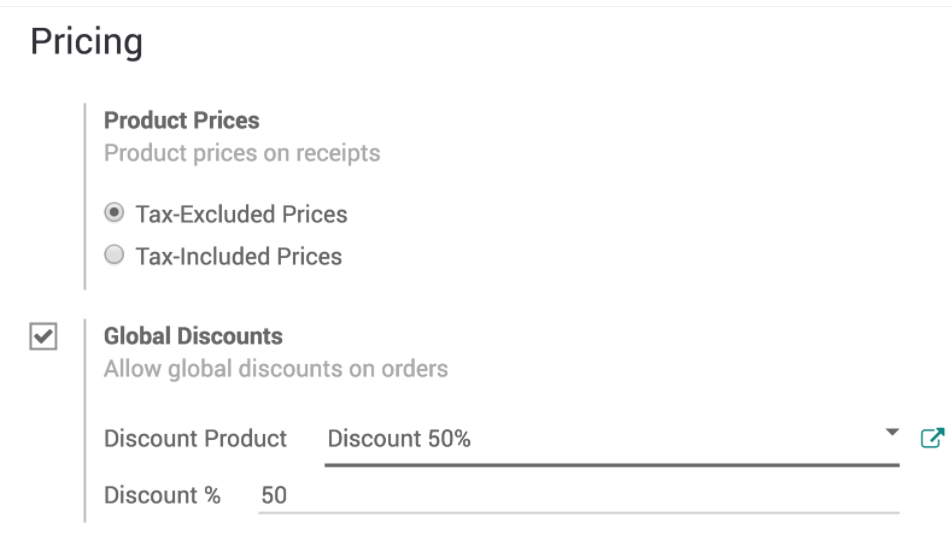
Applying Manual Discounts is an easy and effortless task in the Odoo PoS module. You can choose to apply a discount to one product or a set of products with Odoo. To apply a discount on a product click on the Disc option from your PoS interface and then you can input a discount over the currently selected product. To apply discounts on your products on a global level, just go to the configuration tab in the PoS module and click on Point of Sale from the quick dropdowns for advanced configurations on the module and select your PoS, and under the Pricing, category select Global discounts and configure as given in the screenshot given below.

Immediately after this you can find the Discount button in your PoS interface and click on it to enter the wanted discount. You can easily set up Time-limited discounts on your products and services using the Odoo PoS module. To have this feature go to the Configurations on your POS module and select Point of sale from the dropdown options and enable the Pricelist feature in Odoo 14. To know more about Odoo Pricelists visit Sales Pricelist Management in Odoo 14
After enabling the Pricelist to choose the price list that you want to make available in the PoS and define a default one. And if you want to create a new price list go to Pricelist under the Product tab in your PoS module and click on Create. You can set several criteria to use a specific price and you can also decide to apply that pricelist on specific products or on the entire range of products. After finishing this a new button will appear on your POS interface and you can use it to select a price list that will instantly update the price list and you can finalize the order.
Discounts tags with a barcode scanner
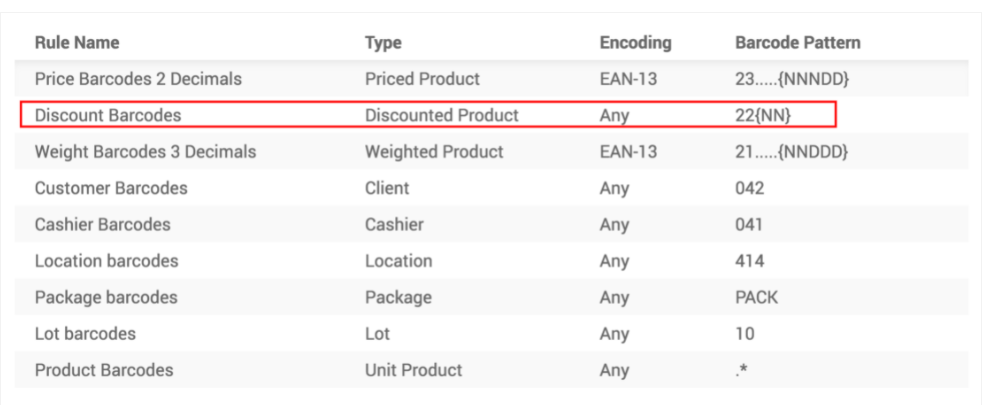
You can easily use discount tags with a barcode scanner in Odoo. You must have a barcode scanner to use the discount tags and for example, you can use this to sell your products with a discount for a product that is coming close to its expiration date. Learning about barcode nomenclature can help you understand Discount Tags. You can find the Default Nomenclature under the settings of your POS interface in Odoo. Activate and click on the Barcode scanner for the POS module and click on Default Nomenclature.

If you want to have 50% on a product (refer to the screenshot given above) then you have to start your barcode with 22 for the discount barcode nomenclature and then 50 to represent the percentage and in respect to this data, the barcode would be as given below.
 Now you can simply scan the product and the 50% discount will be automatically approved into the product.


