In every business, there is some time taken by for the processing of orders for products that are manufactured or extracted in order only. This delay in time is caused due to the fact that the products may get degraded, or the product cost is much higher than if they are stocked up before order in case of them not being sold off would create larger losses to the company. In those instances certain vendors many restrict the deliveries of the product for a certain period of time.
In the case of another instance where the purchasing company only wants the products to be delivered after a certain amount of time period. There should be a delay in deliveries in the products being ordered for this. The Odoo platform allows the user to set the lead time for the purchase, sales, manufacturing, and delivery orders of the products and services. In case a customer wants the servicing or repair of machinery to be done at their site the user can set the order of repair to be delayed customizing as per the need of the customer
This blog will provide details about
How to set up purchase lead times for orders in Odoo
What is Purchase Lead Time in Odoo
How to Setup Purchase Lead Time
Odoo 13 Purchase Management
[wpcc-iframe loading=”lazy” width=”789″ height=”409″ src=”https://www.youtube.com/embed/R5D1N2wSwK8″ frameborder=”0″ allow=”accelerometer; autoplay; encrypted-media; gyroscope; picture-in-picture” allowfullscreen=””]`
Purchase lead time in Odoo
The user can set the lead time for the purchase under each vendor at the instance of the creation of a product or a vendor. But it’s as the user may not want the lead time for every purchase of the product from the vendor, the Odoo platform allows the user to set the lead time at the instance of creating a purchase order for the product. The user will be retired to the product menu from the purchase order upon selecting the product and then the user can select the vendor from the purchase tab of the product. On selecting the vendor the user will be redirected to the vendor page on which the user can adjust the lead time.
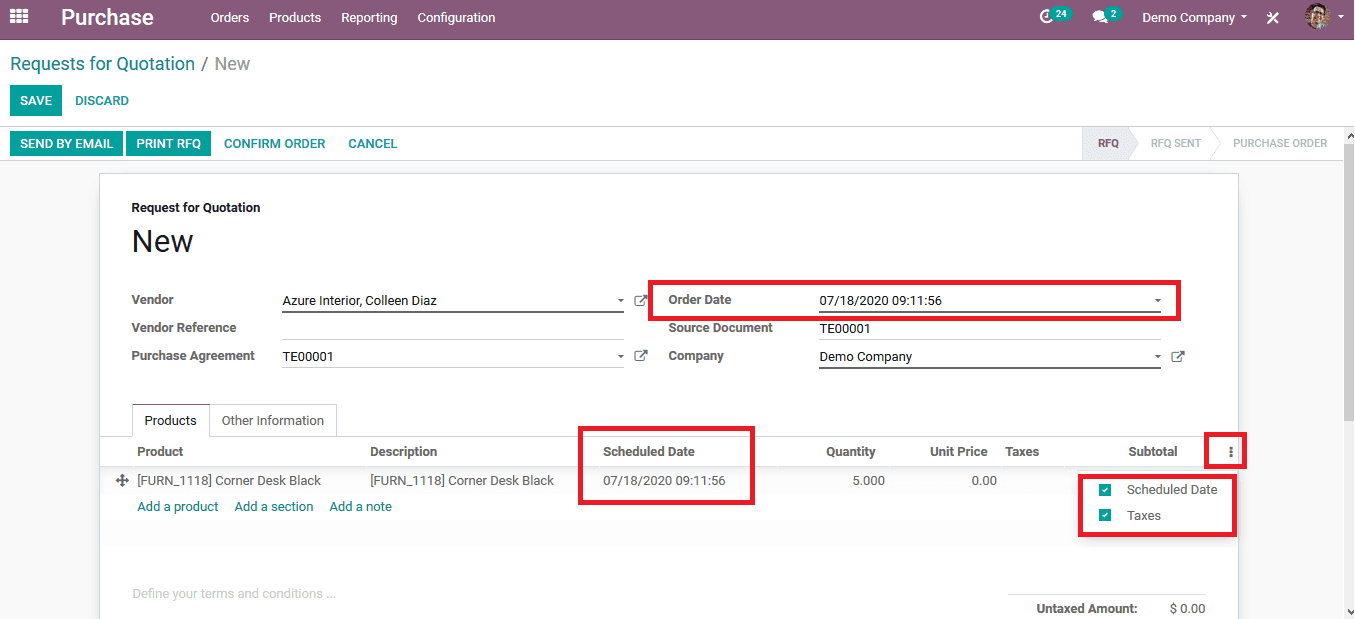
To depict the operation of adjusting the lead time for purchasing a product let’s lookup an example. Initially, a purchase order is created in the purchase module in the quotations menu. To create a purchase order the user can select the create icon on which he/ she will be directed to the new request for the quotations page. Select the product in the product menu by adding a product option and provide the number of units required. If the scheduled date does not appear on the product information select the menu icon depicted as three dots from the product menu and enable the schedule date option. Doing so a new schedule date column appears under the product menu.

Set Purchase Lead Time
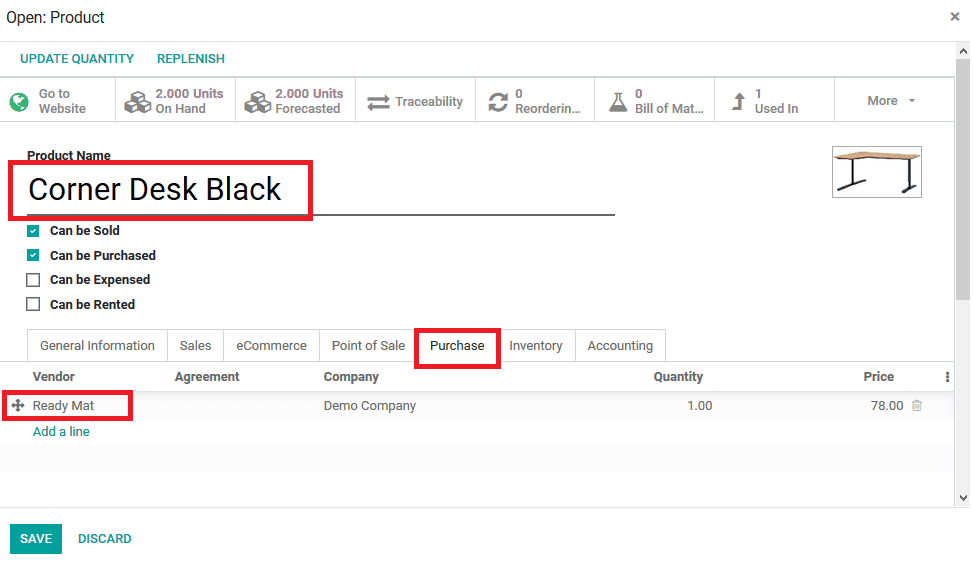
In case the user wants to set the lead time select the external link option available next to the product on which the user will be redirected to the product page. The Odoo platform allows the user to move towards an external link within the platform without leaving the existing page. On selecting the product the user will be depicted with a popup window as shown below. In which the user can view and edit the product details. To set the lead time the user should move to the vendor’s description page which can be done by selecting the purchase menu available on the product page.

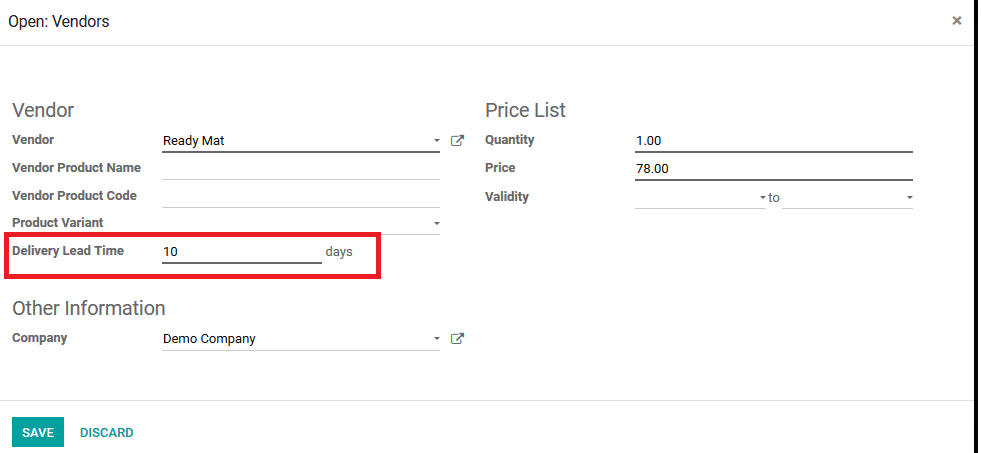
On selecting the purchase page of the product the user can view the vendor details allocated with the product. If multiple vendors are allocated with the product it will be listed out here. The user can also add the various vendors to the menu. By selecting the add a line option. In order to set the lead time for the purchase of a product select an existing vendor or create a new one. Upon selecting the external ink available for the vendor the user will be redirected to the pop up window as depicted in the below image.
In the vendor window, the user can view all the vendor information allocated with it in the Odoo platform. To set the delivery lead time for the vendor, provide the required date in the delivery lead time option available.

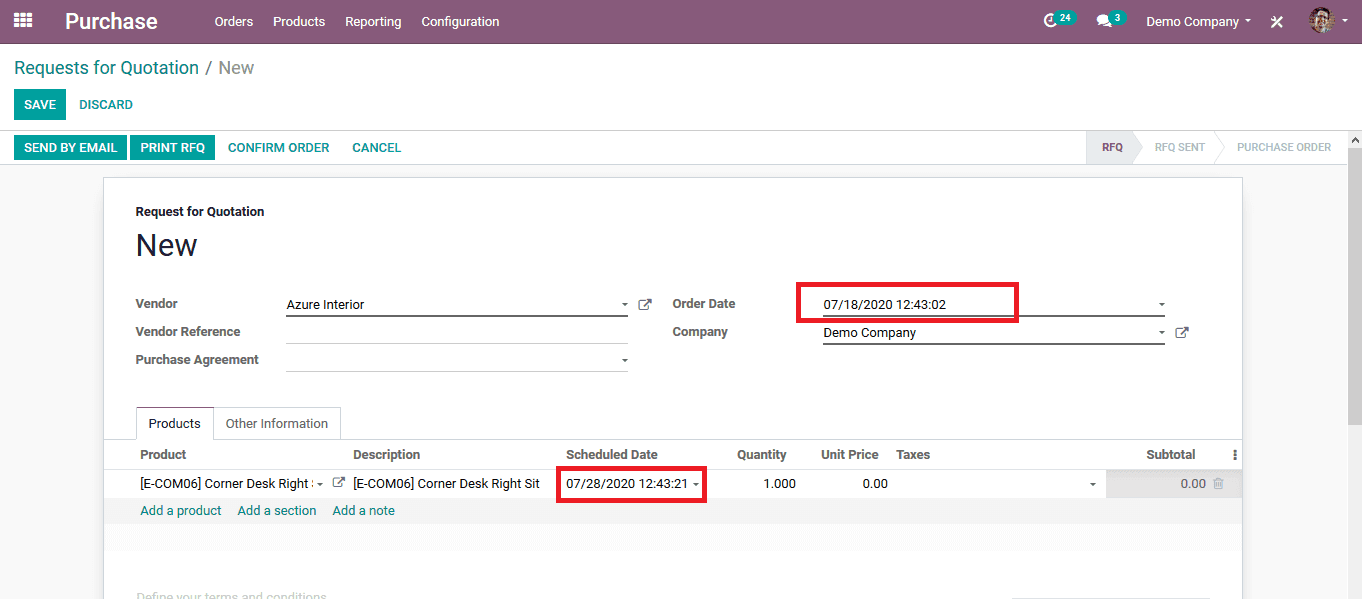
The delayed date can be set as per the user and the date set will be directly depicted in the purchase order of the product. Upon verifying the details the user should save the vendor window and then the product window. The user can now order the product with the lead time. The existing product order will not depict the lead time for the scheduled date. But the user can delete the existing product and add the same product to the product menu on which the schedule date will be described based on the lead time set by the user.

As in the above image the delivery schedule date is 10 days after the day of order as set by the user in the vendor description. This option in Odoo allows the user to set the lead time for the purchase of the product by consulting with the vendor and the inventory in charge of the company. The lead times in Odoo should be set by the user which in turn will not affect the sales and the production activities of the company.
Generally, Purchase Management with Odoo is one of the most crucial sections of an organization. The purchase process in a company should be given the maximum attention when there is a problem in the purchasing department then problems will arise in the production section, Sales section, and will ultimately reduce corporate earnings. Hence, we need a reliable purchase order management to help companies. Refer the blog Odoo Purchase management module for detailed information about the module


