One of the complicated processes for company operations in different countries is compensating and hiring employees. An employee gets benefits in bonuses, salaries, promotions, and other deductions. Some essential elements for payroll calculation in the US are earnings, deductions, gross pay, taxable gross, and an employee’s net pay. Most firms face difficulties with the payroll management of employees, and it varies from country to country. Various steps are needed to complete a payroll operation in a specific county. Using an Odoo ERP, users can easily manage the payroll process quickly. Odoo 15 Payroll module assists in accurately processing payroll management for your desired country.
This blog provides an overview of US payroll management with the assistance of Odoo 15.
Users can manage employees’ contracts and salary attachments using Odoo 15 Payroll module. The salary structure feature in the Payroll module ensures entering the salary details of an employee with various rules quickly. Using the Reporting feature, you can analyze the payroll structure of staff in a firm separately. Now, let’s view how to manage payroll for US employees.
Basic Elements of Payroll in the US
Payslips provided by a US company for an employee consist of various heads such as company identification data, worker details, payroll data, Earnings, and deductions. Company names, addresses, and identification numbers are included in the company details section. You can view the full name, professional category, and DNI number in the workers’ data. Earnings are the base salary for a worker in a firm, and it is classified into two types: taxable earnings and non-taxable earnings, considered as allowances.
Deductions in US payroll are different types:
Federal tax, pre-tax deductions, post-tax deductions, and State and local taxes. The Federal Insurance Contributions Act taxes include social security and medical care taxes. Federal tax is calculated by multiplying the tax percentage of social security or medical care with taxable gross. State and Local taxes vary as per the specific employee location. Post-tax deductions consist of other benefits provided to an employee from a firm. Based on these requirements, let’s develop a new payroll structure inside the Odoo 15 Payroll module.
To Generate a Payroll Structure with Odoo 15
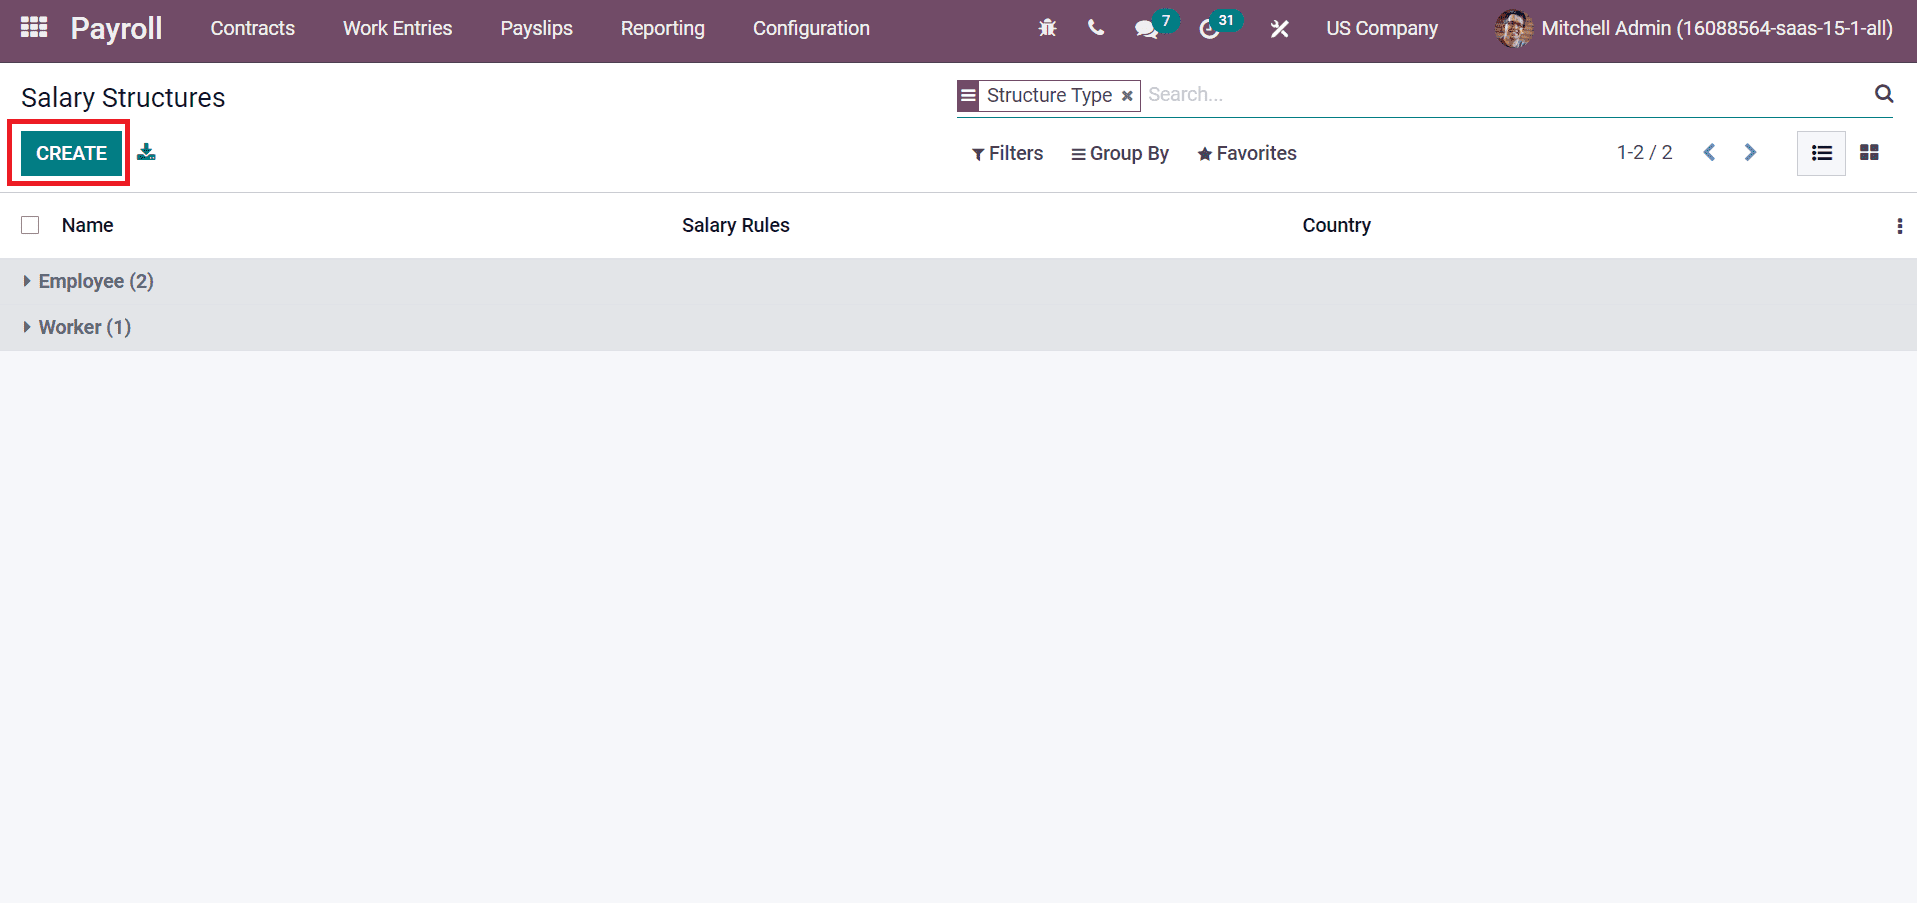
For developing a new payroll structure, a user needs to select the Structures menu in the Configuration tab, and you can view all created structures. Click on the CREATE icon to develop a new structure, as indicated in the screenshot below.
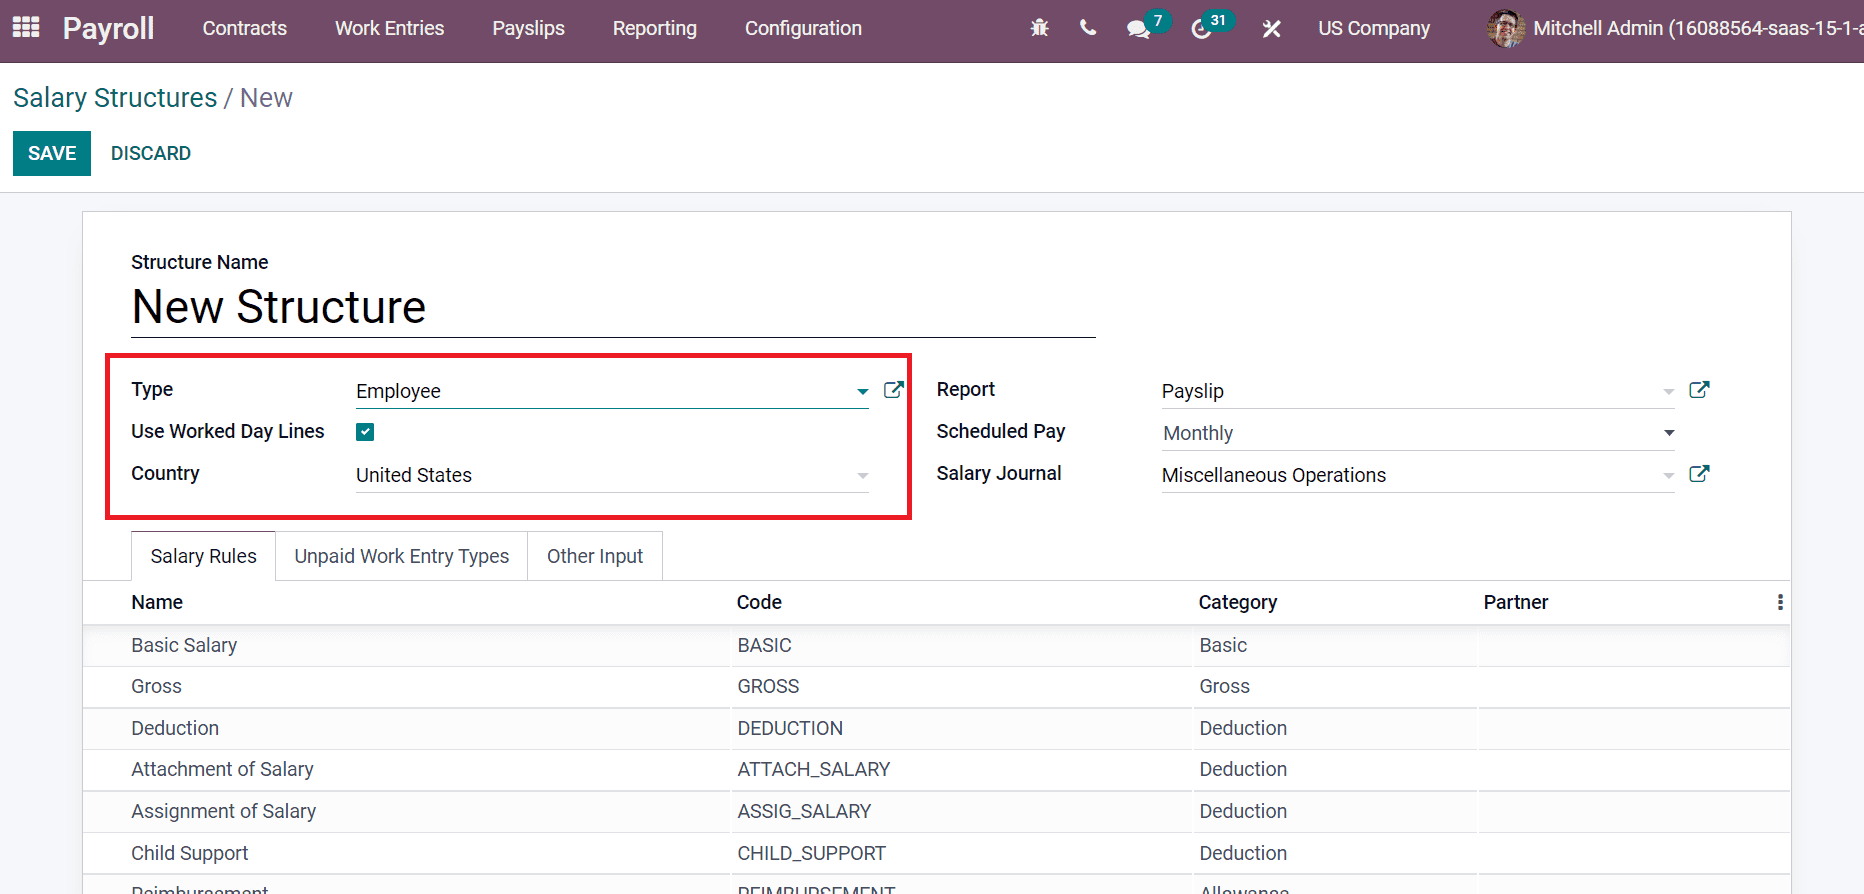
Now, let’s develop a structure named ‘New Structure’ for an employee of the US country in the next window. For creating a salary structure, we consider the payslip data of an employee provided by a US company. Next, we can apply each head to the new salary structure window. Add ‘New Structure’ inside the Structure Name field, Type as an employee, and choose the Country United States as depicted in the screenshot below.
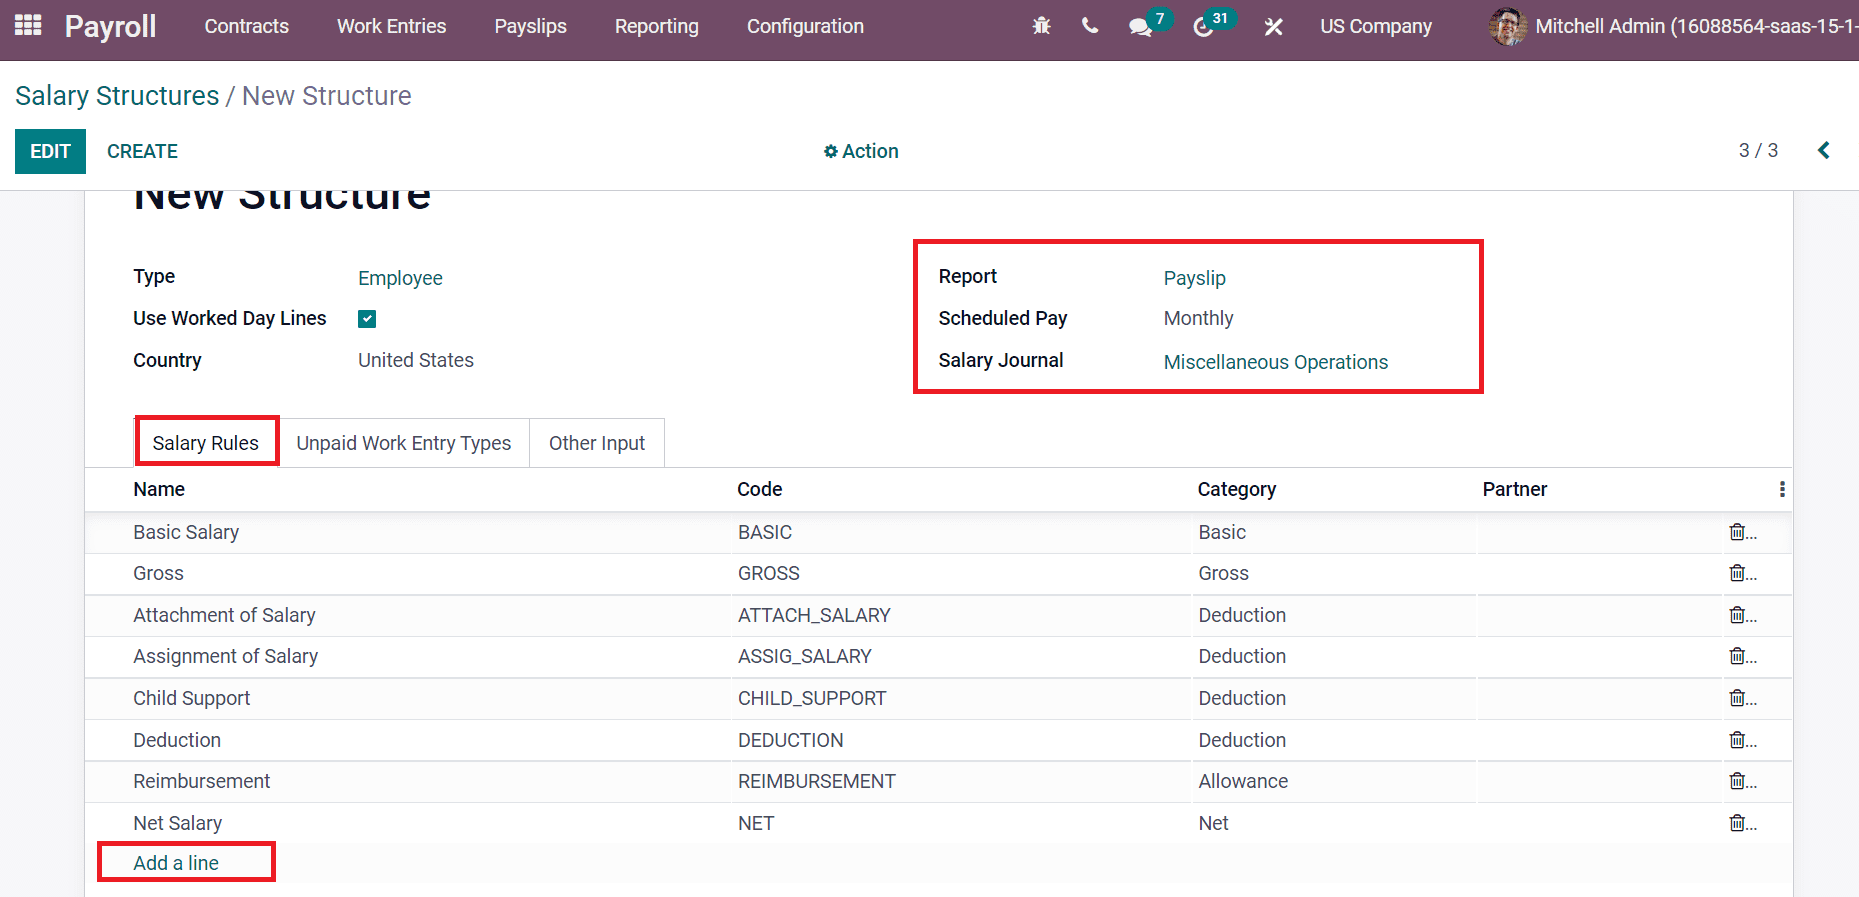
Define your wage payment frequency in the Scheduled Pay field and payroll information records in your account inside the Salary Journal field. Choose Payslip as a Report, enter Monthly inside the Scheduled Pay field, and pick up Miscellaneous Operations in Salary Journal. Later, you can apply various rules for your New Structure by clicking on Add a line option below the Salary Rules tab, as portrayed in the screenshot below.
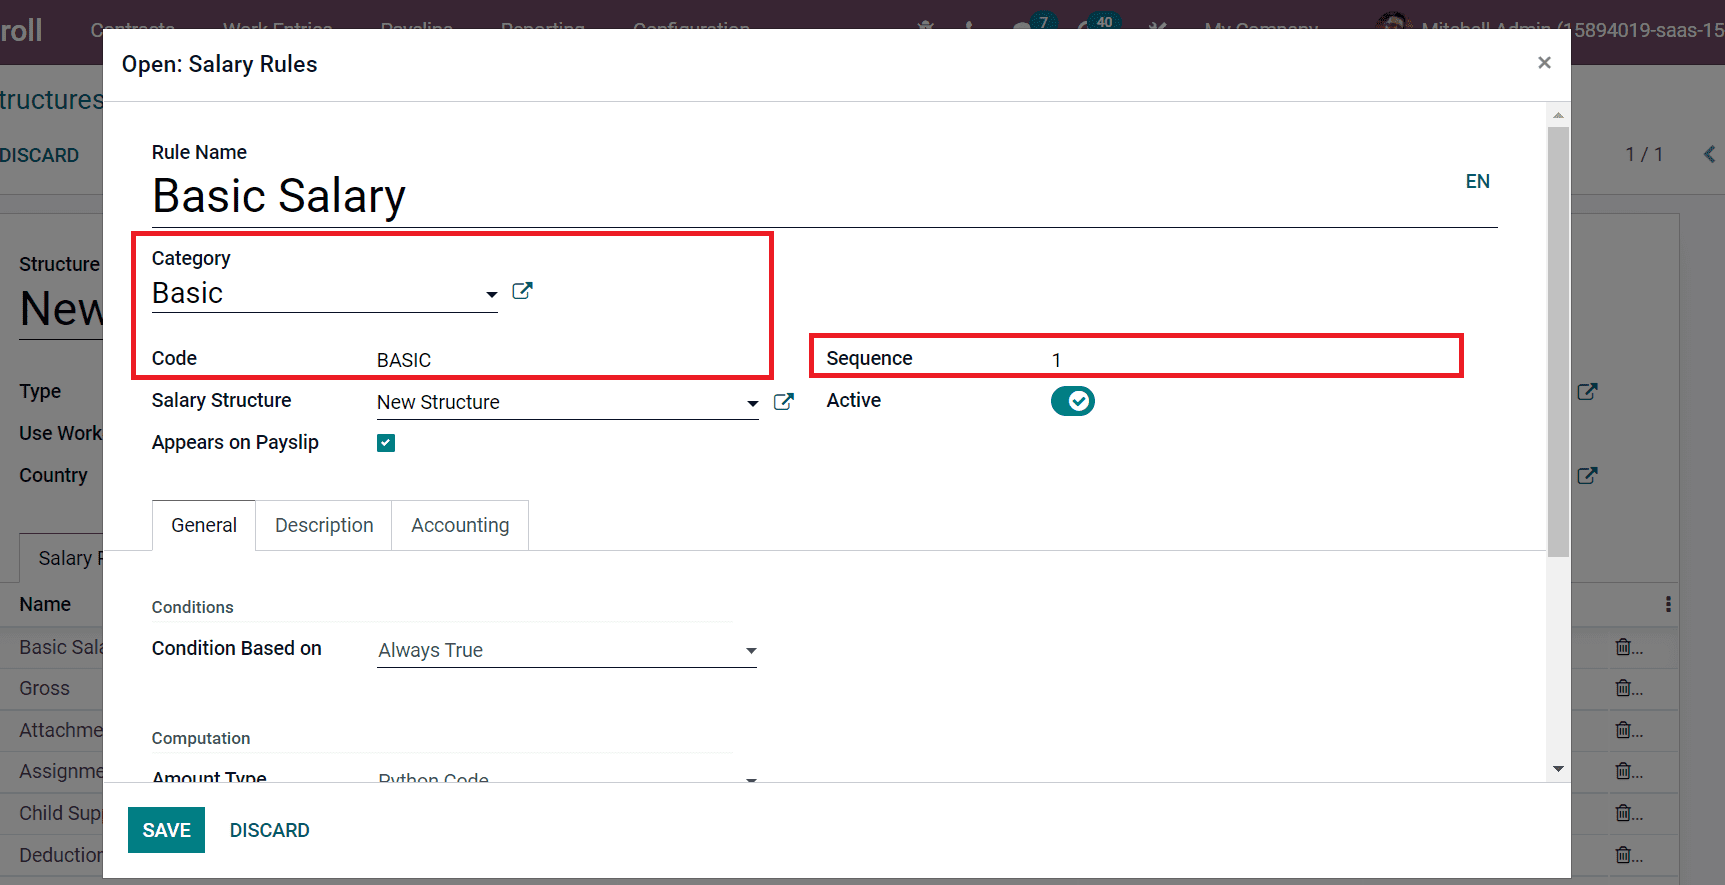
Firstly, we can add a Basic Salary rule for the New Structure. Add Rule Name as Basic Salary, Category as Basic, and type a Code. You can add a Sequence number to arrange the calculation sequence as specified in the screenshot below.
Now, the user can set a computation method for the Basic Salary rule. You can select the Amount Type as Python Code. We consume the basic salary as a wage included in an employee contract. So, Python code will be the result=contract.wage, as shown in the screenshot below.
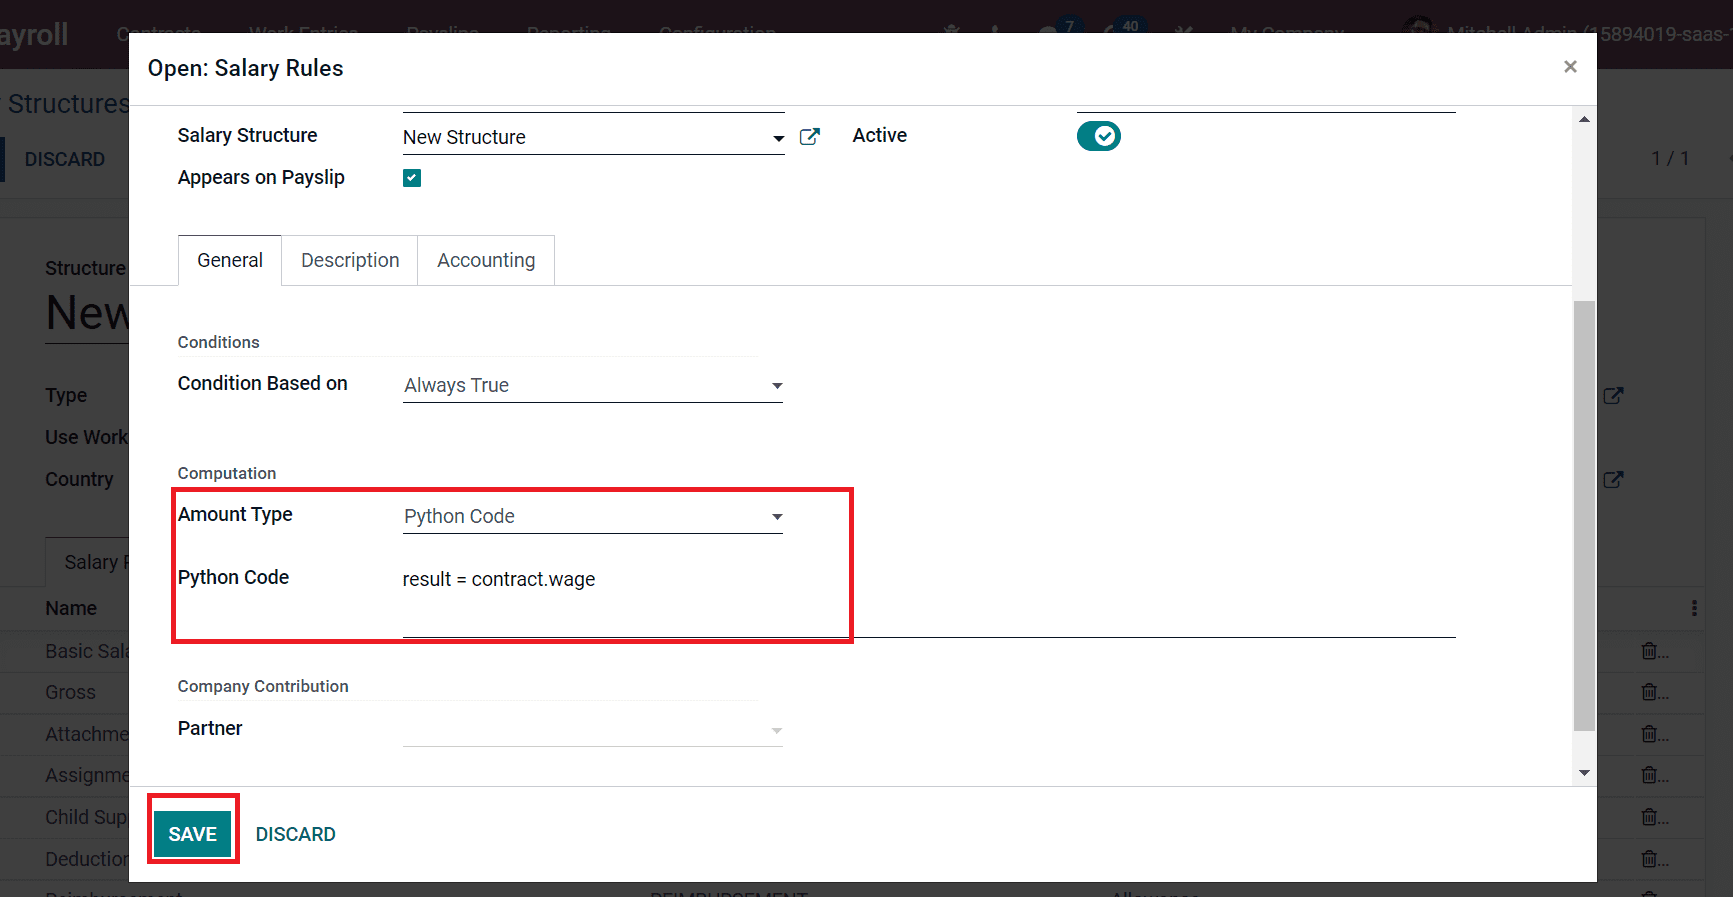
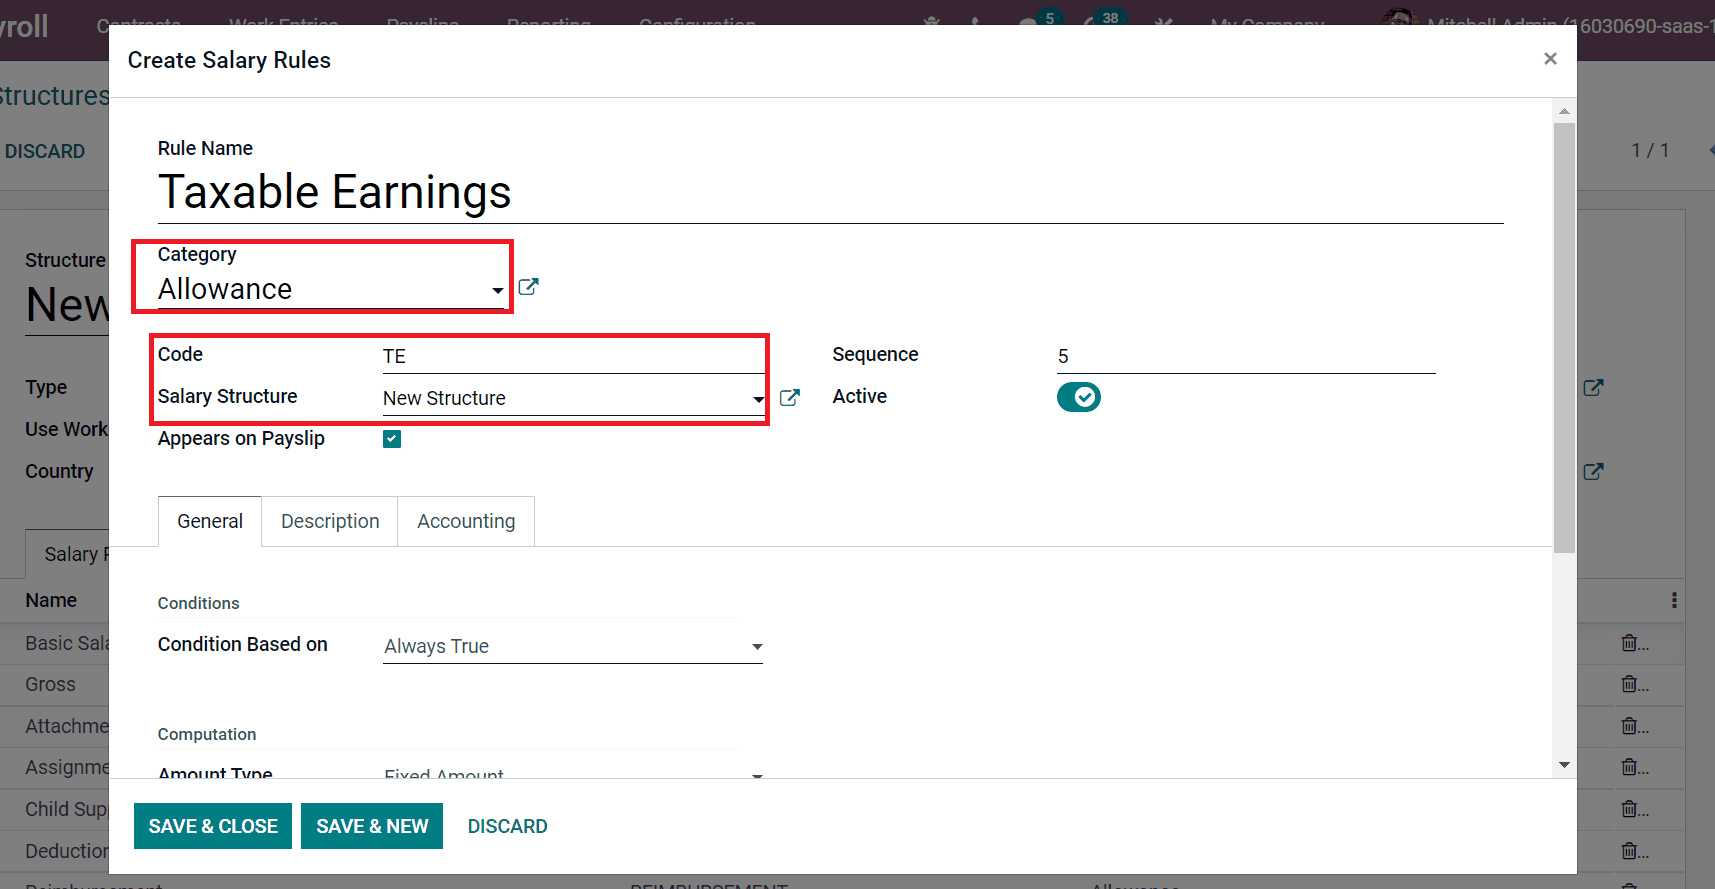
Select the SAVE icon to develop a Basic Salary rule. Next, let’s apply Earnings to other salary rules in New Structure. We know that earnings are divided into taxable earnings and non-taxable earnings. First, we can enter the taxable earnings of employees as a rule in the Salary Structure window. In the new window, add Rule Name as ‘Taxable Earnings,’ Category as ‘Allowance,’ enter a Code ‘TE,’ and select New Structure in the Salary Structure field as displayed in the screenshot below.
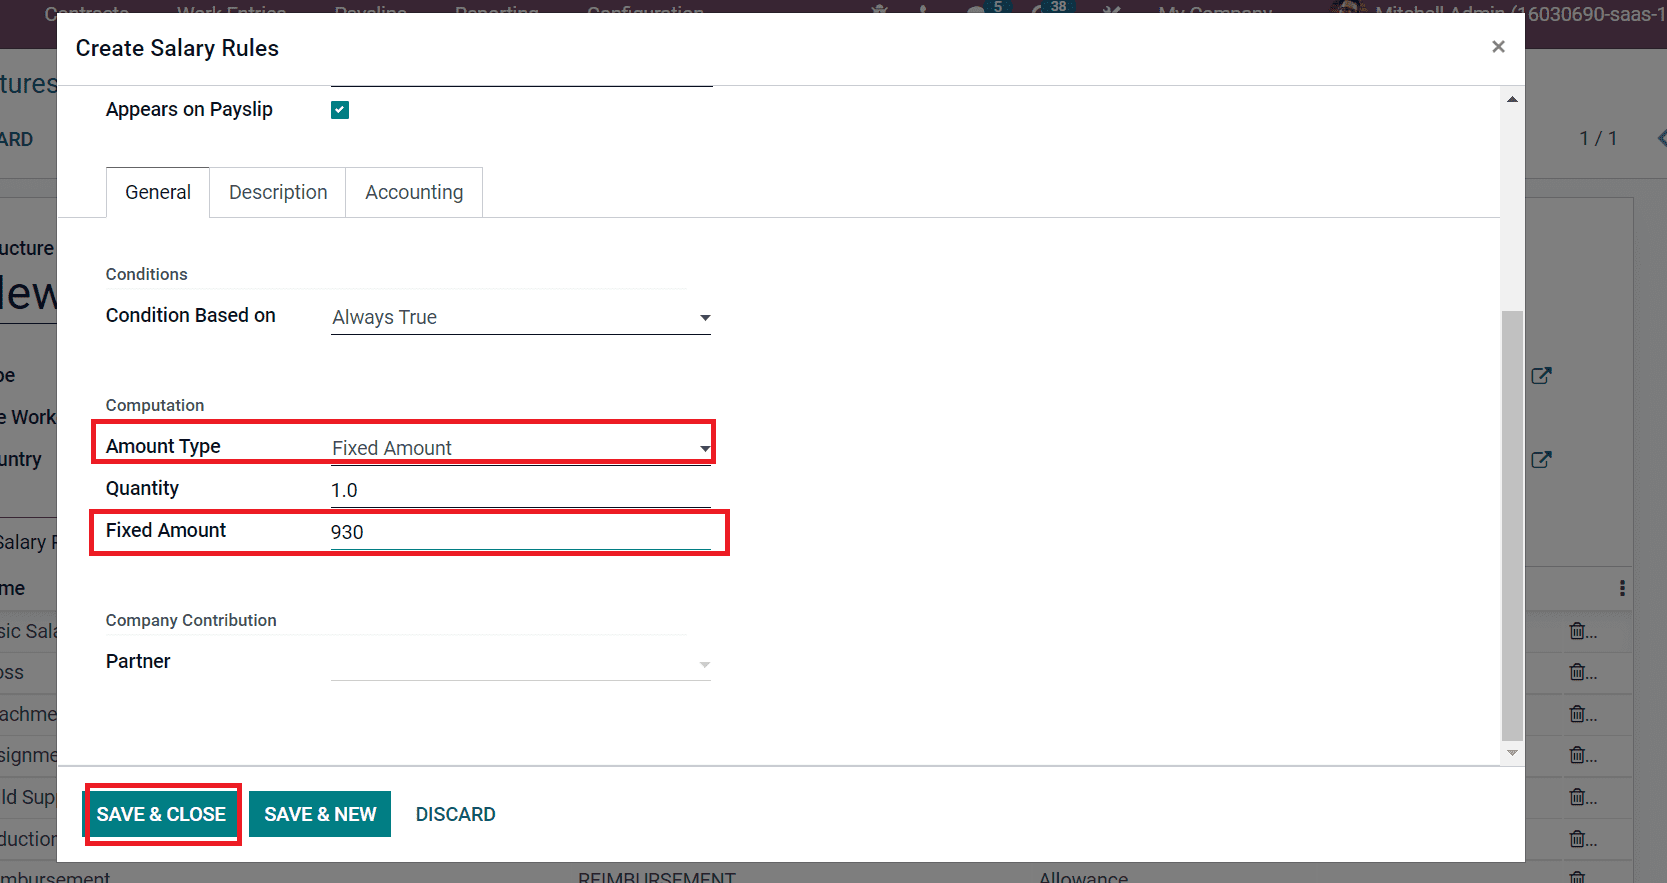
After that, we can set the Amount Type as Fixed Amount inside the Computation section. Later, enter the amount 930 in the Fixed Amount field and select the SAVE & CLOSE icon, as portrayed in the screenshot below.
Now, we can create a salary rule for Non-Taxable earnings. In the Salary rule window, enter Rule Name as Non-taxable Earnings, and add Allowance as Category. You can also enter the Code as ‘NTE’ and New Structure inside the Salary Structure field, as denoted in the screenshot below.
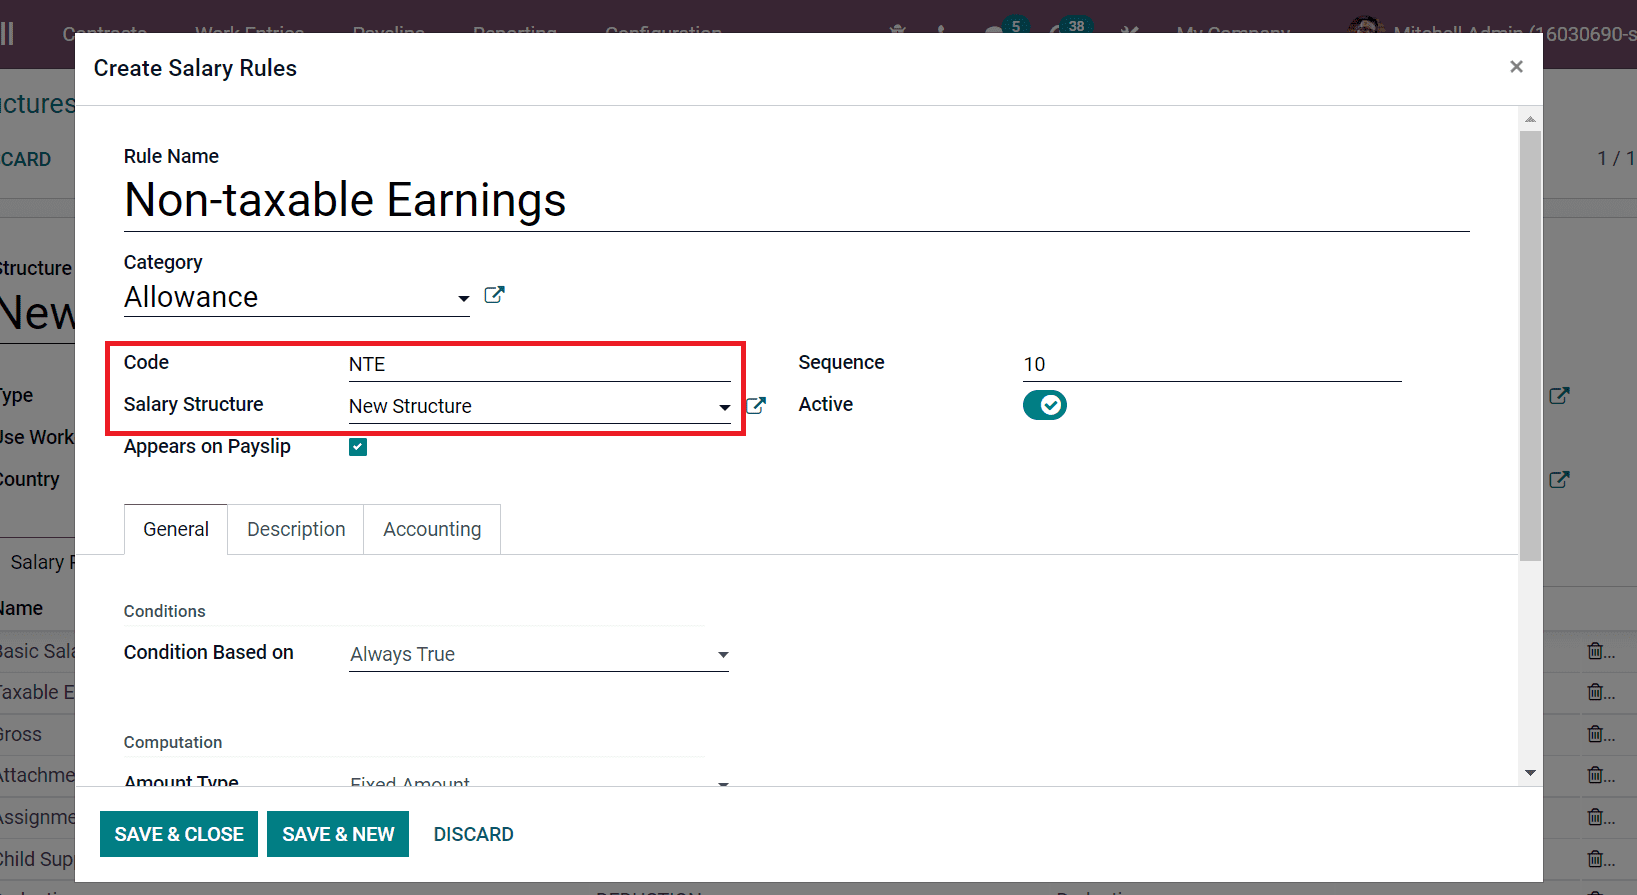
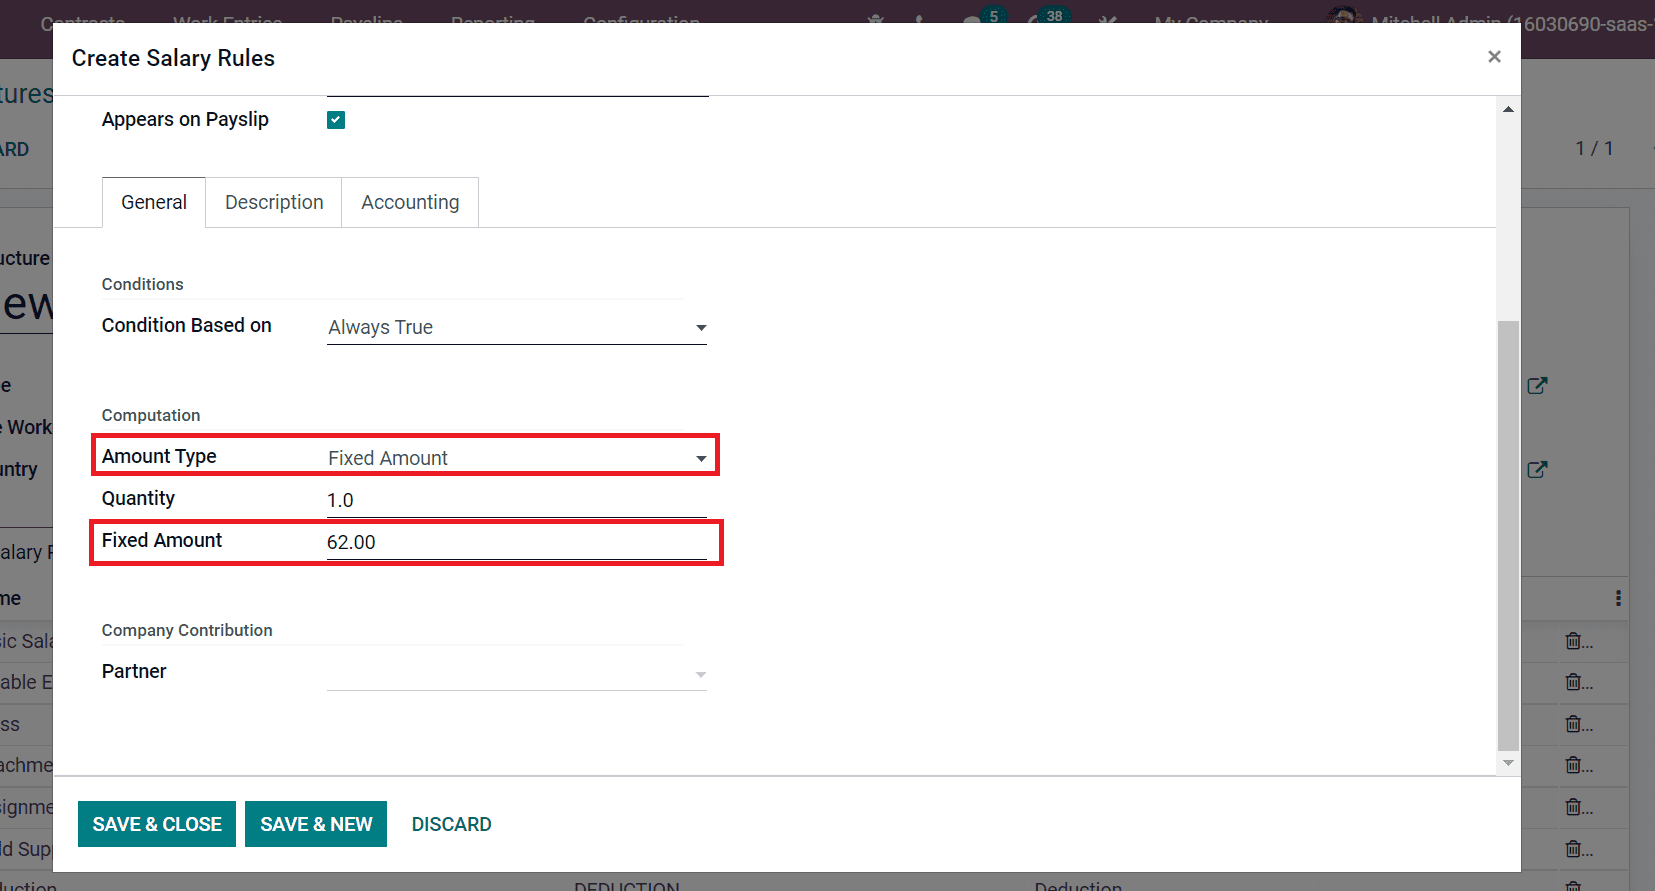
You can choose Fixed Amount as Amount Type and enter 62 in the Fixed Amount field as specified in the screenshot below.
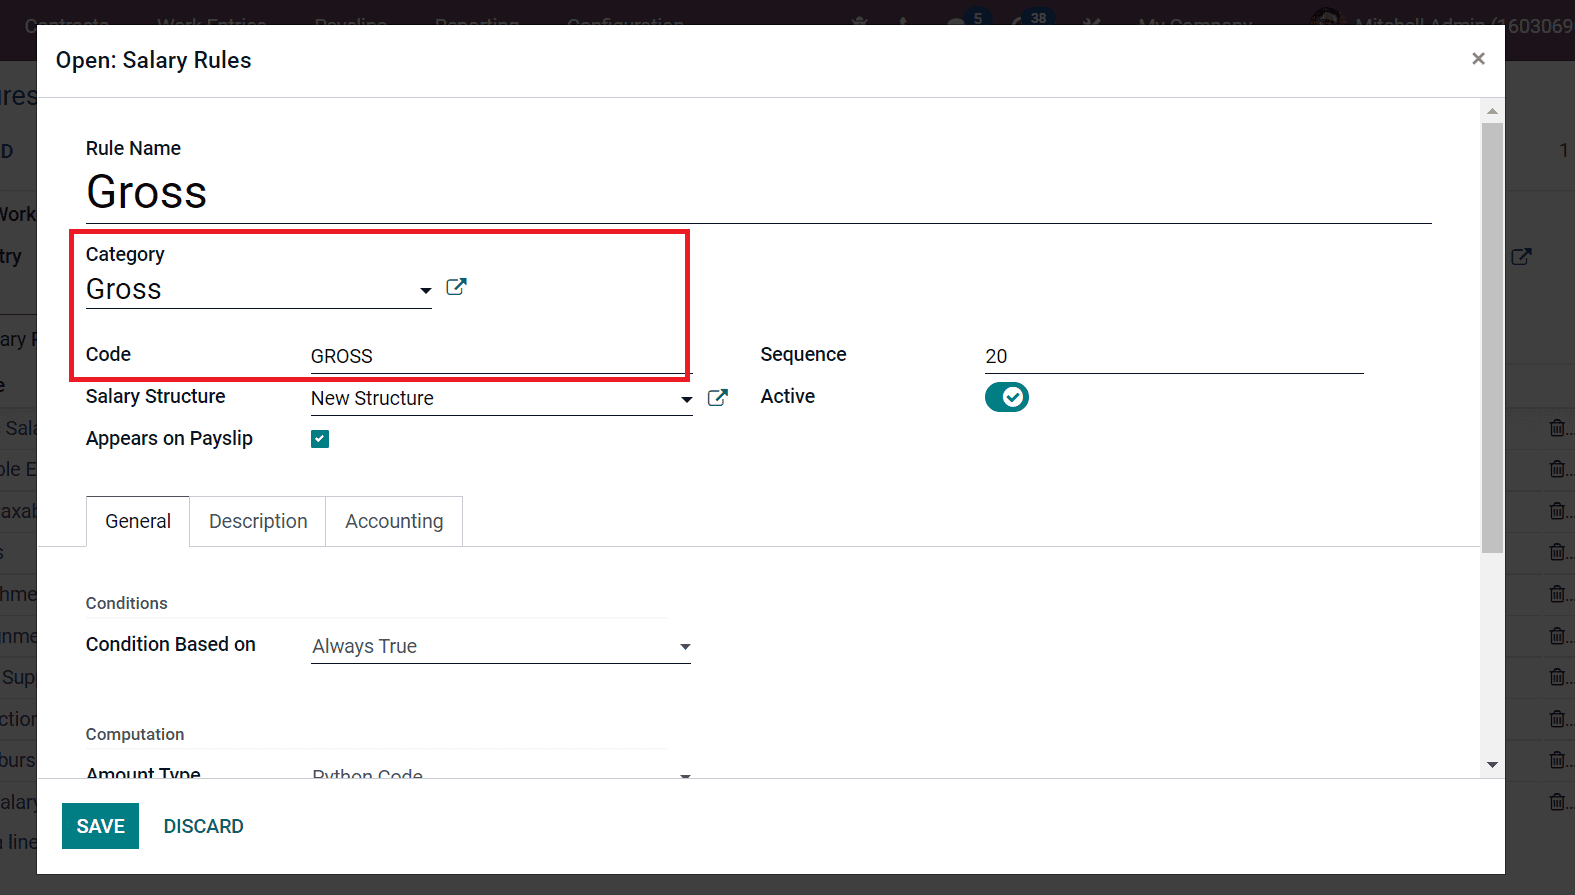
After saving the data, we can add another rule for Gross pay. In the new window, apply Gross as Rule Name, Category as Gross, and enter Code ‘GROSS’ as mentioned in the screenshot below.
Gross pay is calculated by adding basic and allowances. In the US, the allowances are taxable earnings and non-taxable earnings. So, we can add Python Code based on Gross calculation. After selecting the Python Code as Amount Type, enter a Python Code as a result = categories.BASIC + categories.ALW, as depicted in the screenshot below.
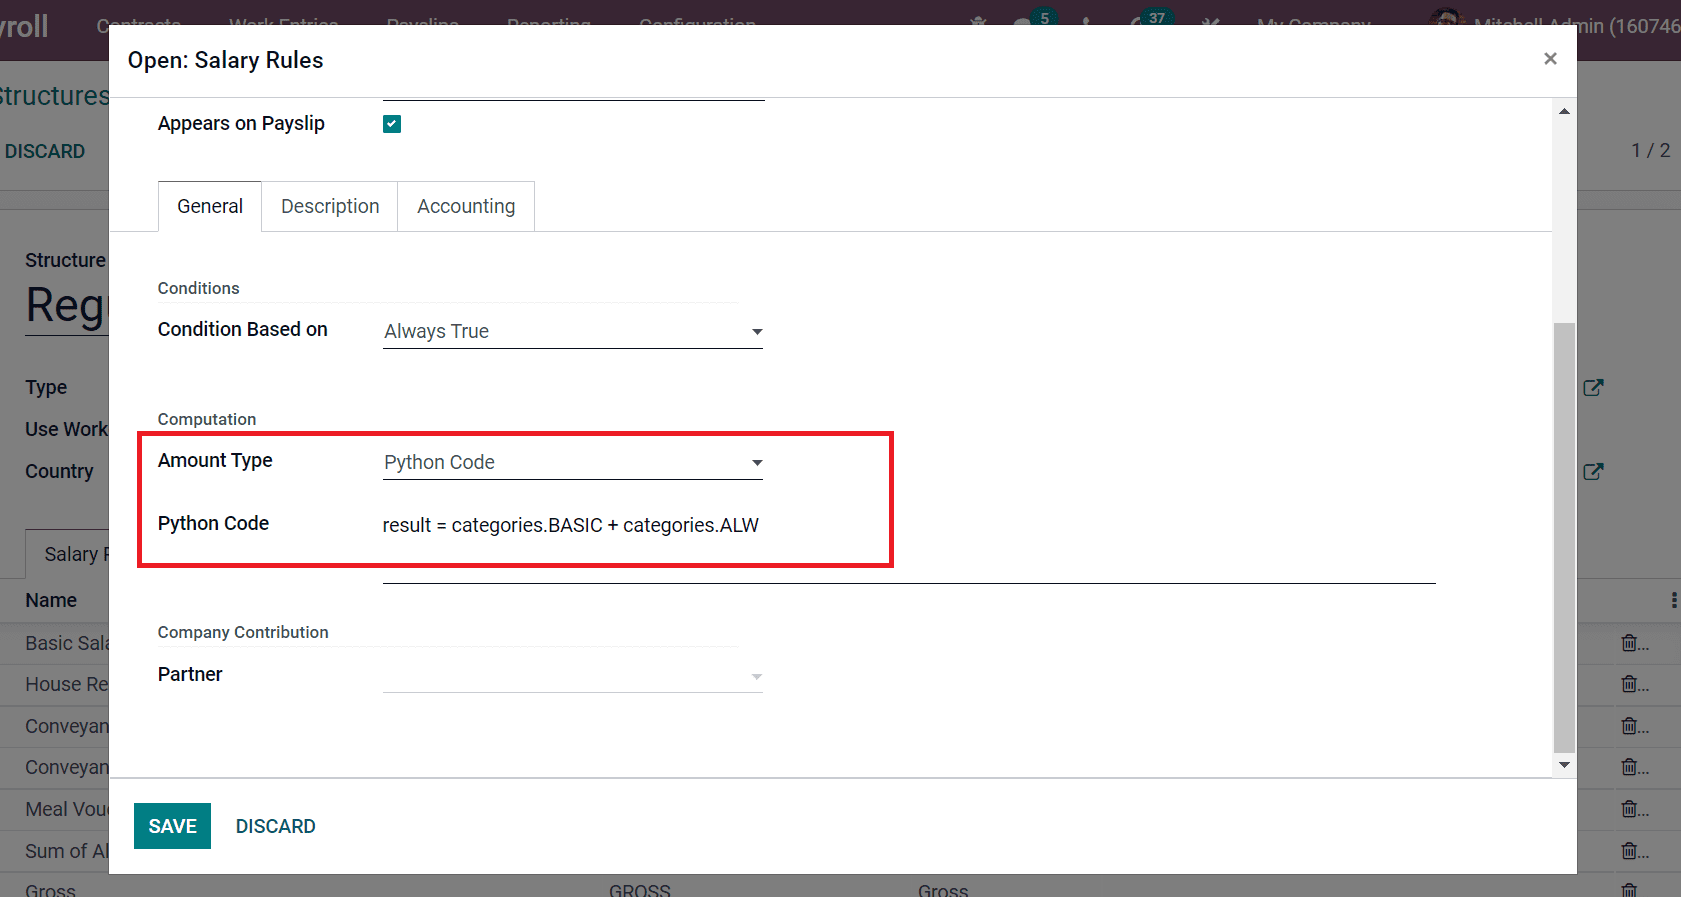
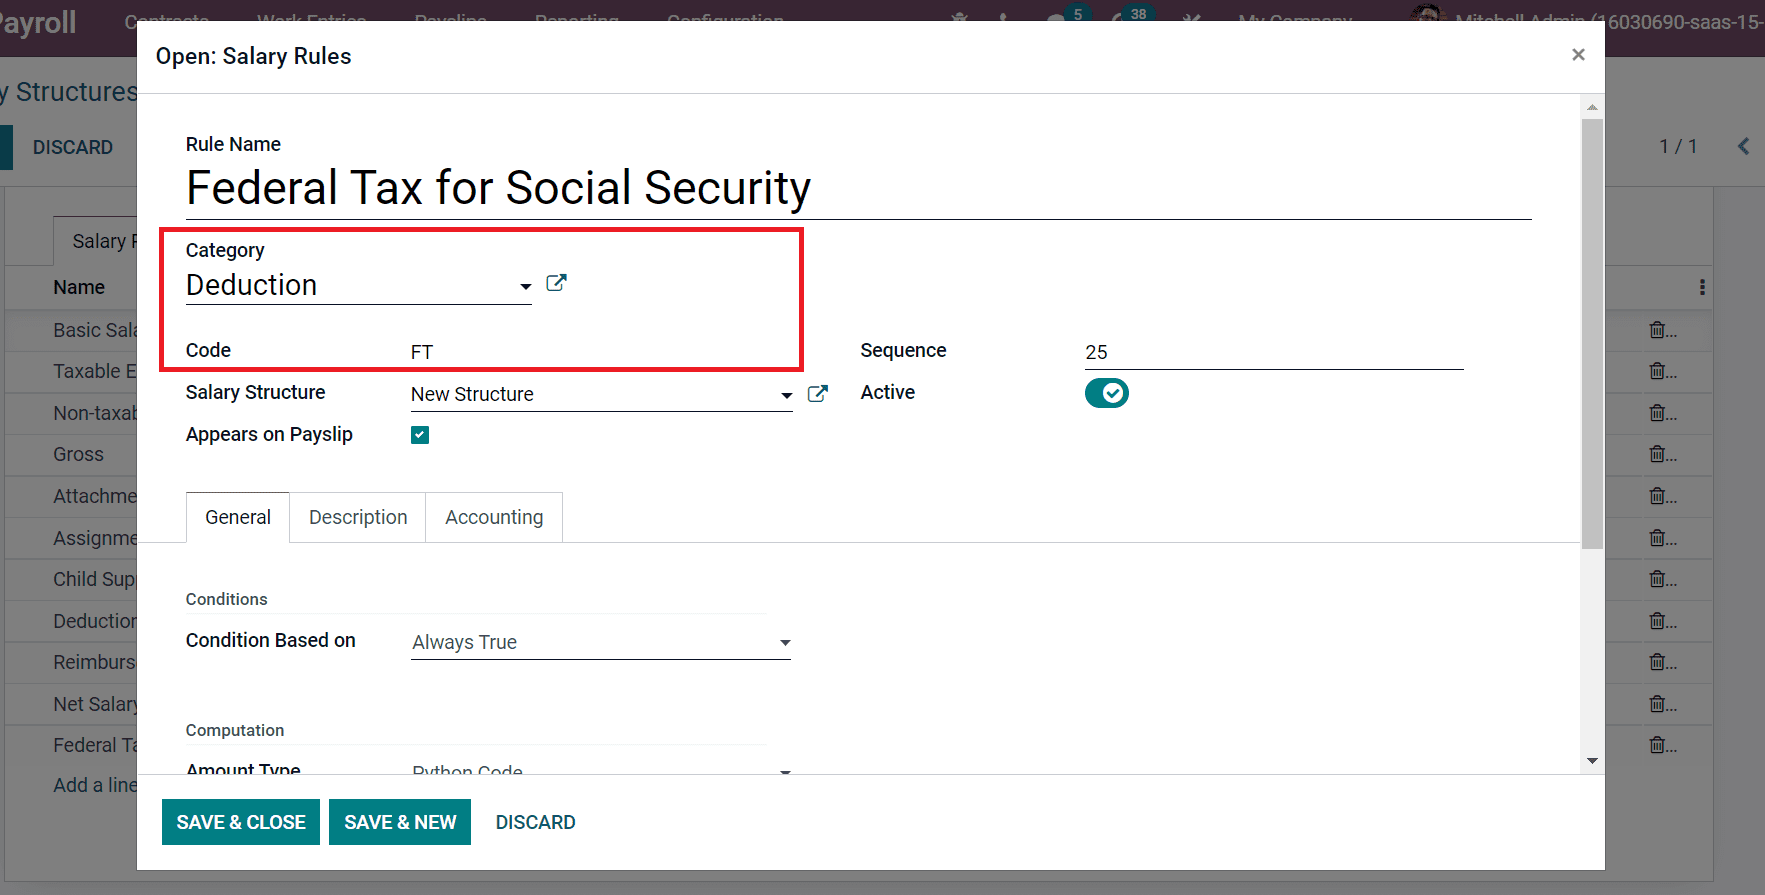
Here, ‘categories. ALW’ means the sum of taxable earnings and non-taxable earnings. The shortcode for the allowances category we created in the Salary rule is ALW. Other salary rules for the US are Federal Tax, State and Local Tax, Pre-tax deductions, and post-tax deductions. All these came under the category of deductions. The Federal Taxes are based on social security tax and medicare tax. Now, let’s view each one separately. In the Salary rule window, add Federal Tax for Social Security in the Rule Name field and Category as Deduction, as mentioned in the screenshot below.
Inside the General section, you can set conditions based on python expression, as denoted in the screenshot below.
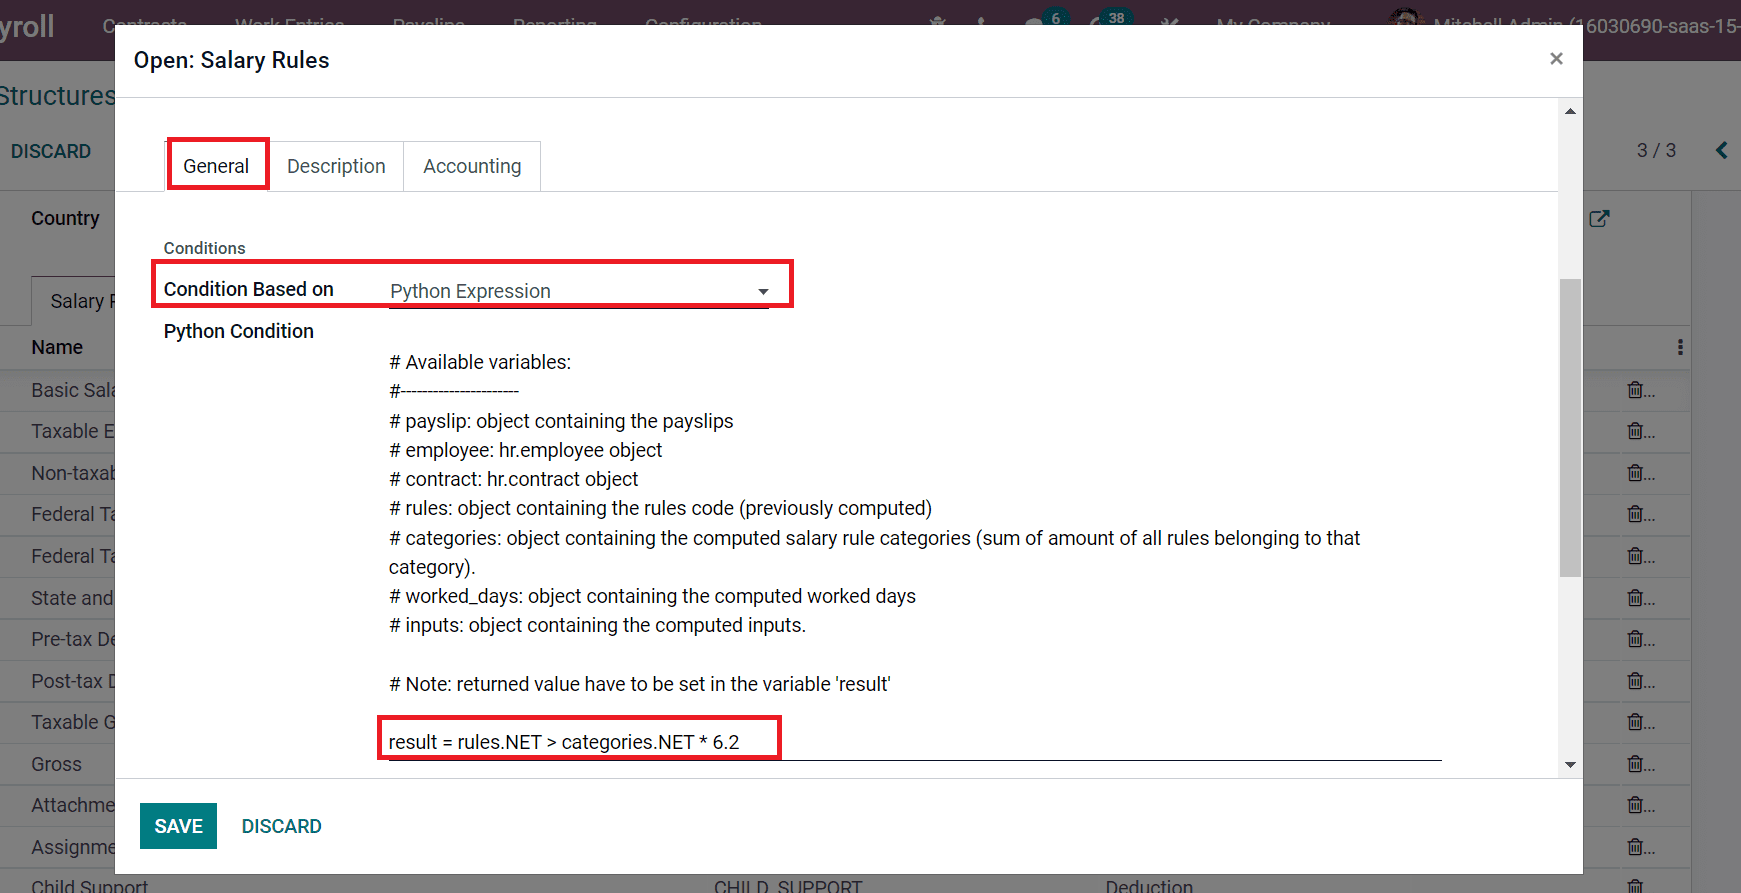
The US federal tax for social security is 6.2%, added inside Python Condition as in the above screenshot. After saving the details, we can develop a salary rule for Federal Tax for Medical Care. Apply the Category as Deduction and enter Code as FTM, as illustrated in the screenshot below.
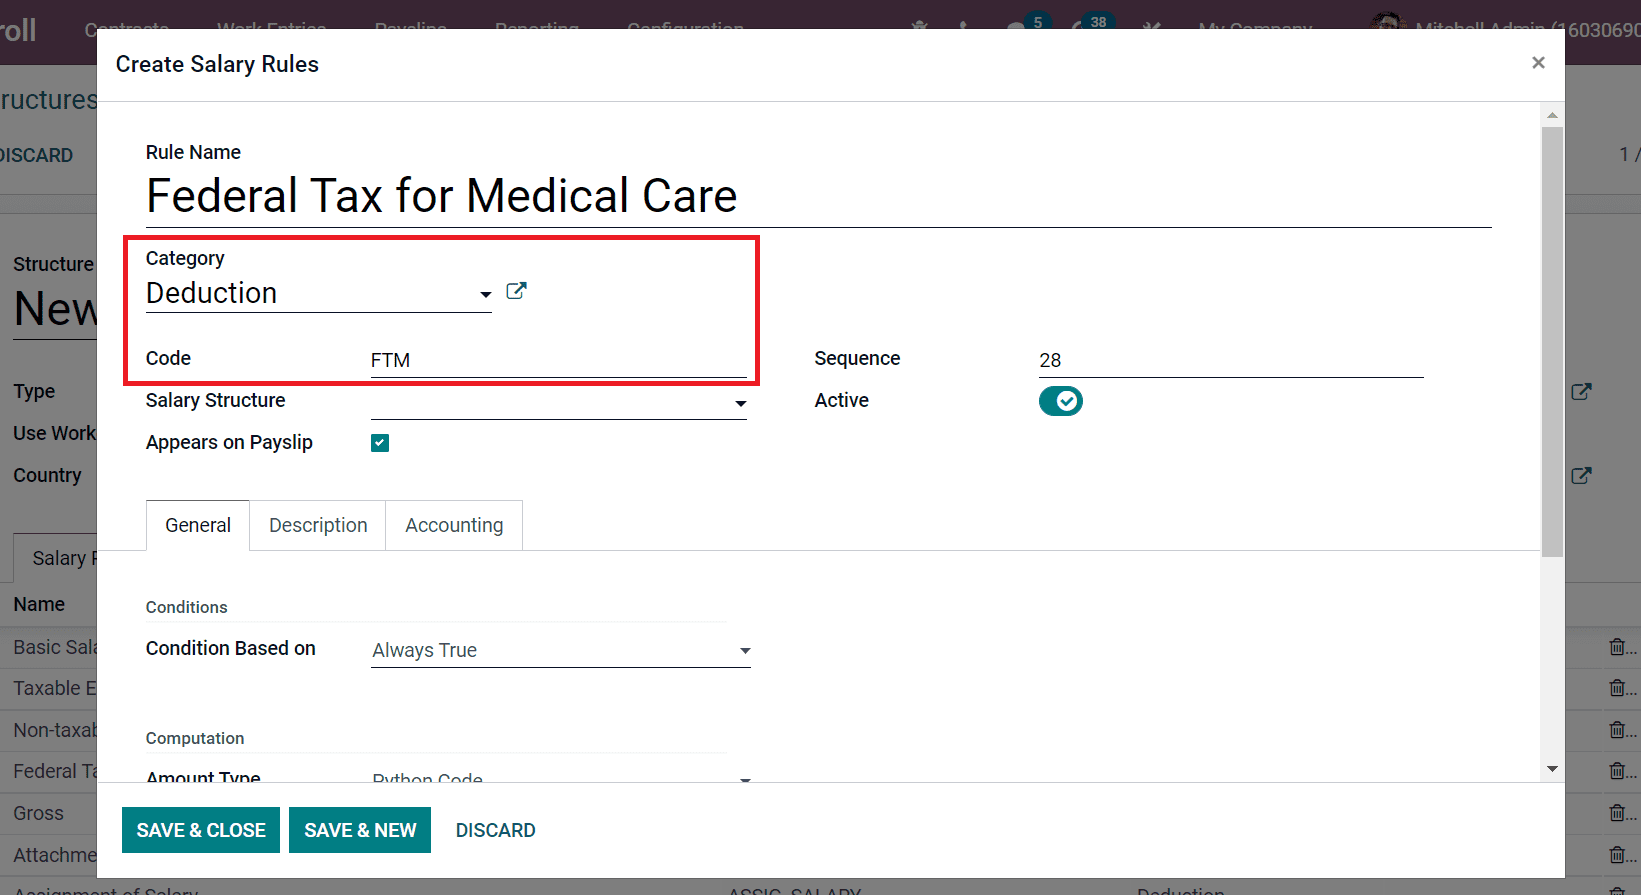
Here, set the Python Expression in Condition Based on the field and apply the rule in the Python Condition field as mentioned in the screenshot below.
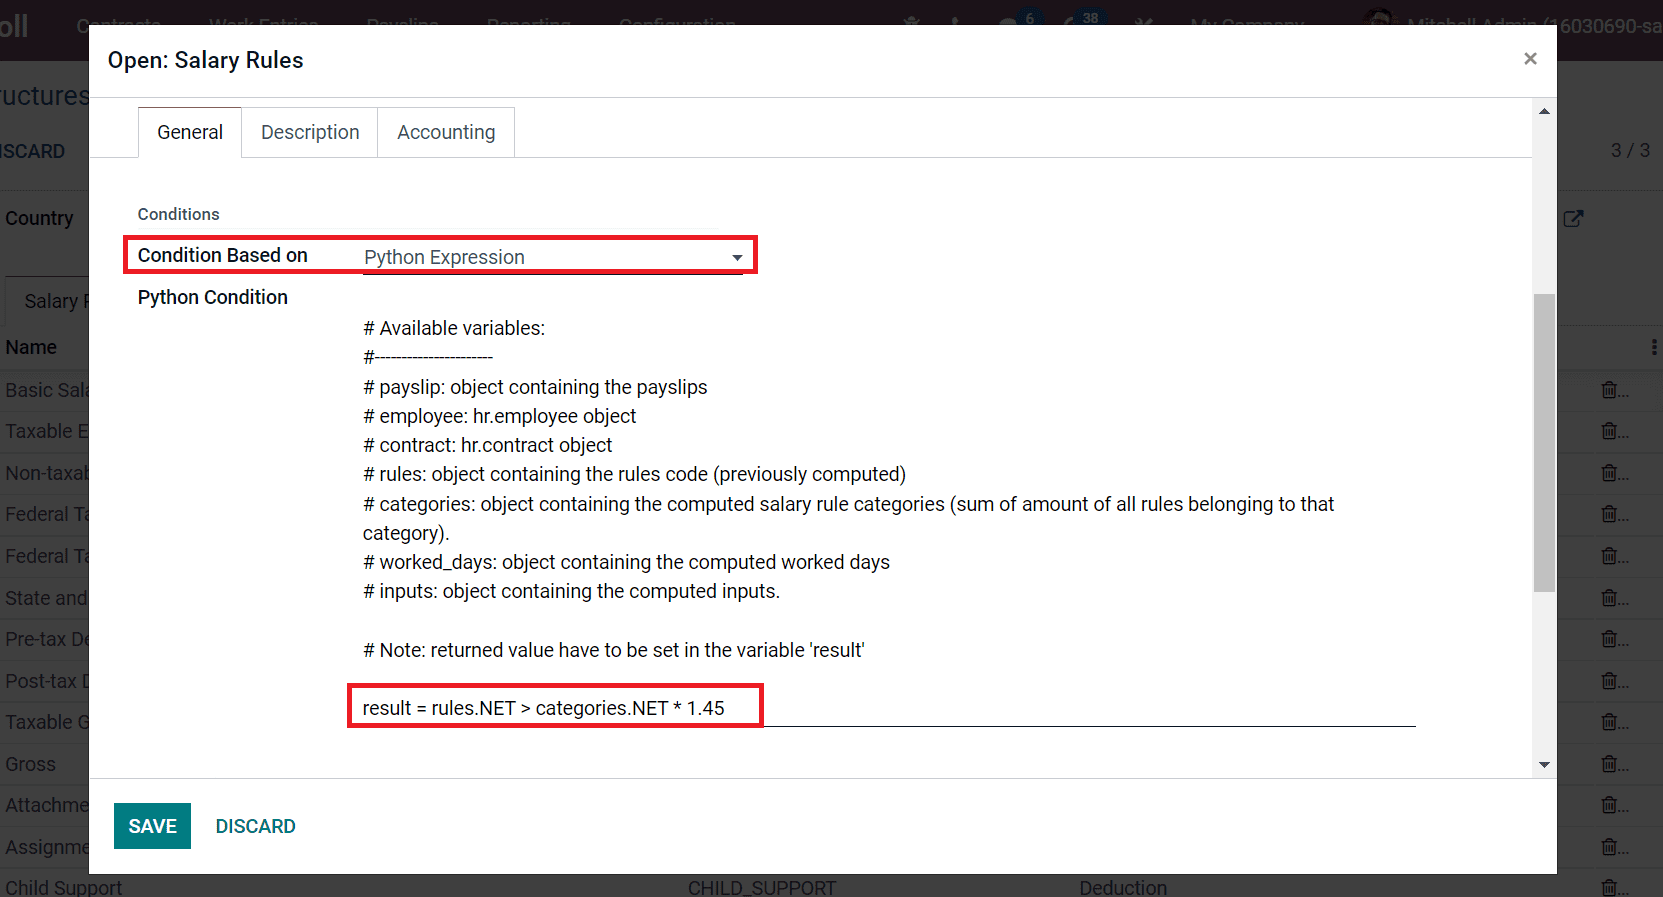
Federal Tax for Medicare is 1.45% provided to employees in the US. You need to mention it inside the python code. Now, we can apply State and Local Taxes inside Rule name and Category as Deductions, as in the screenshot below.
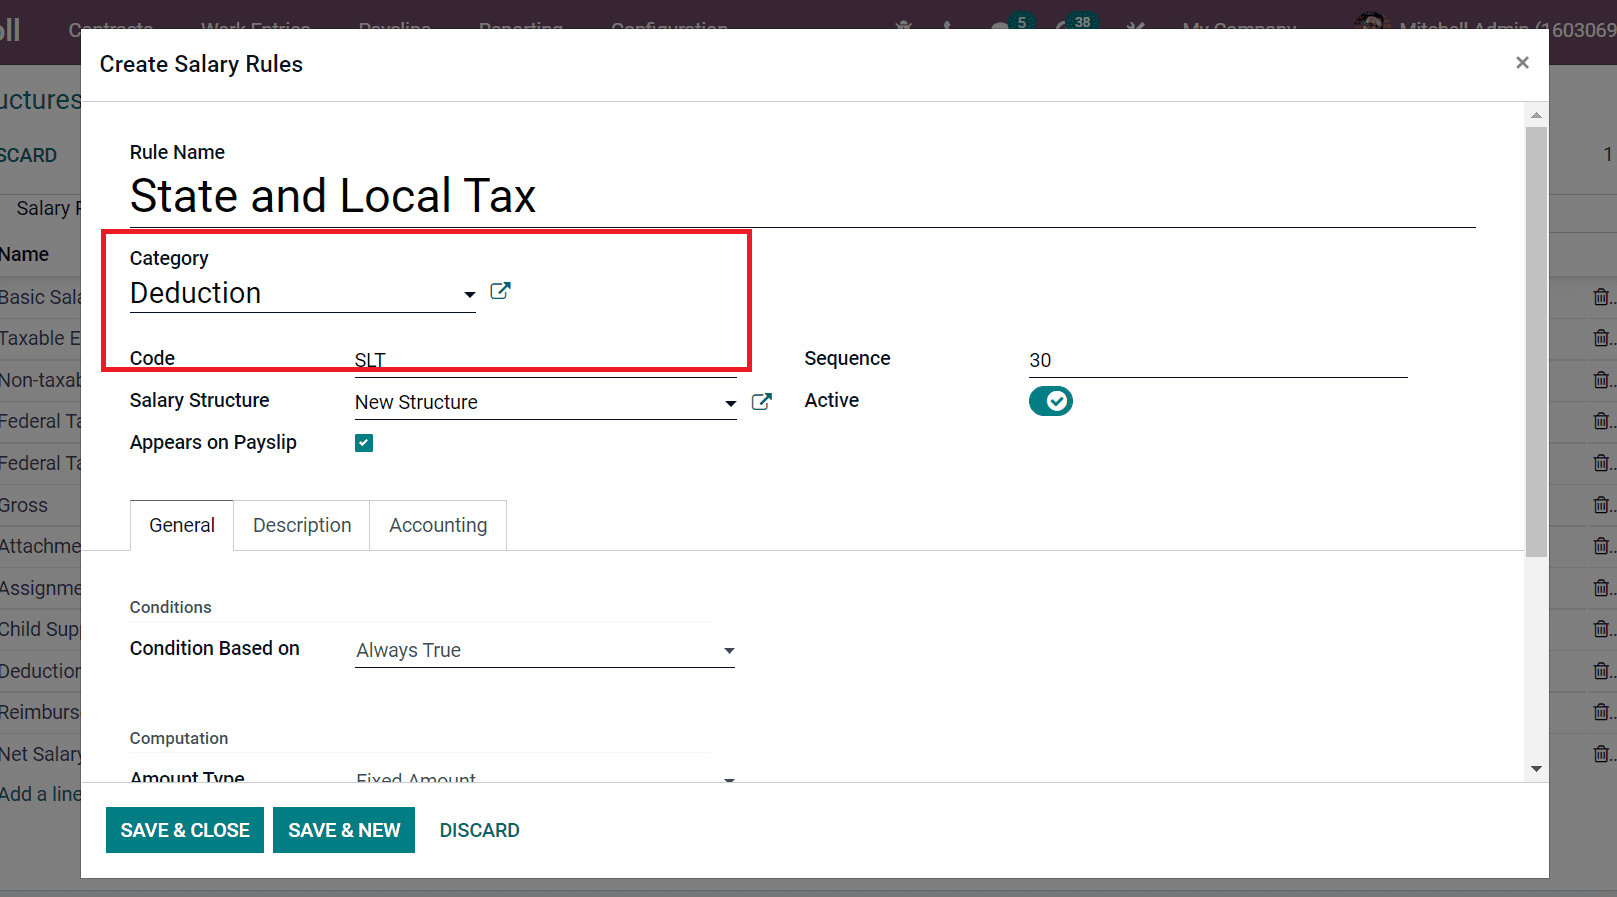
The State and Local Tax varies as per the city of an employee. Here, we set the Fixed Amount in the Amount Type field and enter a value as mentioned in the screenshot below.
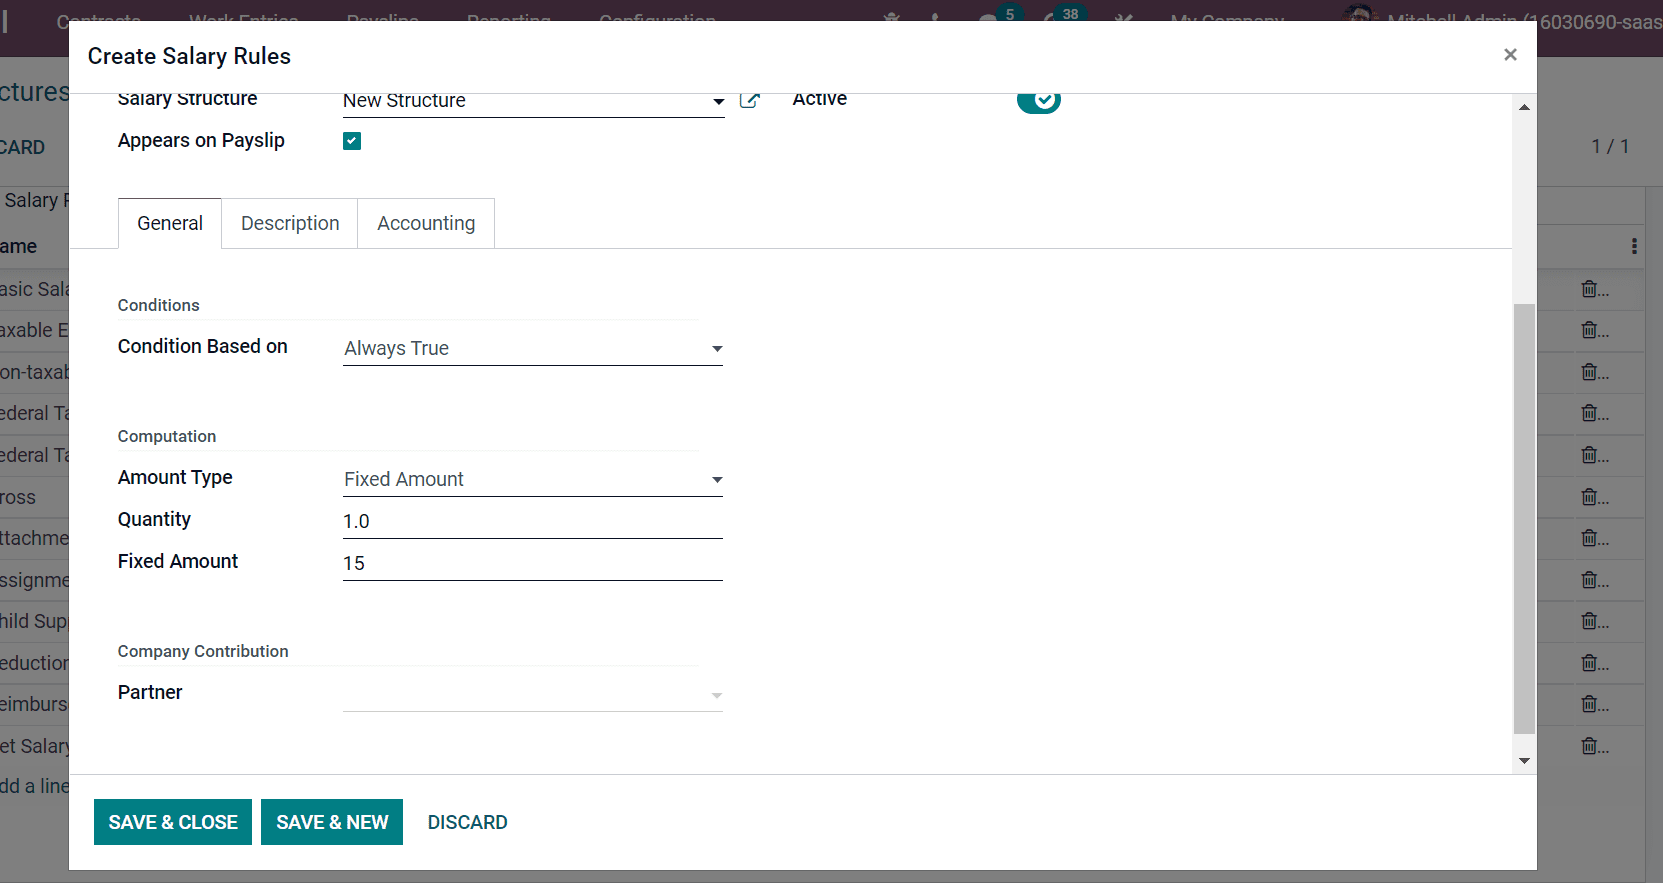
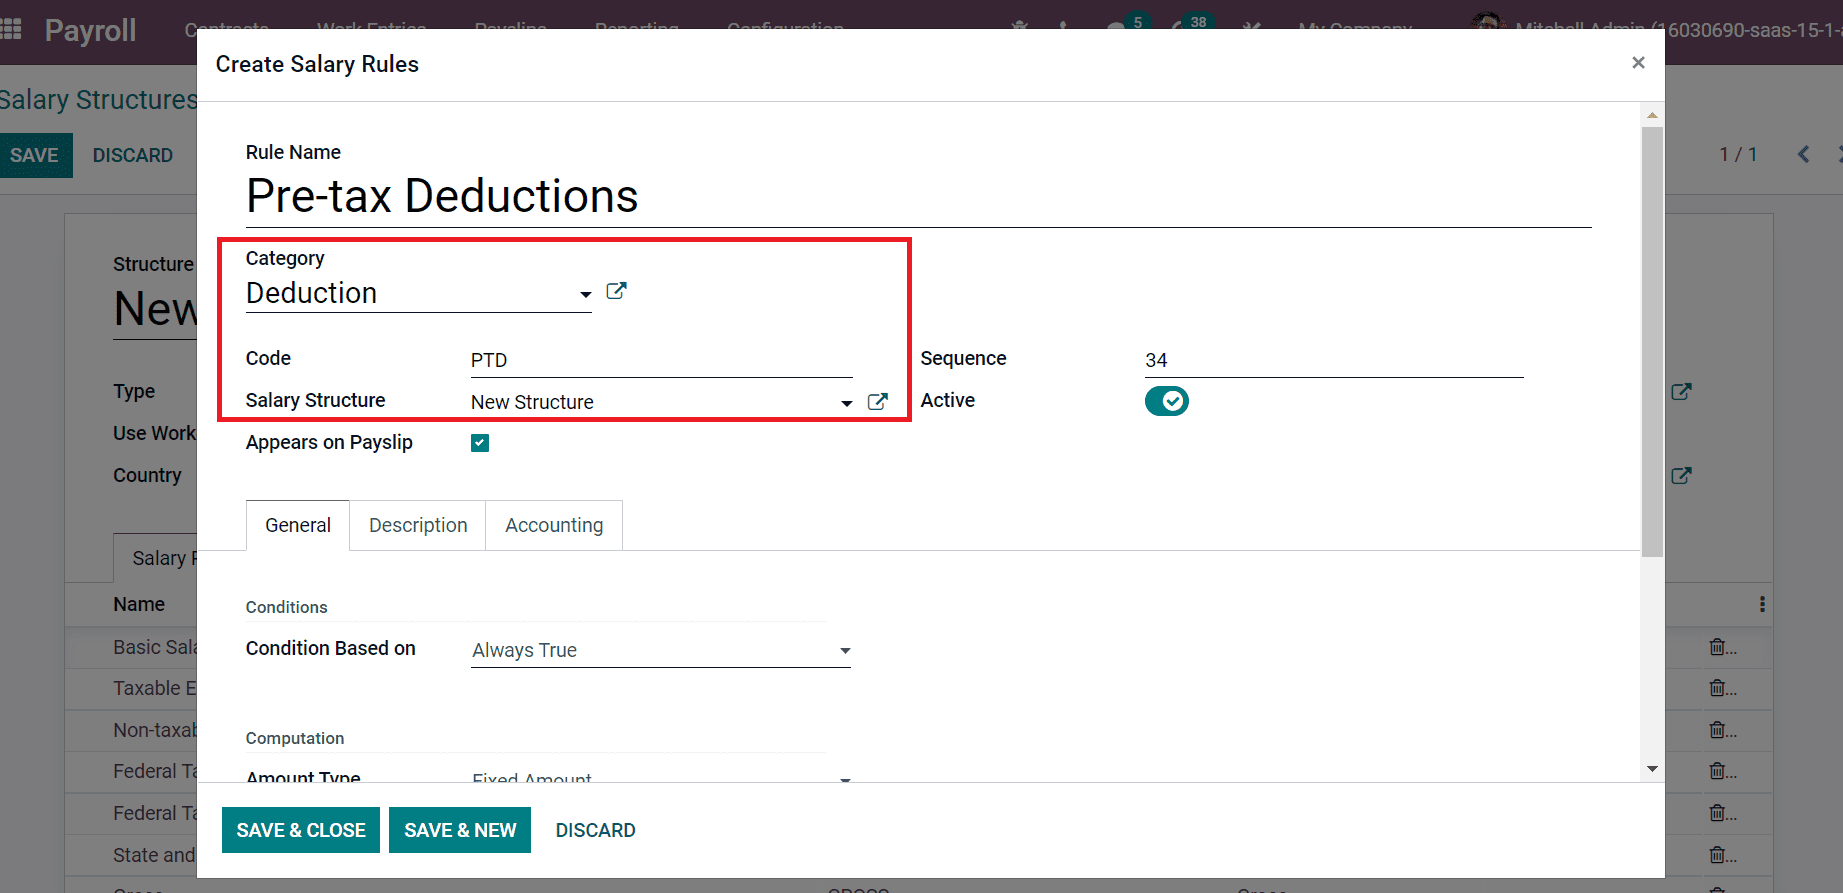
Next, we can enter the employee’s pre-tax and post-tax deductions salary rules in the New Structure window. For that, enter Pre-tax deductions in Rule Name and Deduction as Category. Later, add PTD in the Code field and choose New Structure inside the Salary Structure field, as portrayed in the screenshot below.
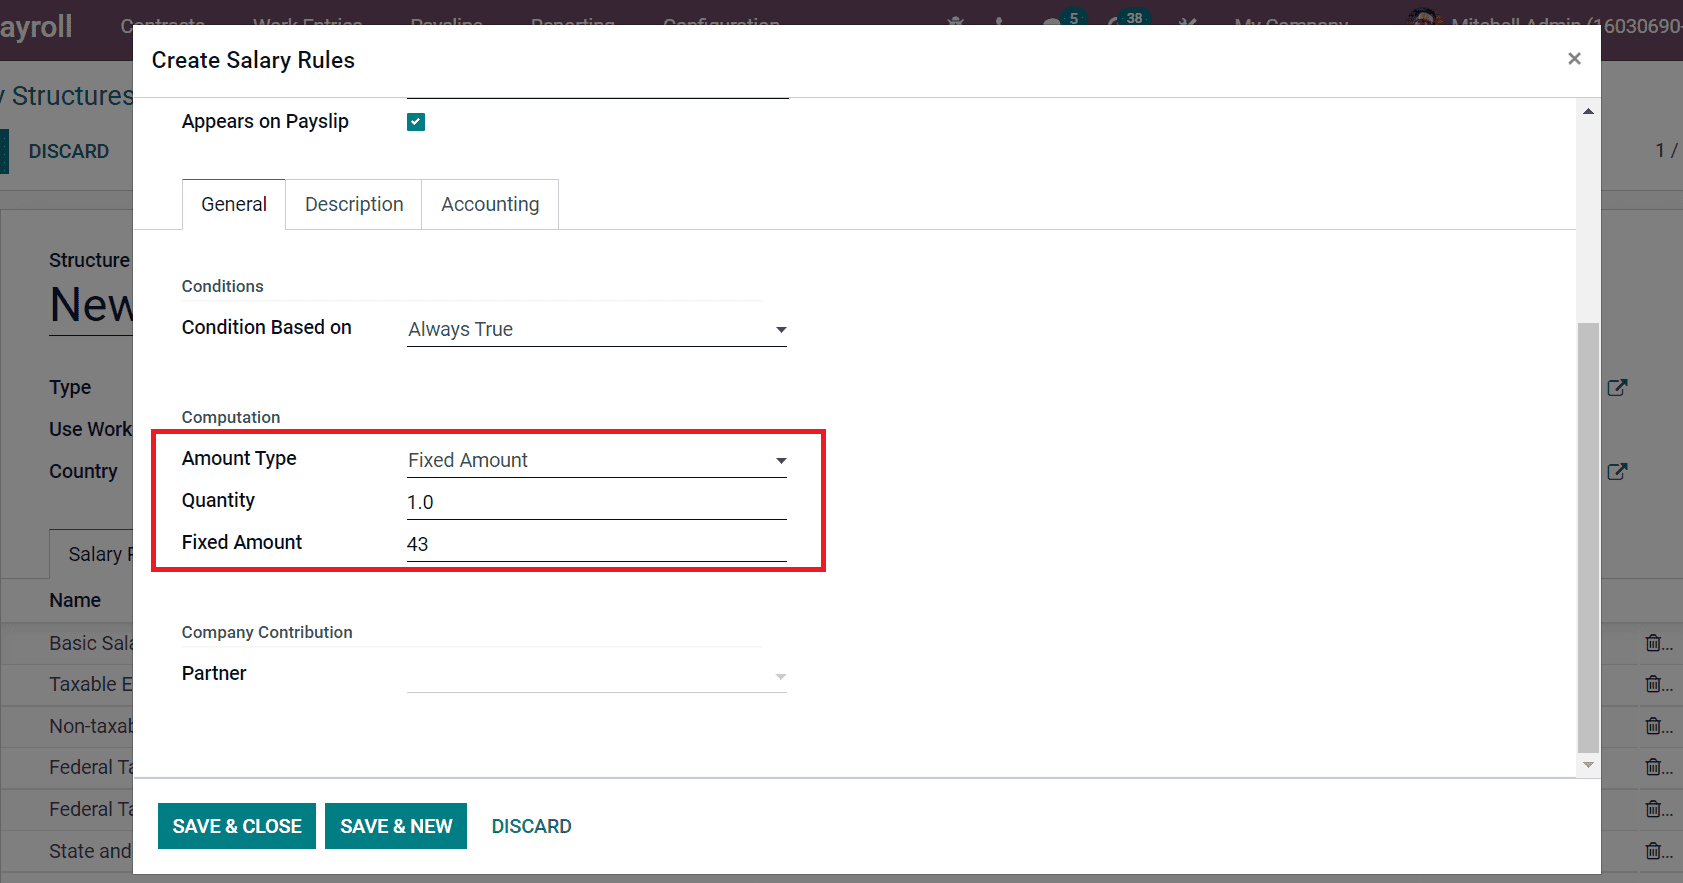
You can select the Amount Type as Fixed below the Computation section. Later, add the Fixed Amount and Quantity as illustrated in the screenshot below.
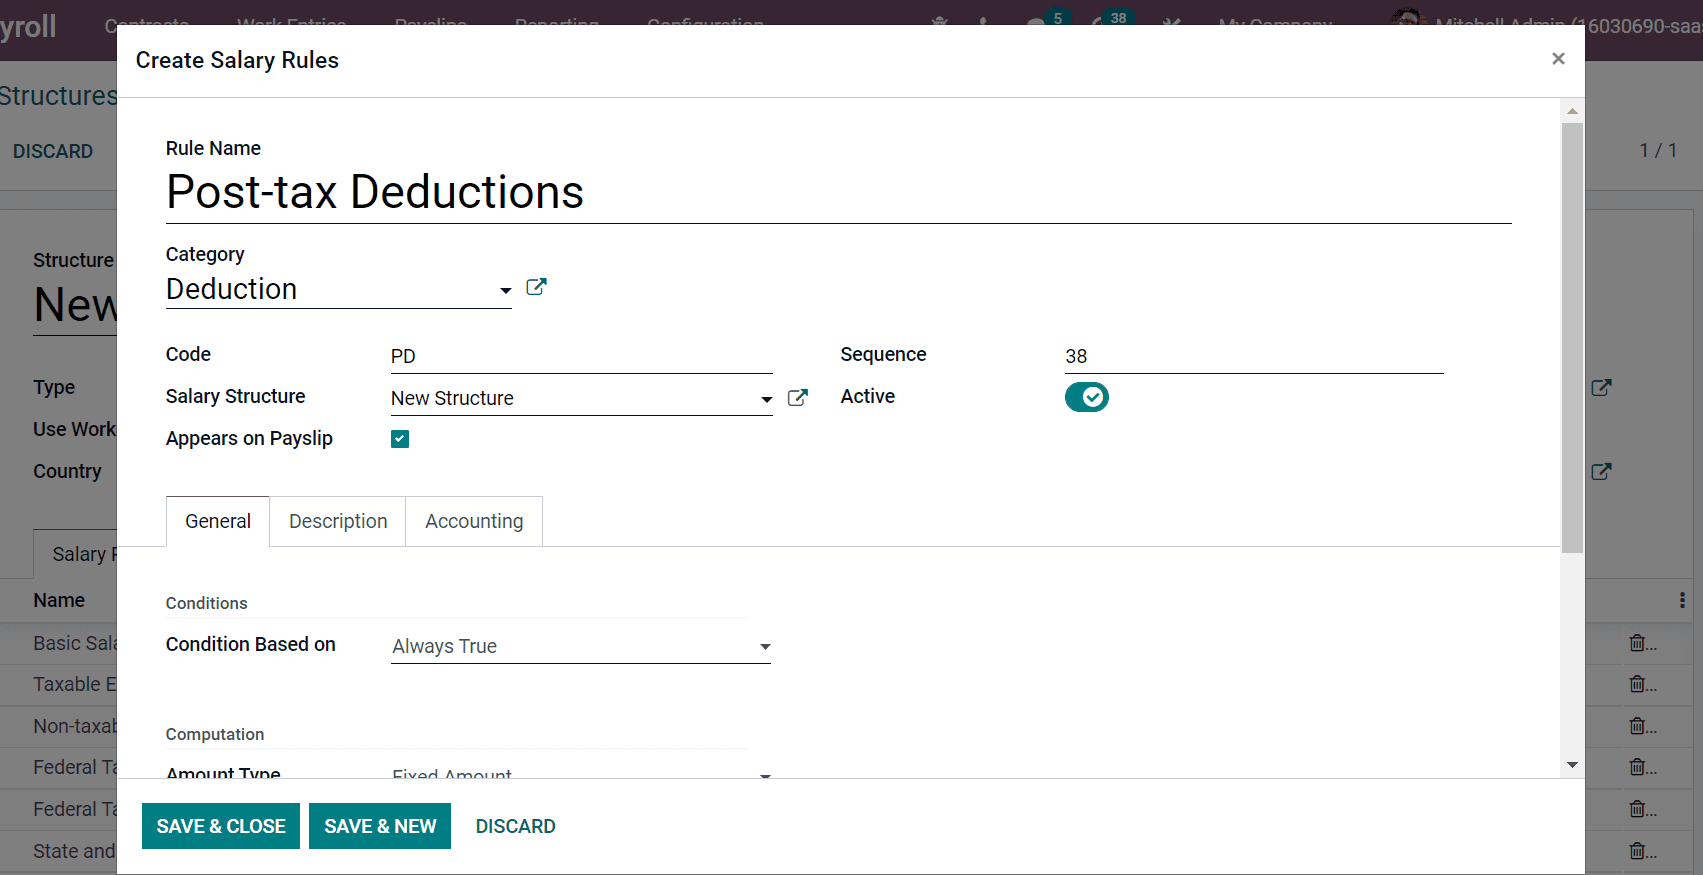
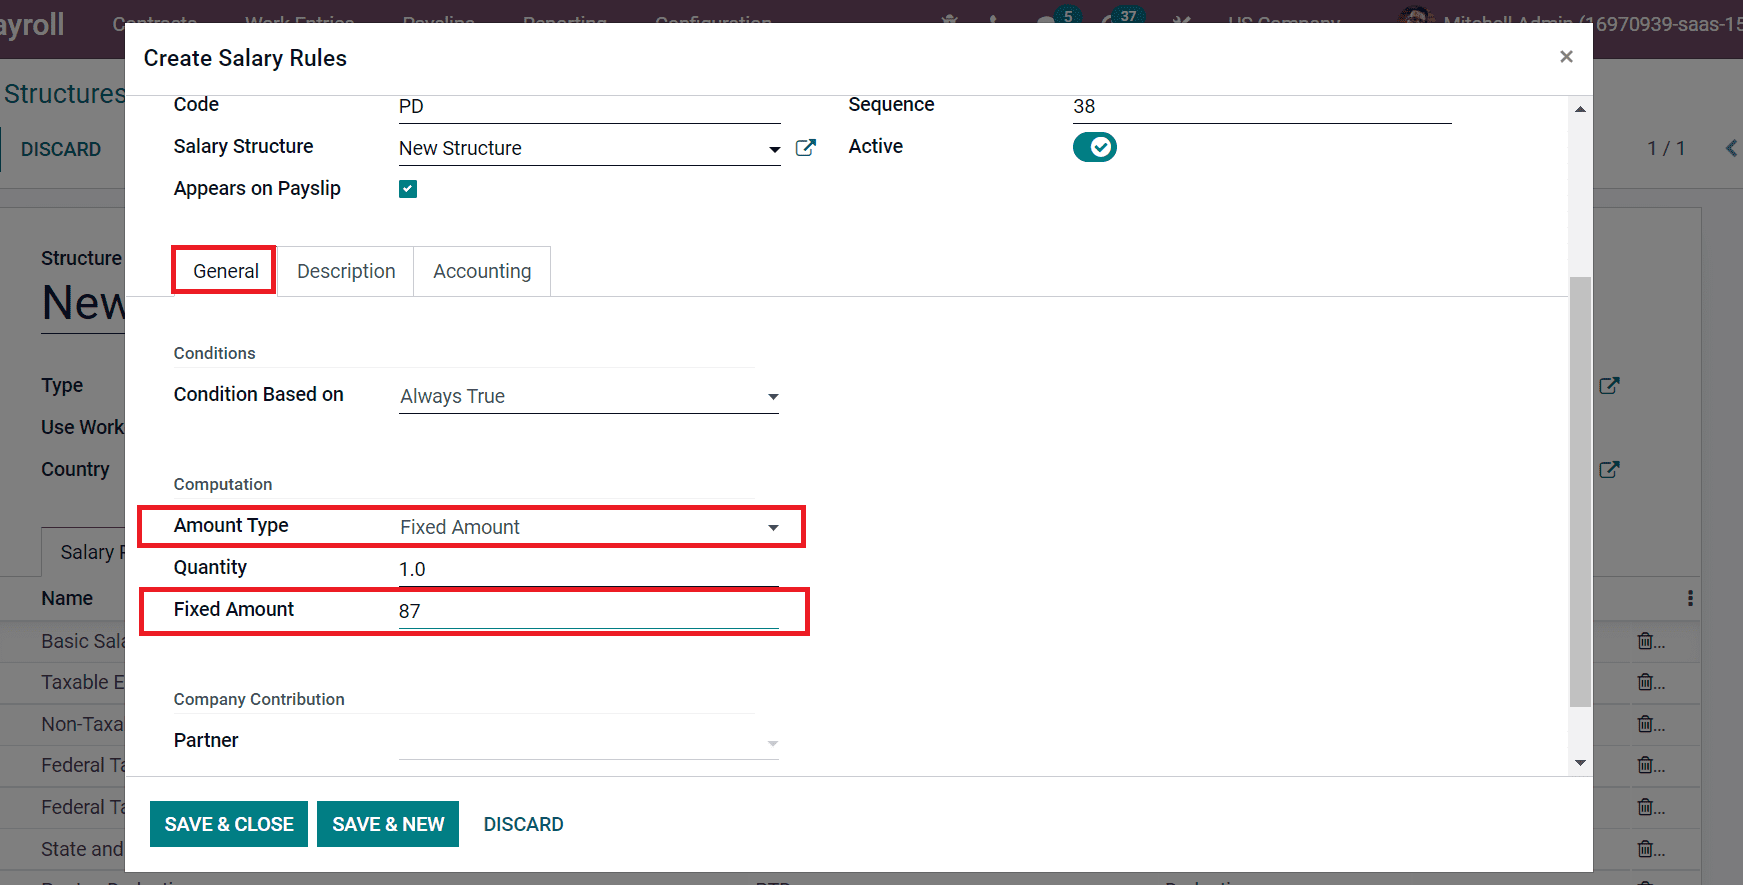
In the same way, you can also generate a salary rule for post-tax deductions. For that, enter Post-tax Deductions inside Rule Name, Code as PD, choose New Structure in Salary Structure field and Sequence, as in the screenshot below.
Below the General tab, select Fixed Amount in the Amount Type field and add the amount $87 in the Fixed Amount field as represented in the screenshot below.
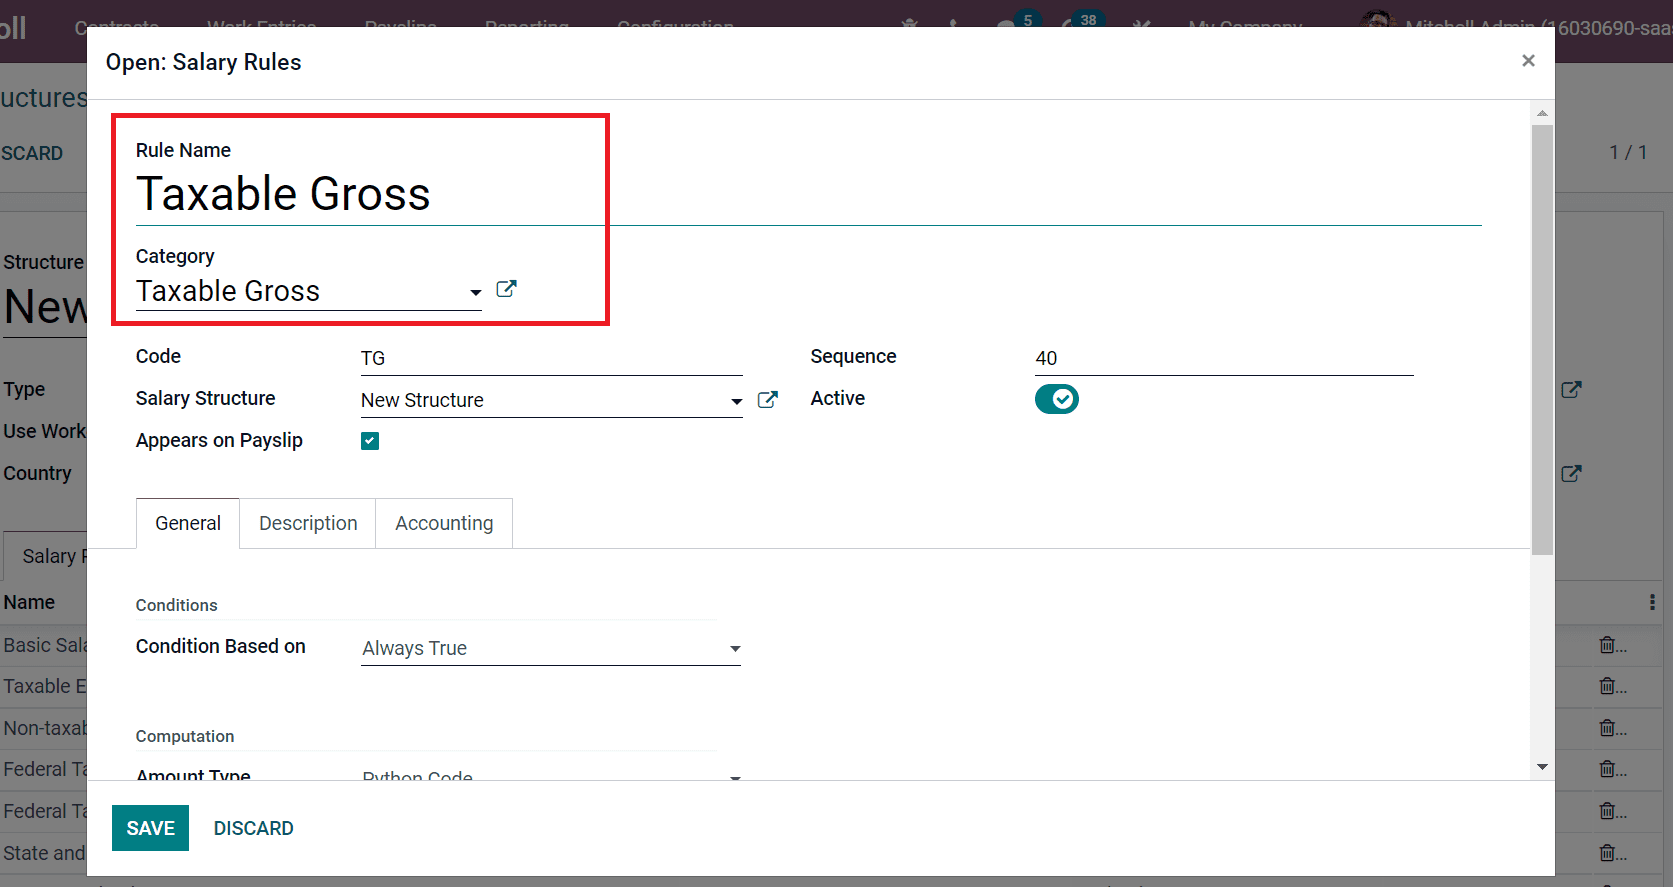
Now, let’s create a salary rule for Taxable Gross in the new window. Apply Category and Rule Name as Taxable Gross as denoted in the screenshot below.
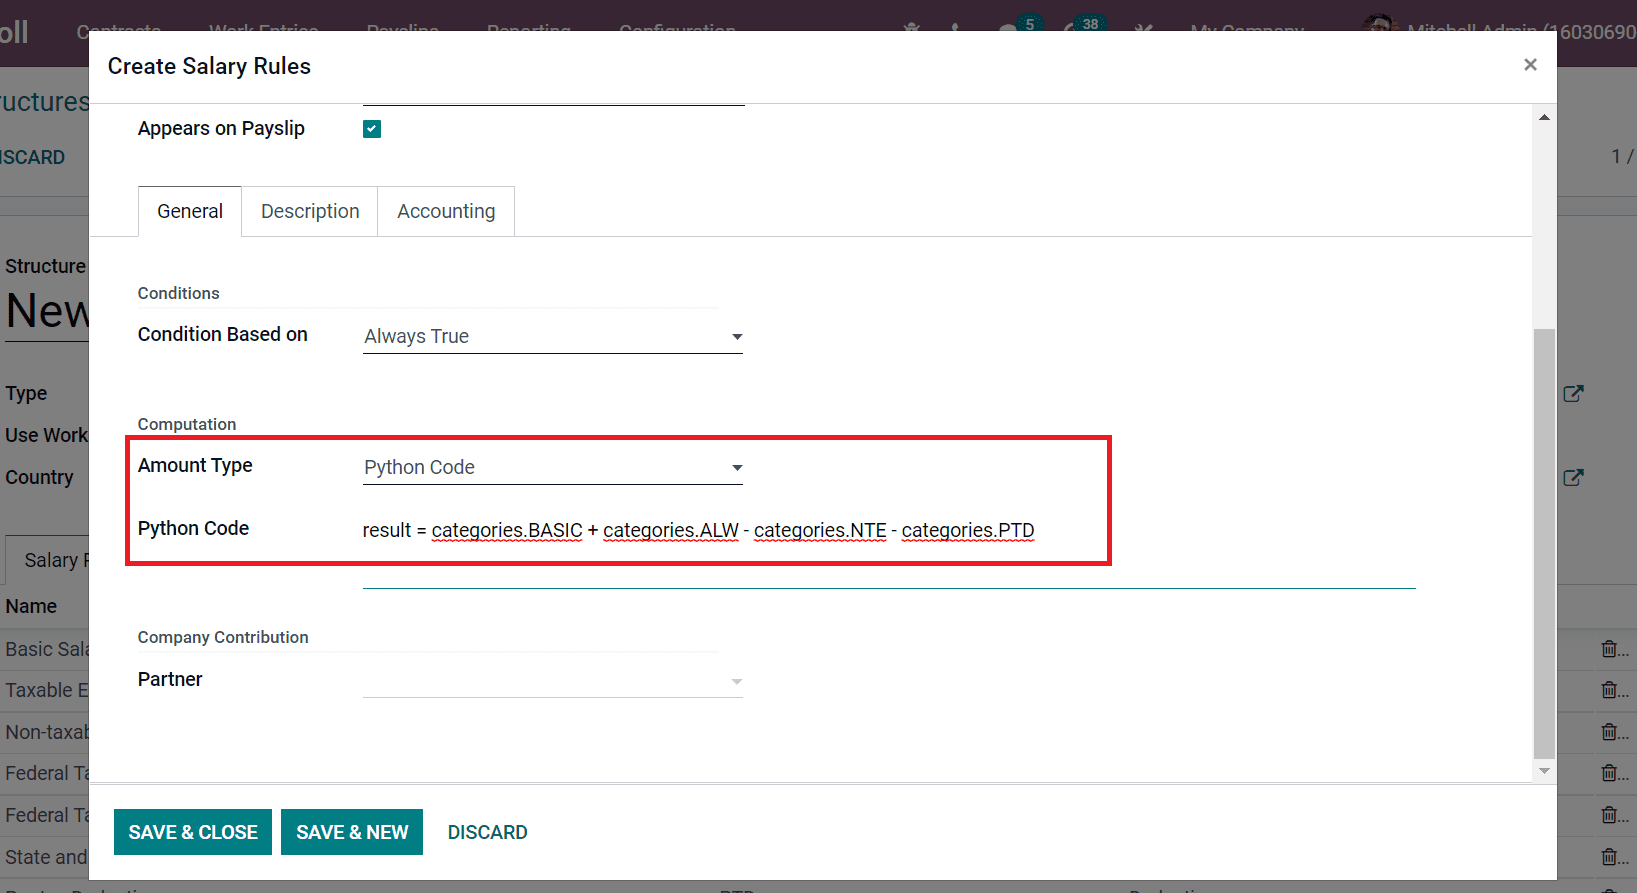
The taxable gross is calculated by subtracting the gross amount from non-taxable earnings and pre-tax deductions. As per these values, we can apply a python code inside the Computation section, as mentioned in the screenshot below.
All these created salary rules for an employee in the US are viewable inside the Salary Rules tab in the New Structure window, as depicted in the screenshot below.
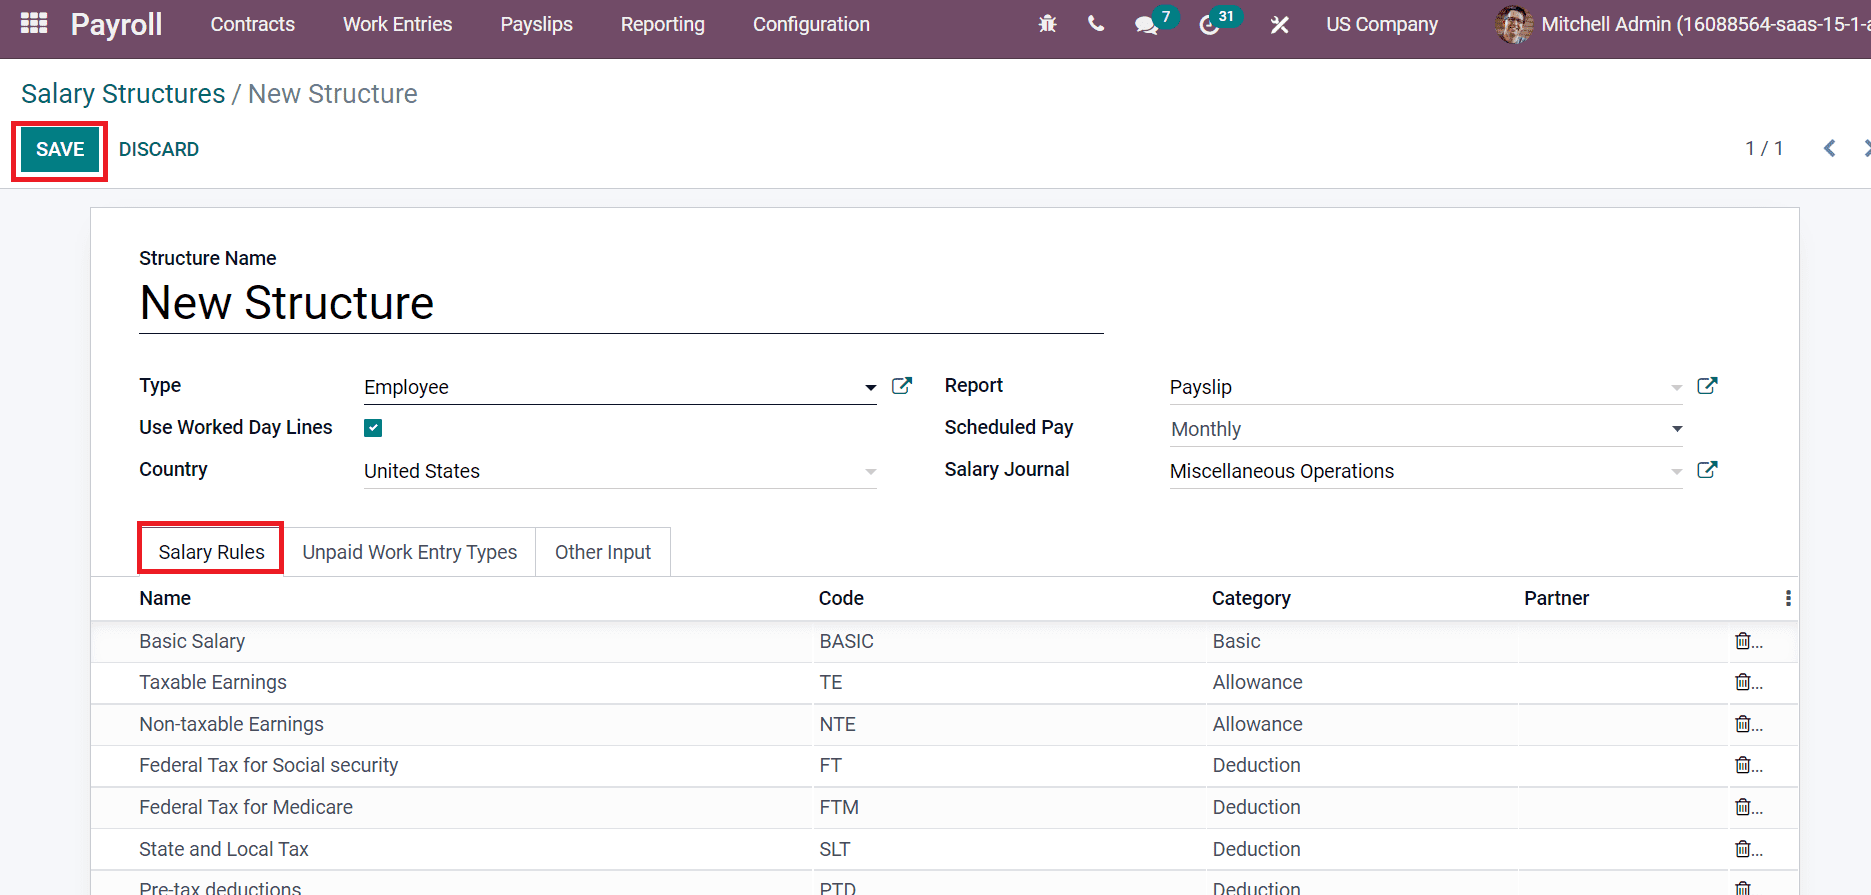
Choose the SAVE icon after applying all salary rules.
How to Apply Salary Attachments for an Employee?
We can add salary attachments for employees by selecting the Salary Attachments menu in the Contracts tab of the Odoo Payroll module. In the Salary Attachment window, add Employee as Mitchell Admin and Advance salary in the Description field, as displayed in the screenshot below.
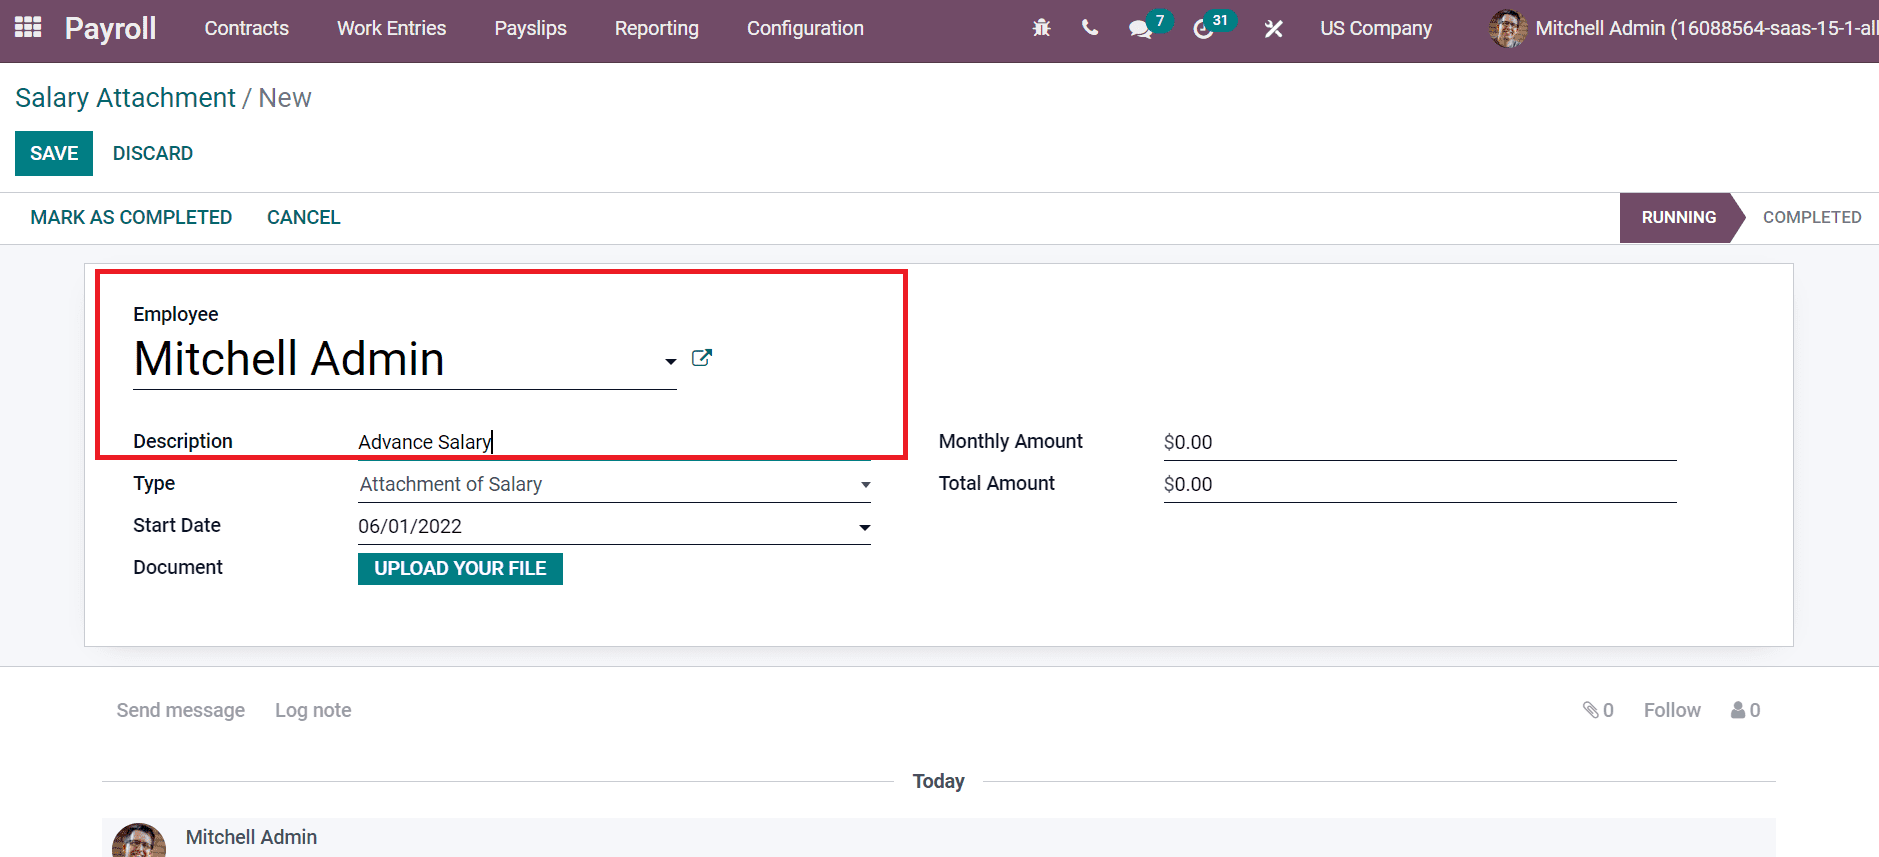
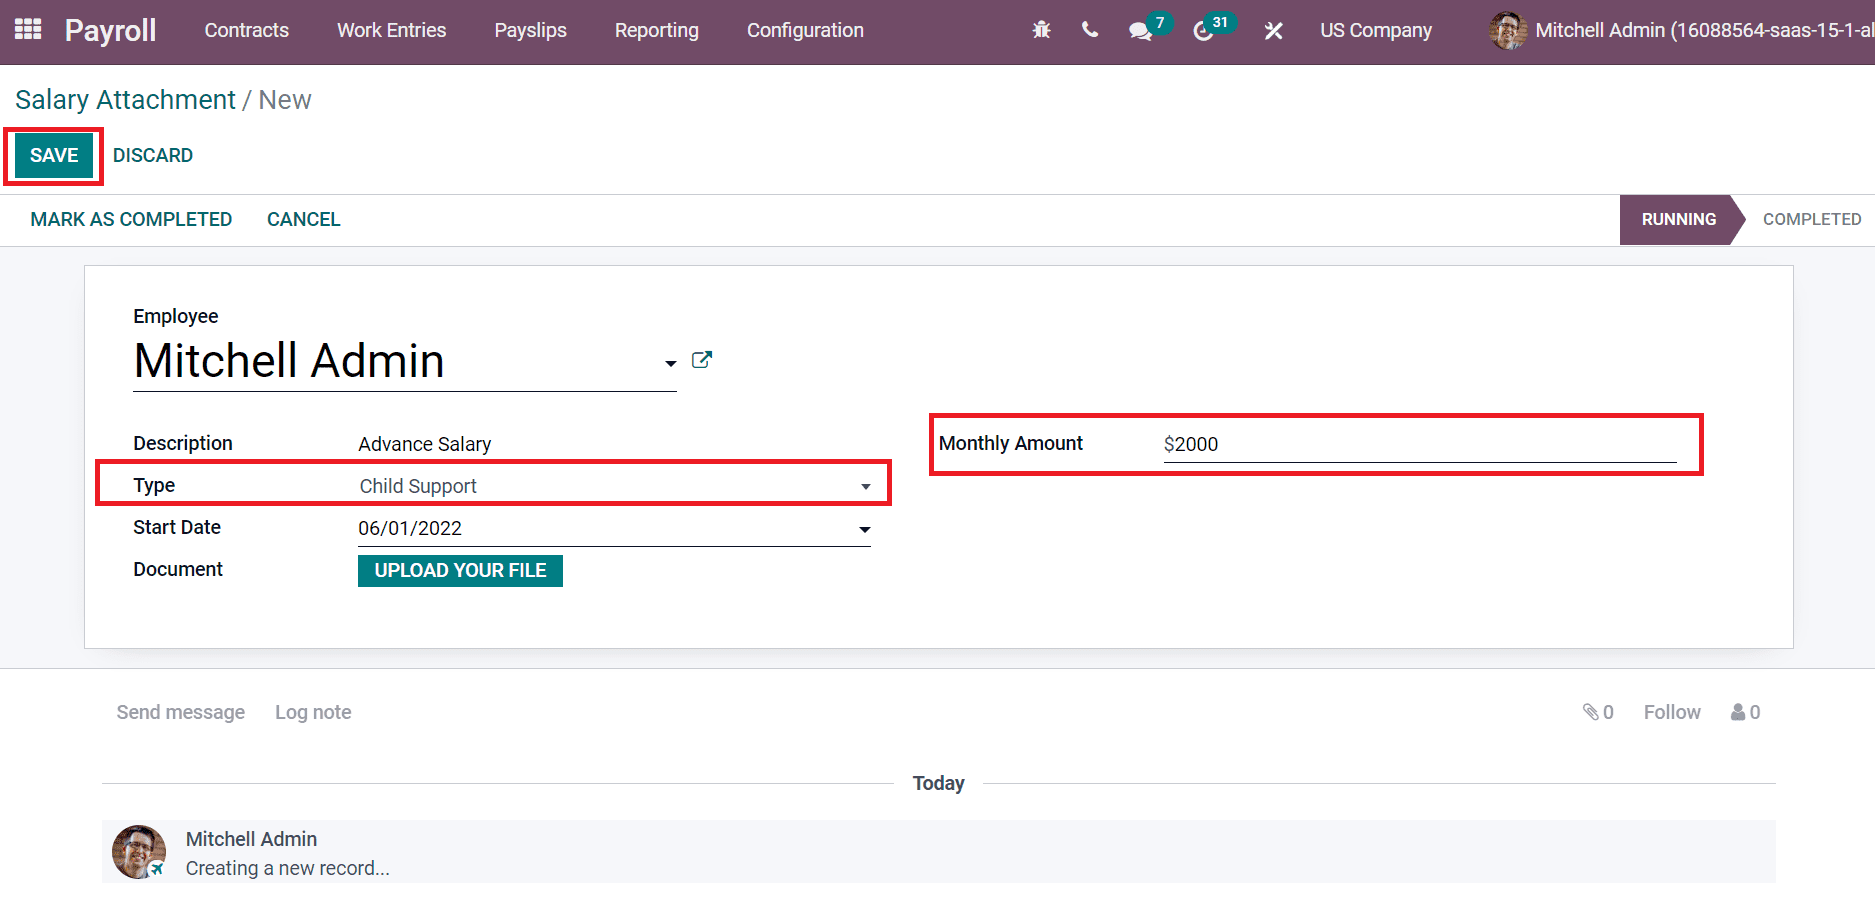
Salary attachment types are three: Child Support, Assignment of Salary, or Attachment of Salary. After choosing the Child Support as Type, a Monthly Account field is viewable before you. Enter your amount in the Monthly Account field and click on the SAVE icon, as mentioned in the screenshot below.
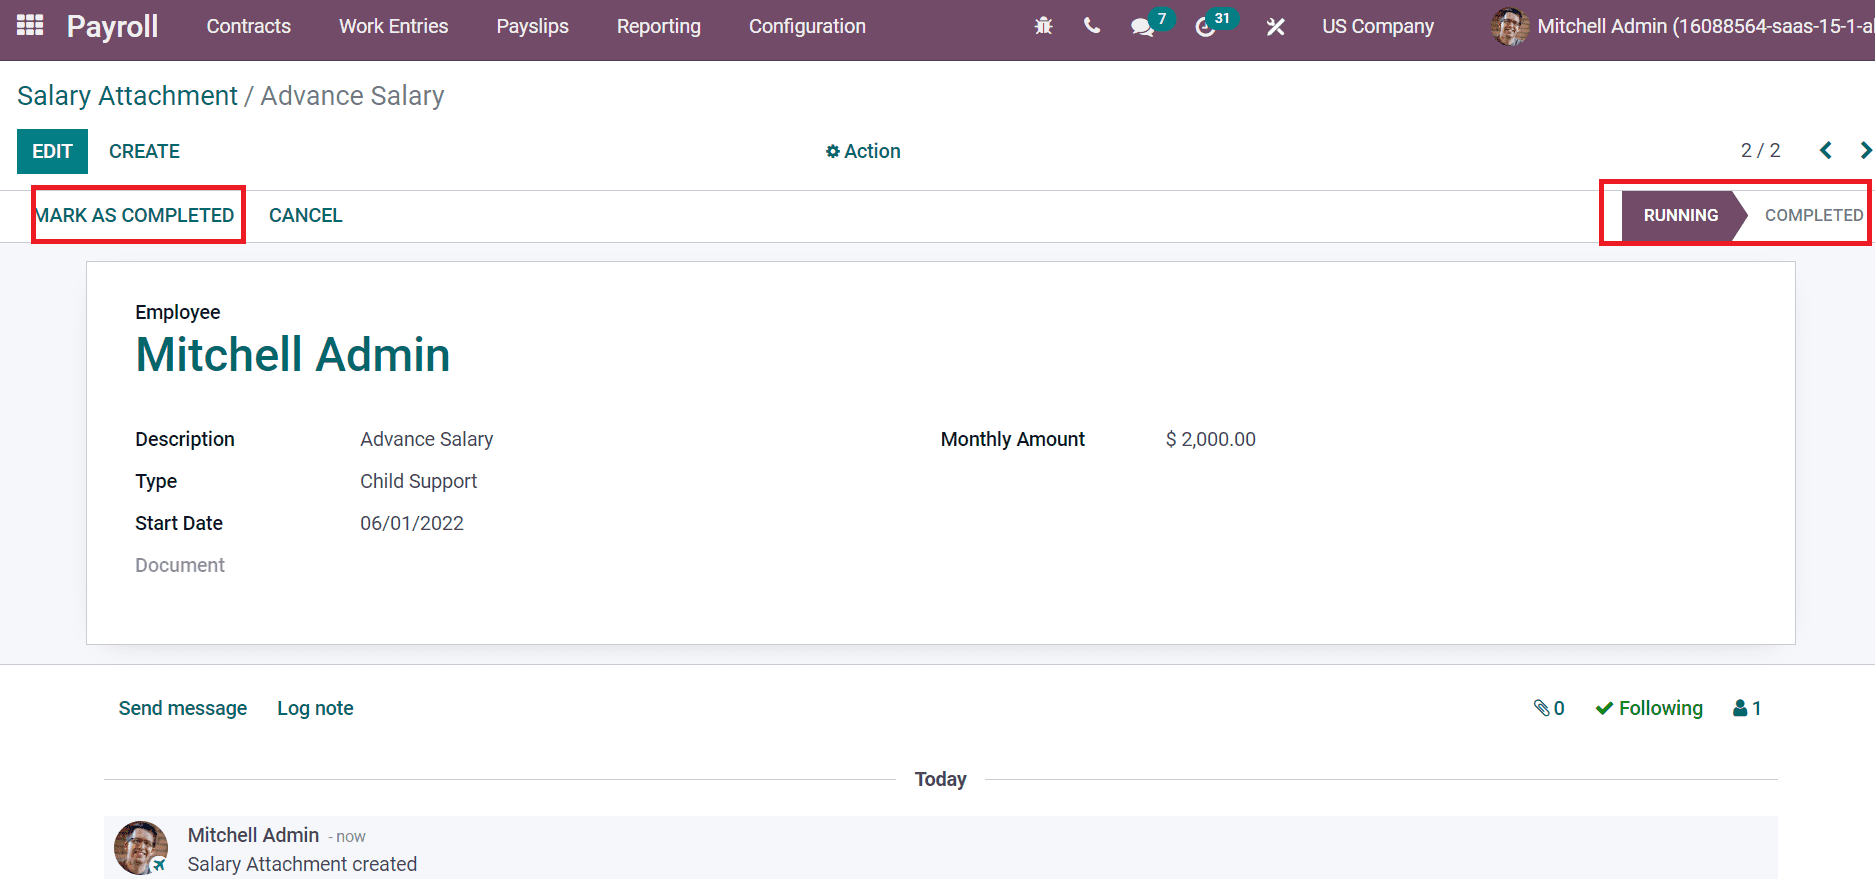
We can see that process is running for the employee Mitchell admin. After a few months, you can also complete the process by clicking on MARK AS COMPLETED icon as represented in the screenshot below.
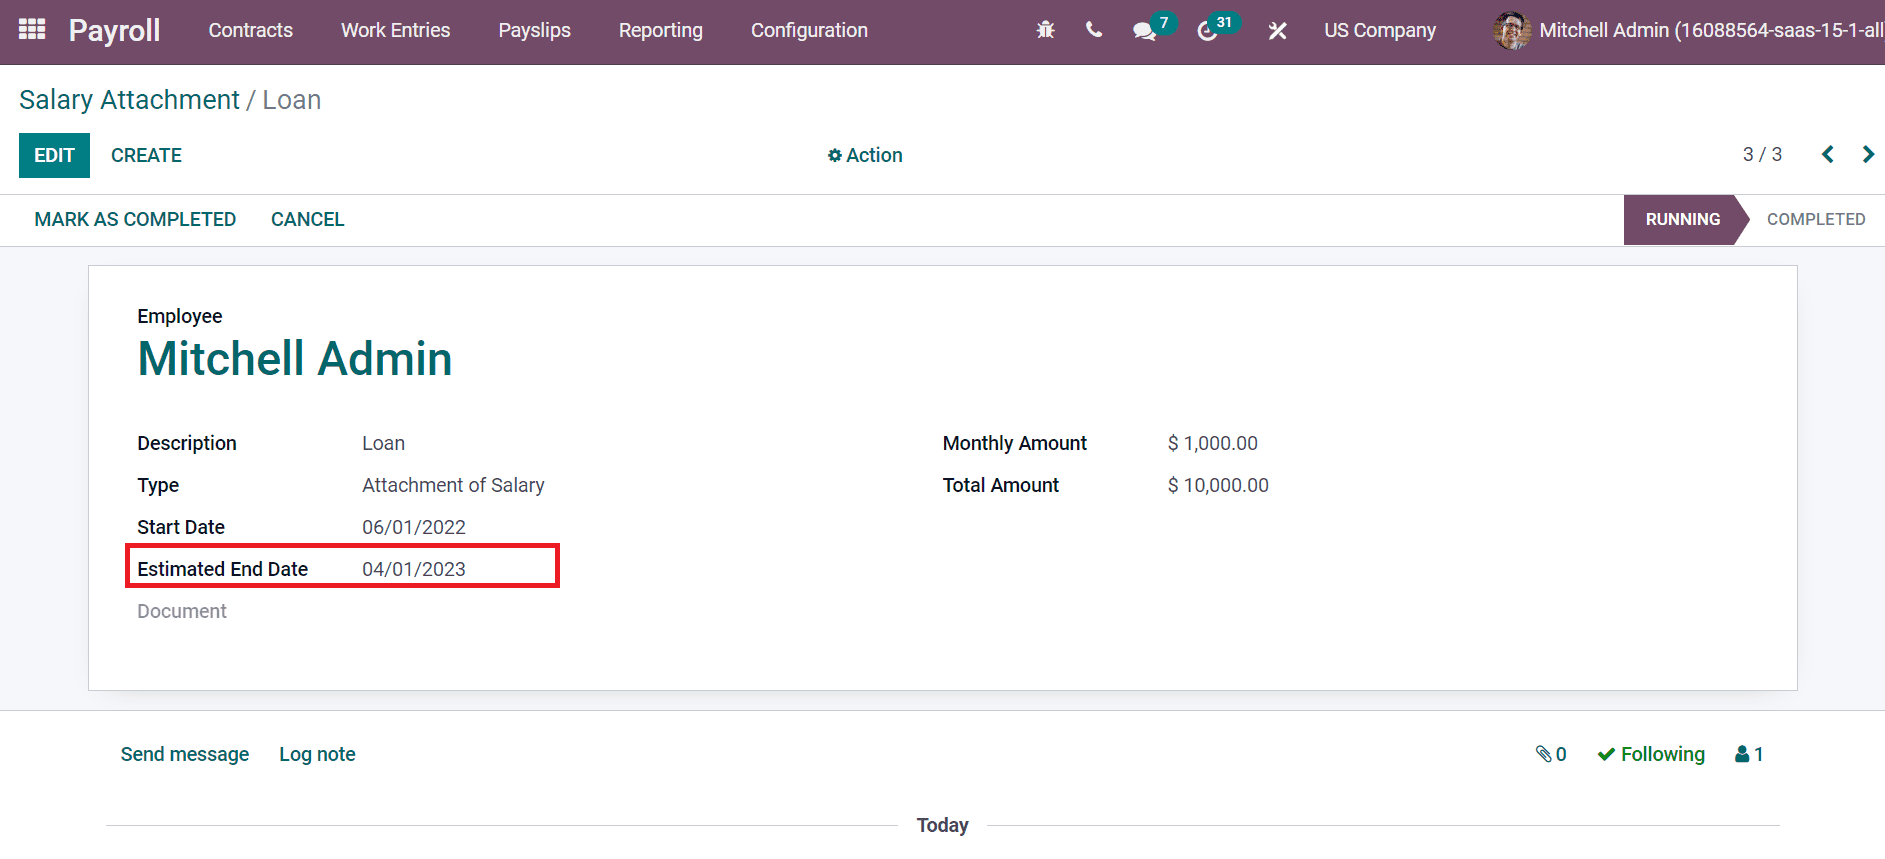
In the case of a loan for an employee, you can change the Type to Attachment of Salary or Assignment of Salary. Add the Description as Loan, and choose Attachment of Salary inside the Type section. After selecting the Attachment of Salary, you can add the amount in Monthly Amount and Total Amount as specified in the screenshot below.
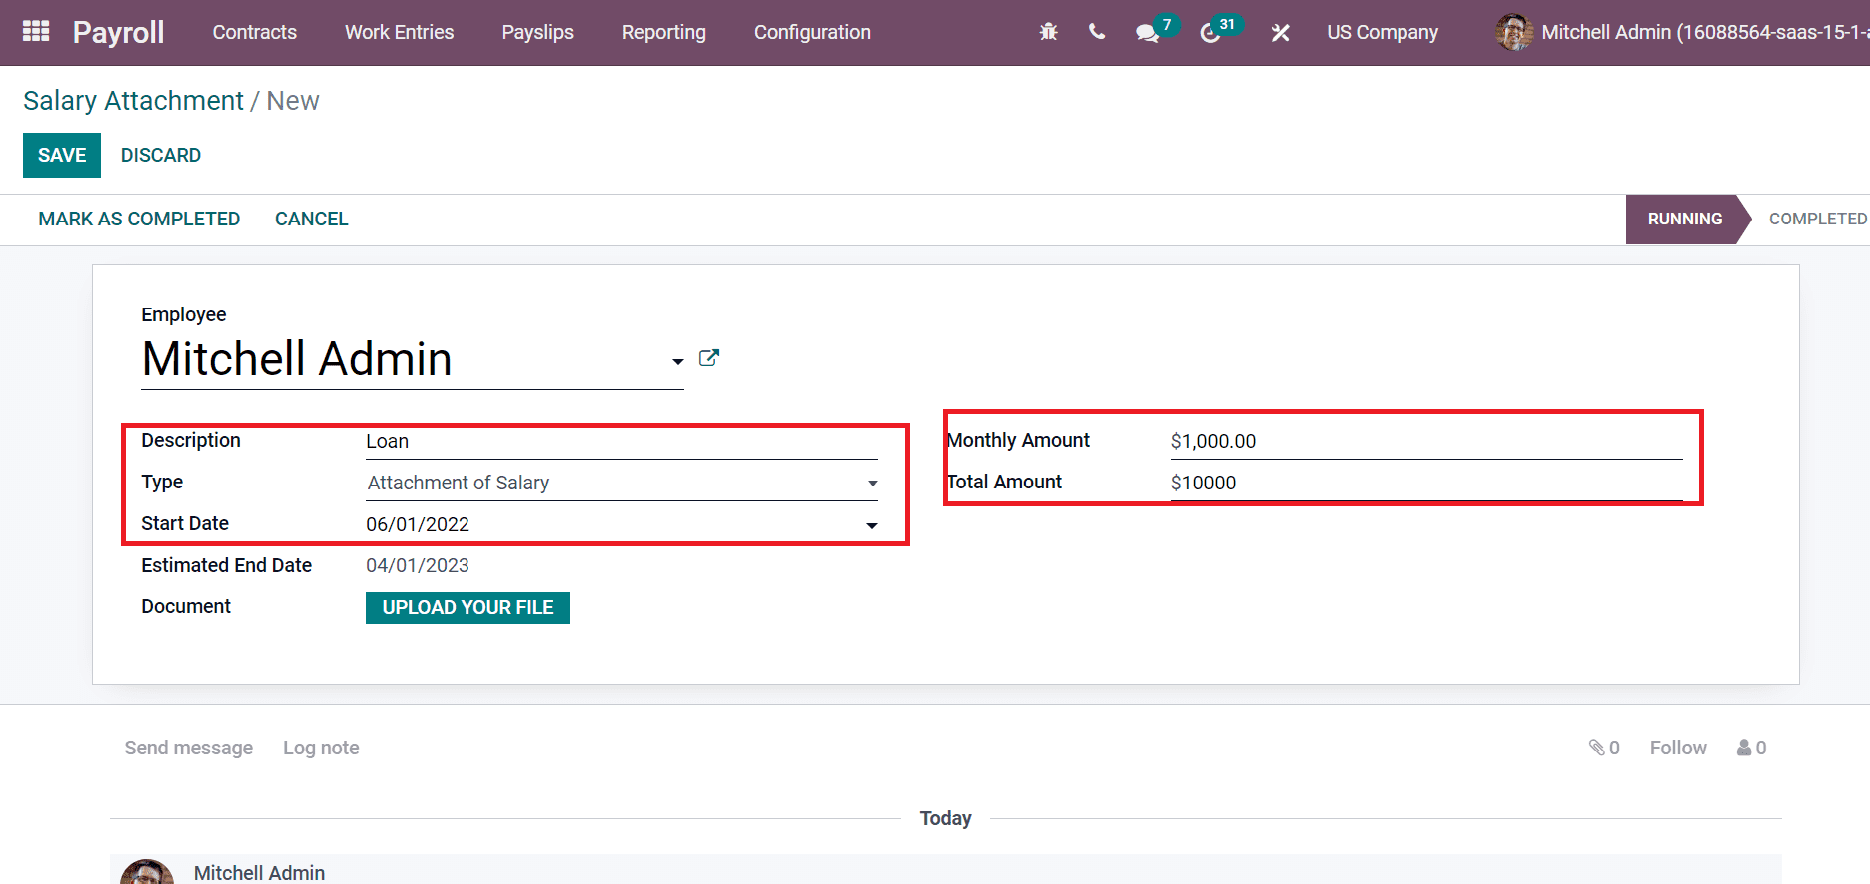
Based on the total amount, the Estimated End Date for a loan to the employee is viewable before you, as in the screenshot below.
To Generate a Payslip for Employees with Odoo 15
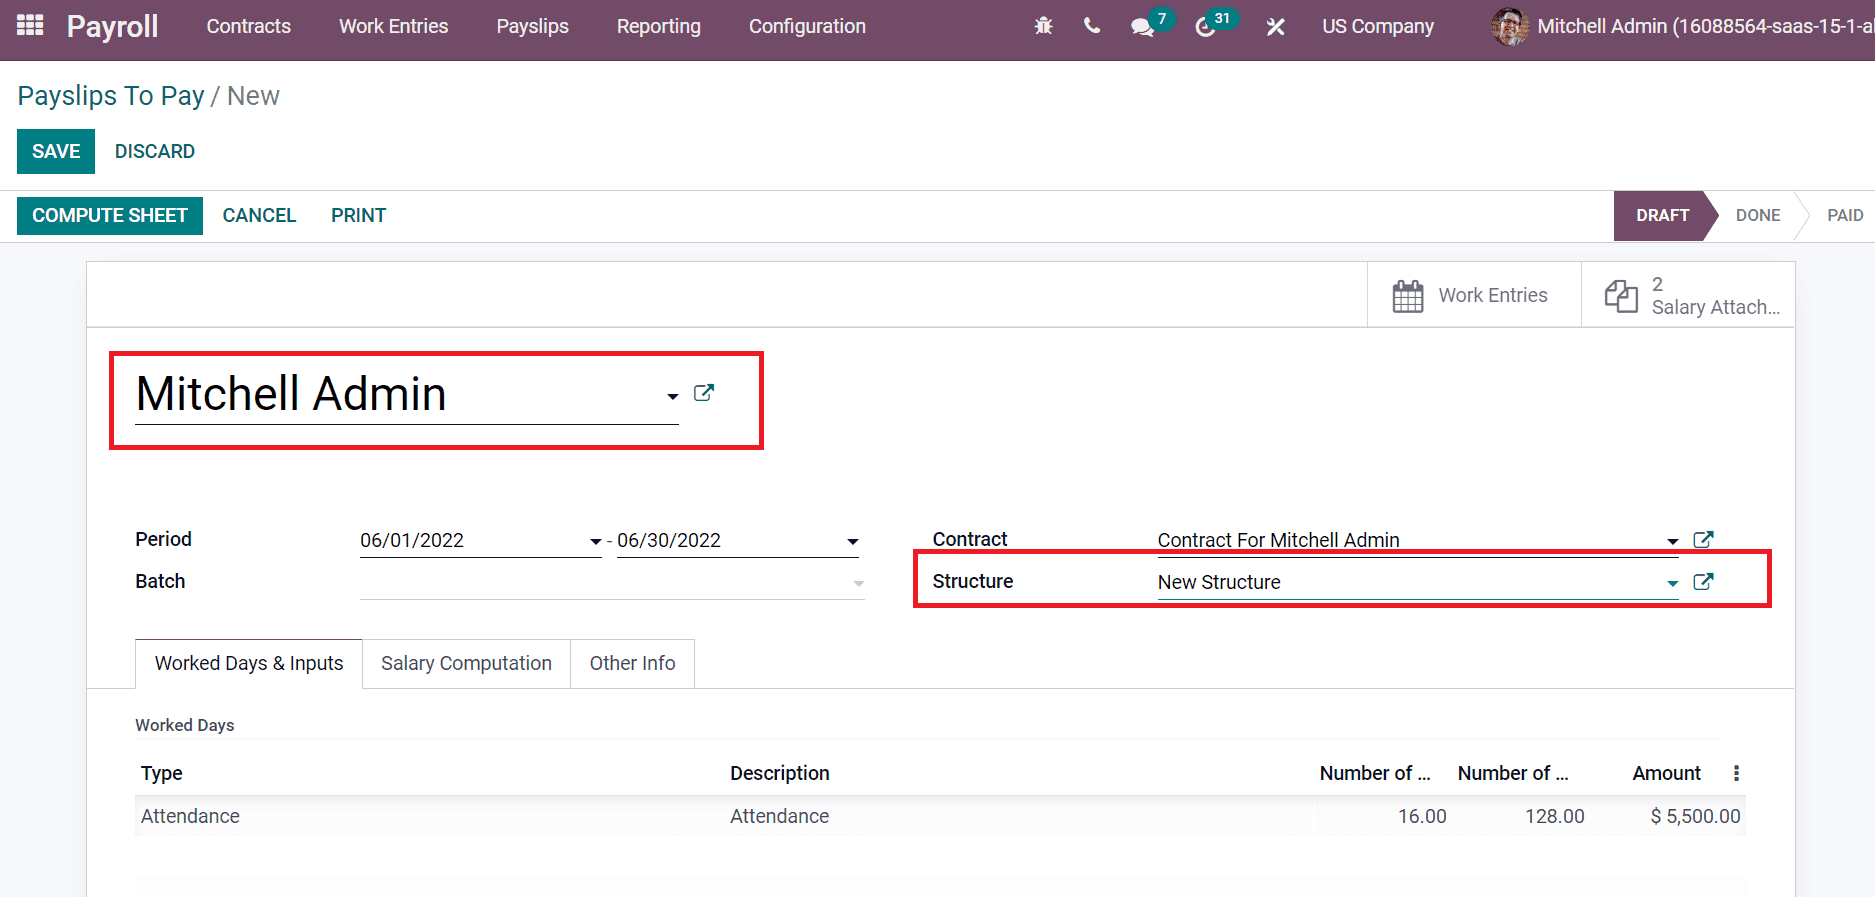
We can constitute a payslip for Mitchell Admin by selecting the To Pay menu inside the Payslips tab. In the new Payslip window, add the Employee name as ‘Mitchell Admin’ and choose New Structure inside the Structure field, denoted in the screenshot below.
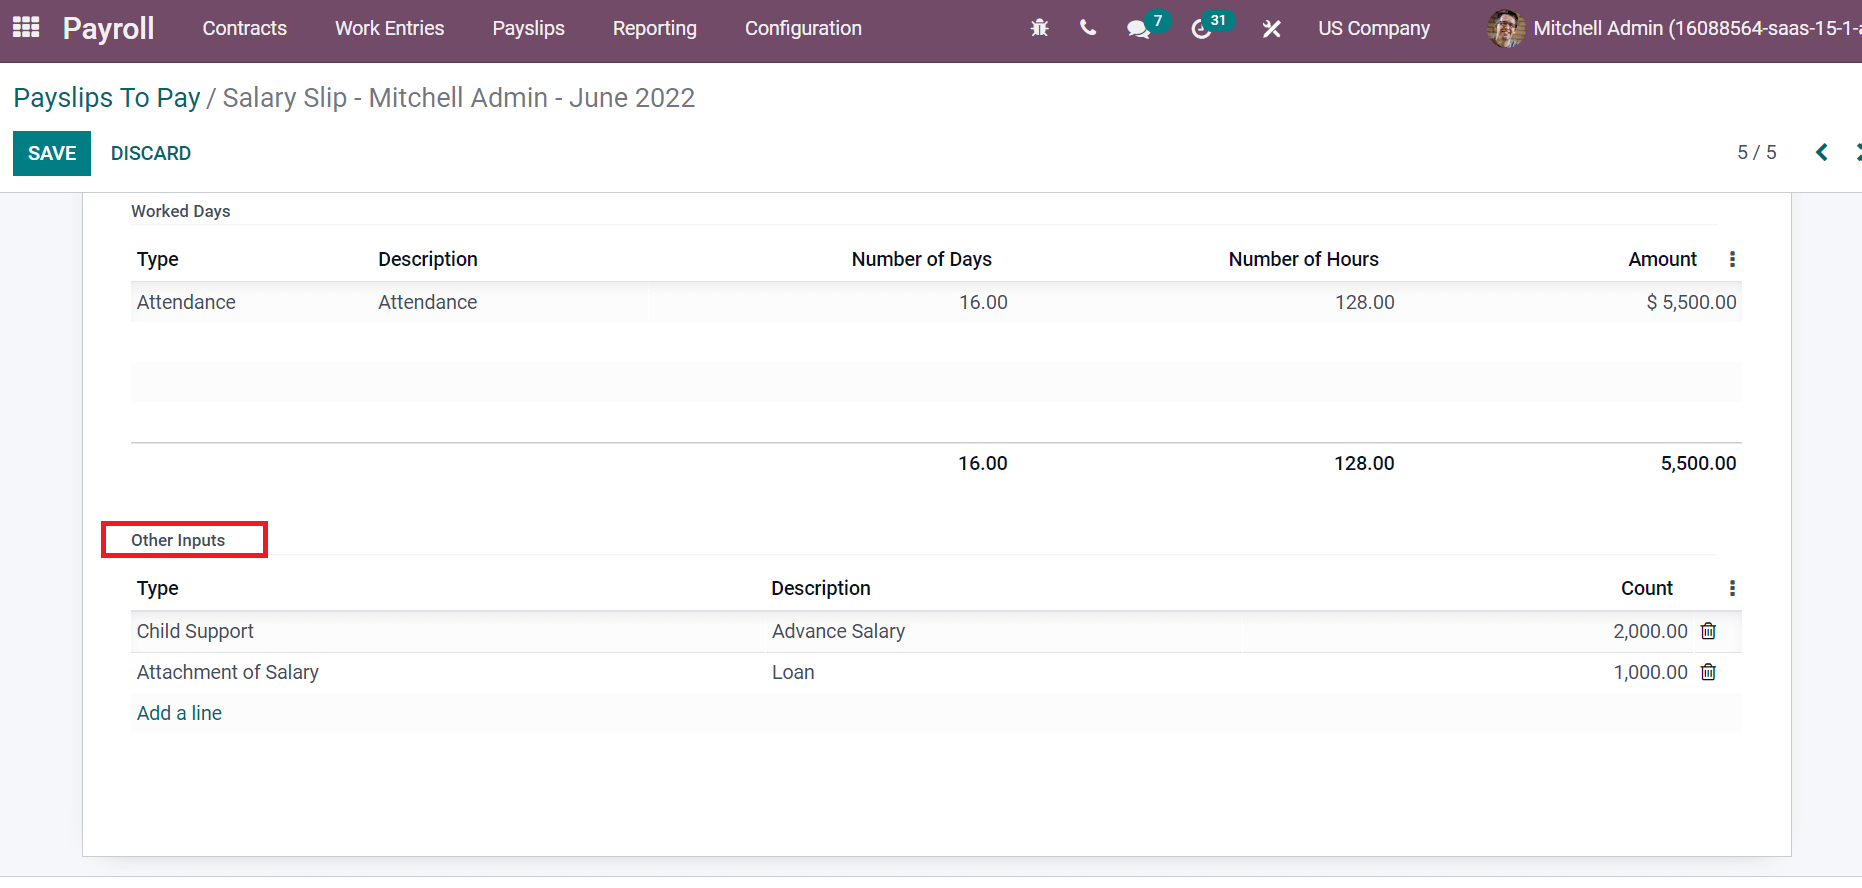
By selecting the New Structure option, you can view created salary attachment types and descriptions inside the Other Inputs sections, as depicted in the screenshot below.
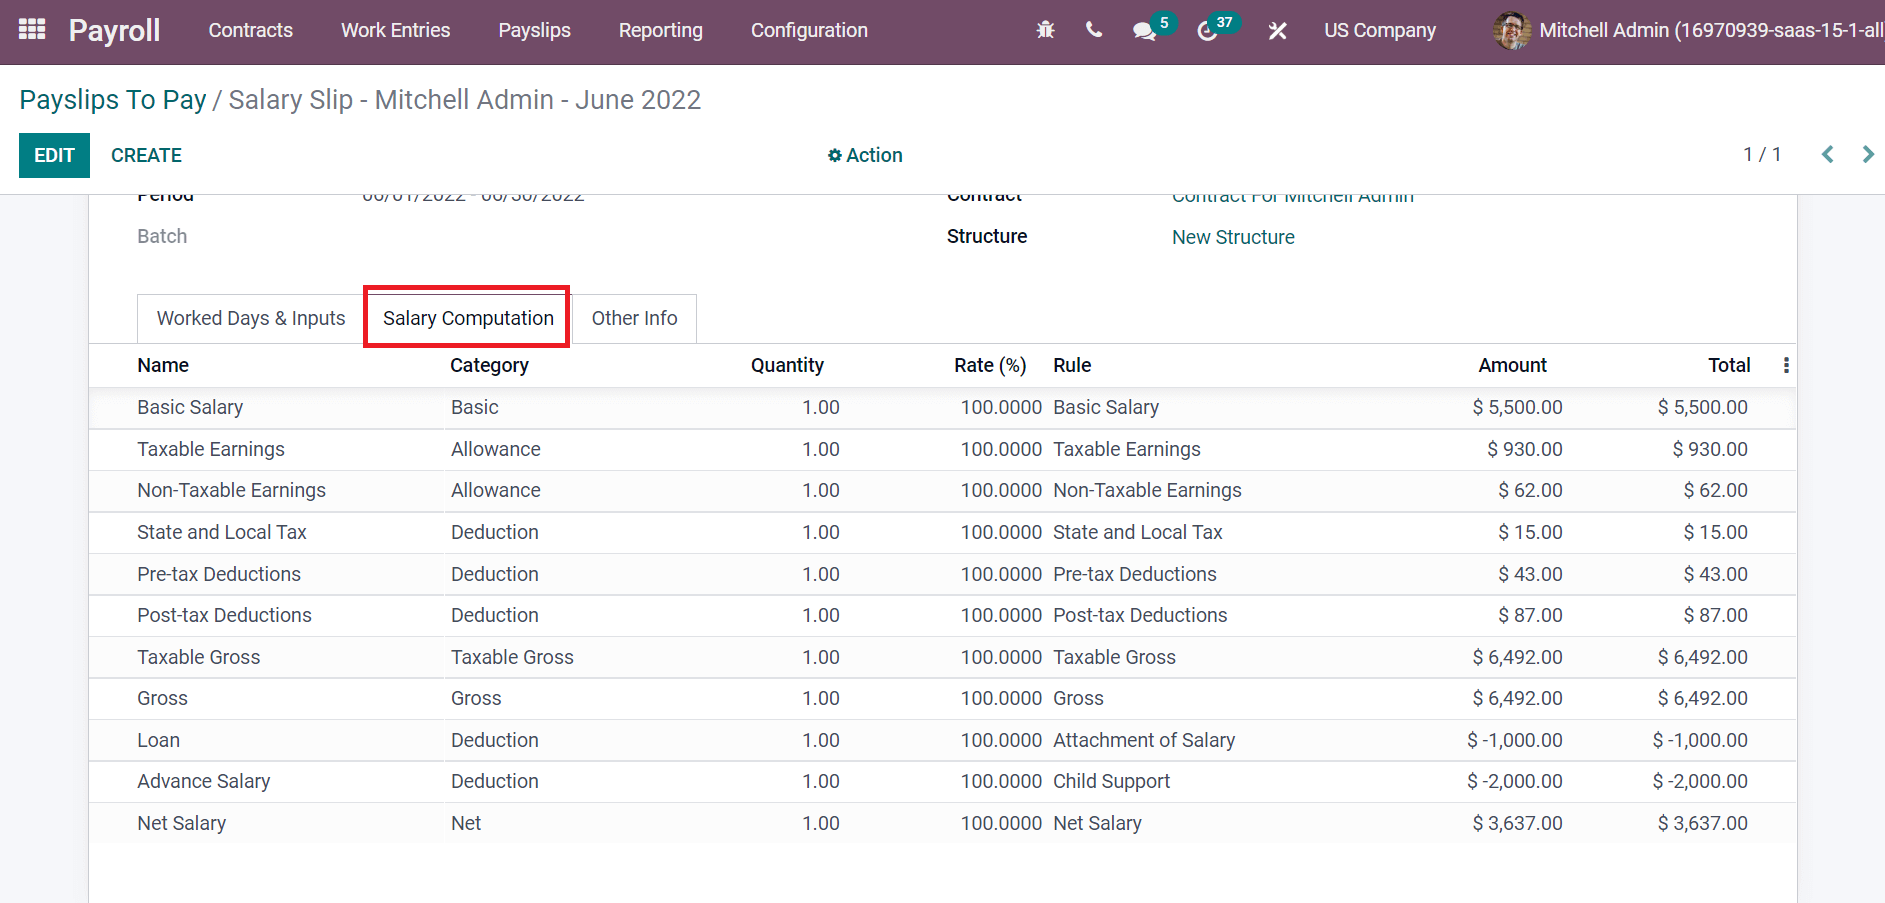
After selecting computing, computation is based on each amount in the Salary Computation tab, as illustrated in the screenshot below.
Select the PRINT icon in Payslips to Pay window for accessing the payslip of Mitchell Admin.
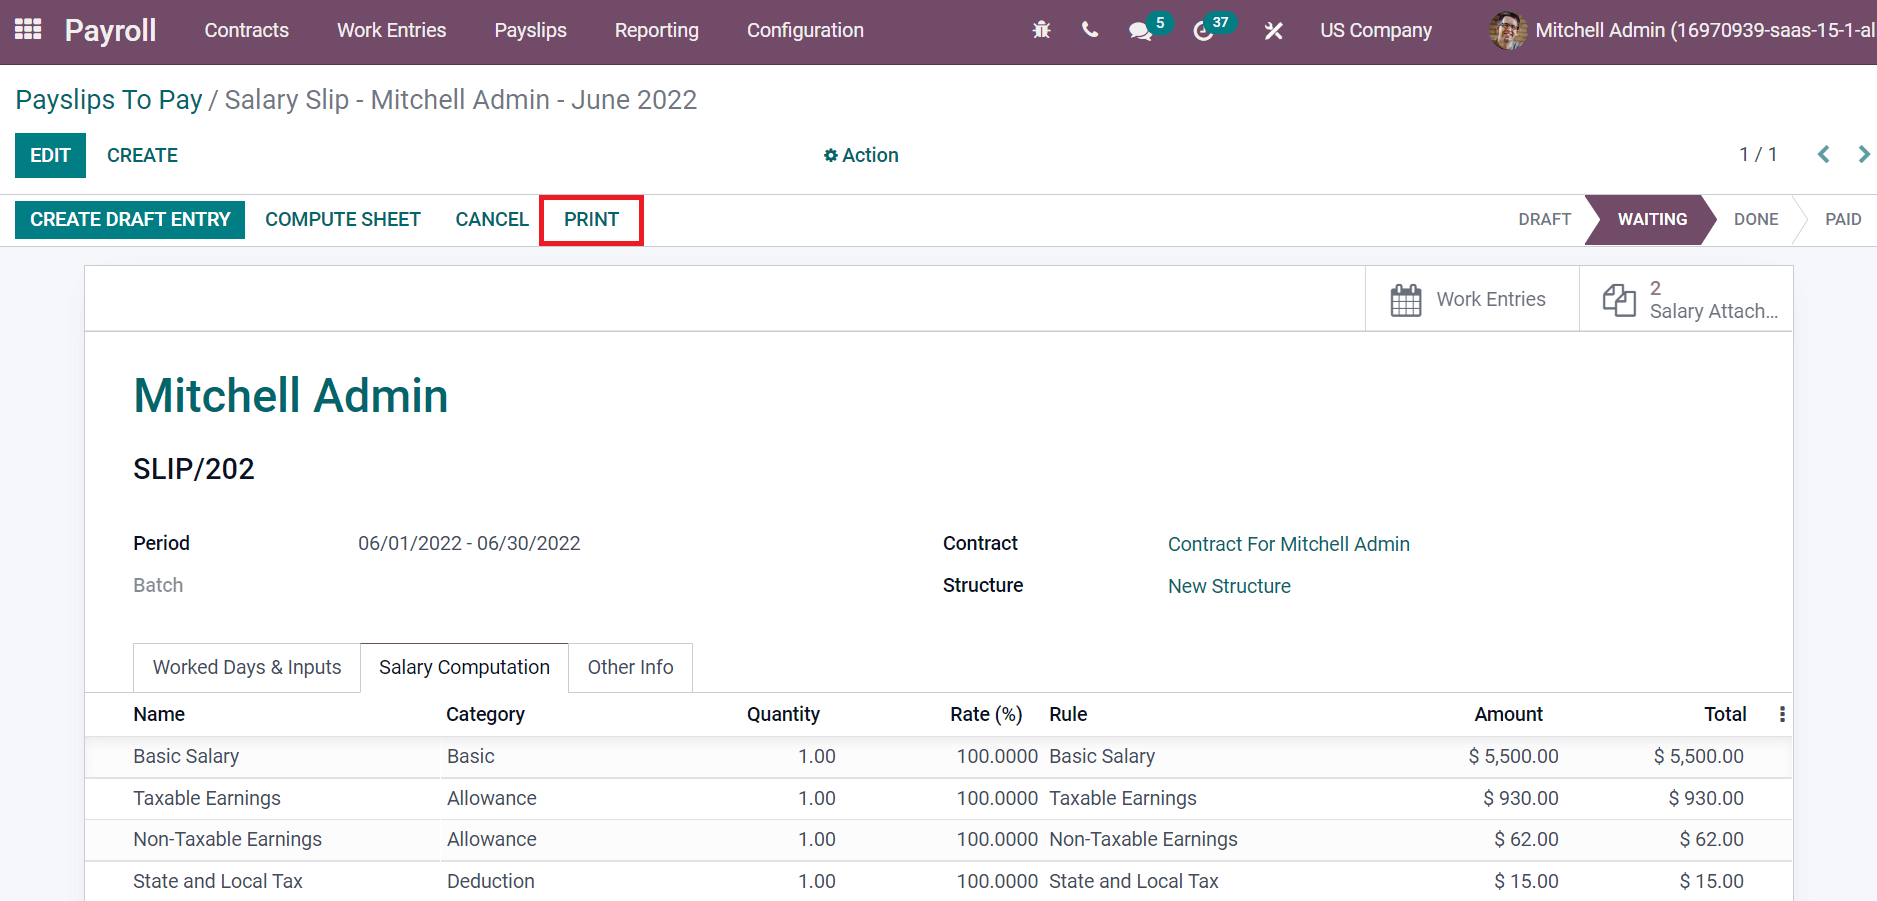
Hence, a payslip for Mitchell Admin is created. The salary slip of Mitchell Admin is shown in the screenshot below.
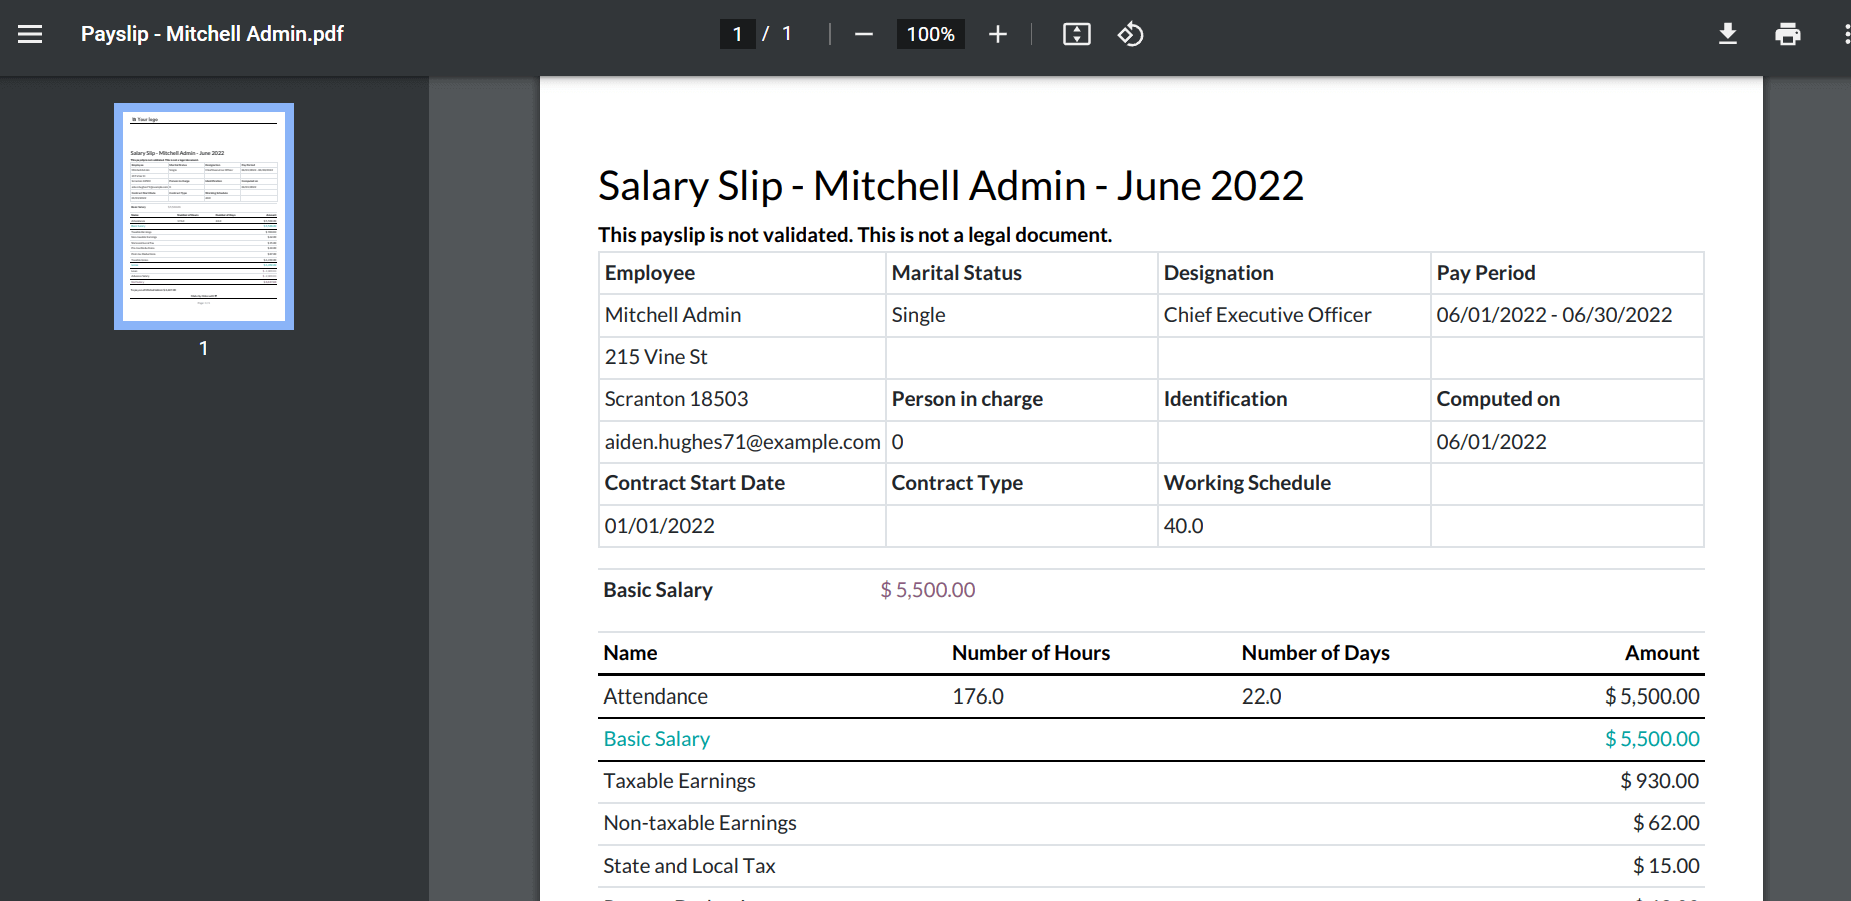
Odoo 15 Payroll module enable users to formulate payslip for employees in several countries. We can quickly develop various salary rules and attachments for an individual using the advanced features of the Odoo 15 Payroll module. Refer to the following blog to know more about Odoo 15 Payroll Module.


