Since employees are an organization’s most valuable resource, managing them well contributes to your company’s success. In order to make informed business decisions, employee data must be carefully maintained. Additionally, handling and protecting employee data is a legal requirement for HR, and failing to do so will result in severe consequences. The problem is that there are several challenges involved in manually handling a sizable collection of personnel data. It may take a lot of time and be error-prone, especially if your firm has many staff and other significant responsibilities to finish. Another significant risk associated with manual database administration is security.
Keeping an effective employee management system will bring benefits such as,
* Organizes data in a single location
* Increases data security
* Promotes overall productivity
* Improves employee collaboration
* Minimizes compliance risks
* Access to the organization’s hierarchy is provided.
In this blog, we will go through how to manage skills and resumes in odoo 16 employees app.
Odoo 16 Employee Module and its Features
Odoo 16 Employee Module is an all-in-one solution for employee management requirements for any kind of organization. You can store all employee-related data with the help of Odoo ERP. You can keep track of your employee skills, credentials, job history, and details of completed projects via the skill management tool offered by Odoo. The Employee management module of Odoo is a useful tool for managing all tasks associated with employees.
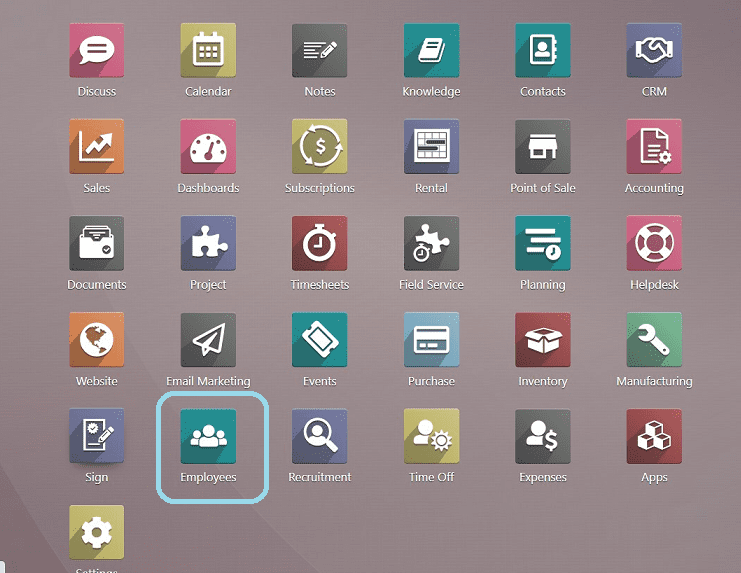
Odoo Employee Module Features
Let’s discuss some of the features of the Odoo 16 Employee Module.
Make employee profiles: Collect all information about each employee in one location.
Contract management: Maintain a record of your employees’ status, job titles, contract type, dates, and timetable.
Control timesheets: Create weekly and monthly timesheets to track how much time your staff spends on tasks.
Take care of attendance: Keep an eye on your employees’ whereabouts at work. With the menu entry and state, HR managers can quickly report employees’ monthly presence.
Take care of the leaves: Manage your vacations, legal leaves, and sick days.
Dashboards: Create a dashboard for each manager.
Creating Employee Records and Skill Management
Open the Odoo 16 Employee Module to create a new Employee Record. You can see the dashboard view of all employees displayed on the Employee homepage, as you can see from the screenshot below.
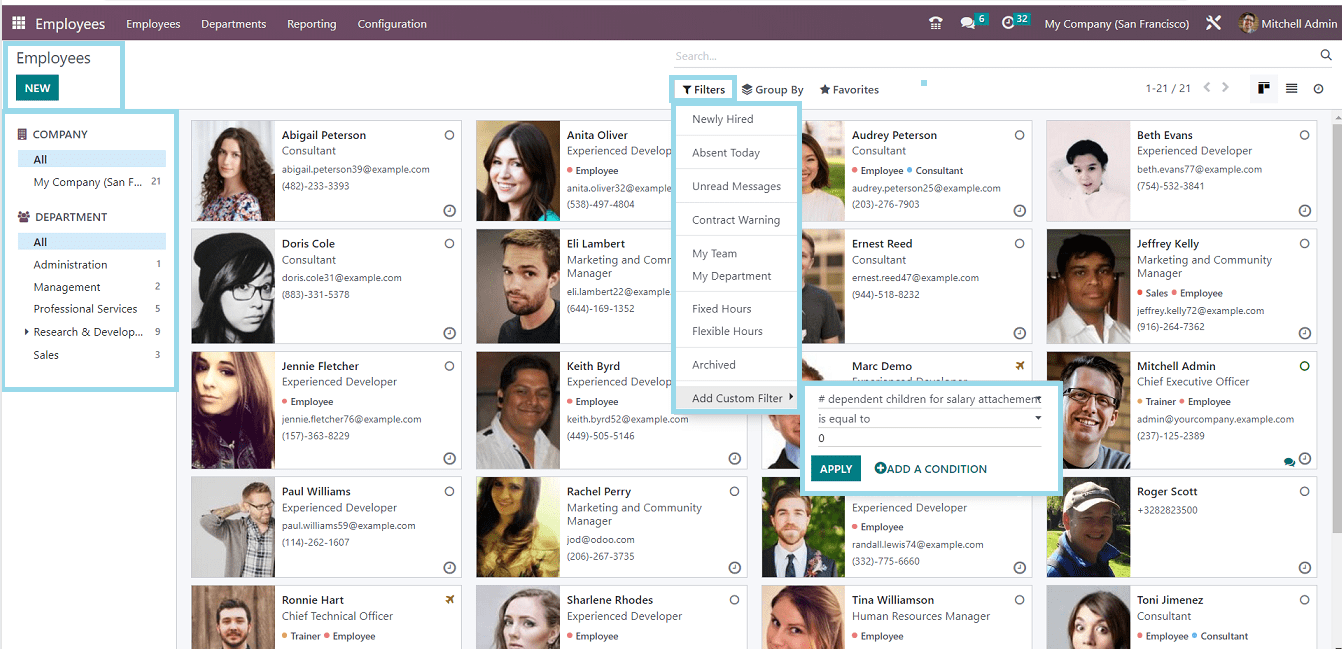
Employee records are displayed in a Kanban format, with the Employee Name, Designation, Mail-Id, and Contact Number. When you click on a specific employee’s Kanban card, the employee details configure form, which contains all of the employee’s information, appears.
From the upper left corner of the screen, users can view personnel by Company and Department.
Also, like any other Odoo platform, Odoo gives filter choices such as Filter, Group By, and Favourites so that we may sort and filter the required employee data depending on the options offered in each of the options dropdown boxes. Additionally, using the “Add Custom Filter” option, you can construct customized filters illustrated in the above screenshot.
Create New Employee Profile
To create a new Employee profile, Click on the “NEW” button available in the top left corner of the screen that will open a configuration from where we can create new Employee details as shown in the screenshot below.
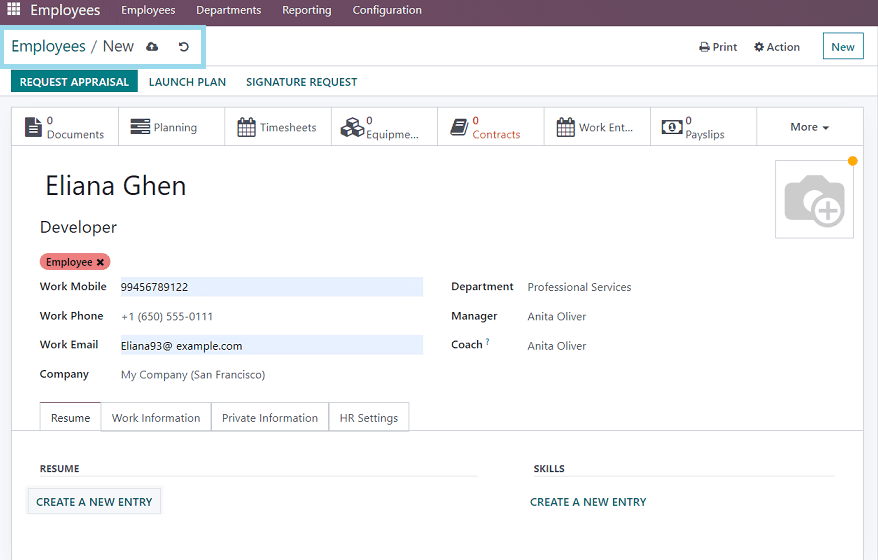
In this form, Users have to give the Employee’s Name, Job Position, and Tags regarding their job department or post. Then fill in the basic information, such as Work Mobile, Work Phone, Work Email, Company, Department, Manager, and Coach. And also, you can add the Employee Picture in the Image Box provided in the top right corner of the form.
As seen in the screenshot above, this form also has four other tabs, including Resume, Work Information, Private Information, and HR Settings. Let’s go over each tab section in more depth.
1.Resume Tab
Users can create an Employee Resume using this Tab, which contains two options such as RESUME and SKILLS.
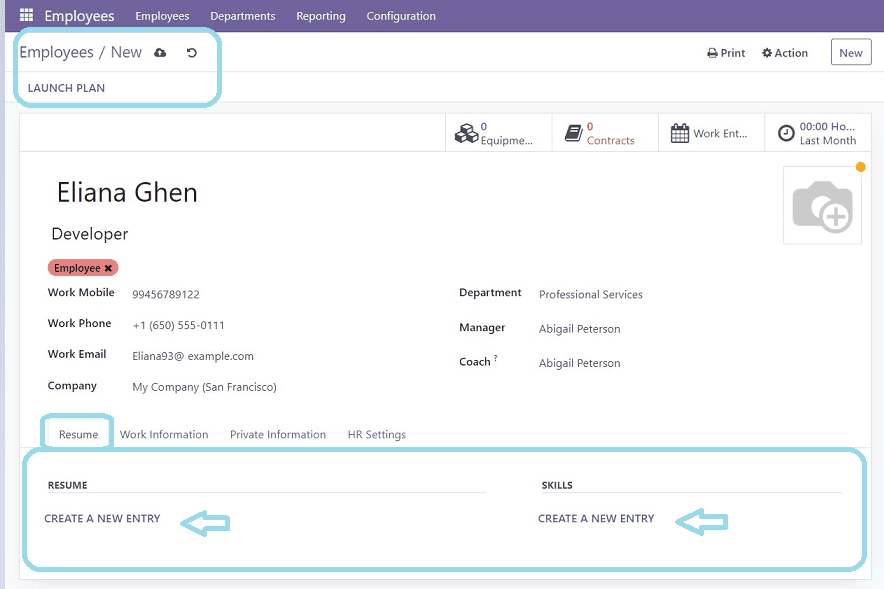
In the RESUME section, you can create a new resume entry by clicking on the “ CREATE A NEW ENTRY” option, which will open a pop-up window as shown below.
You can enter your educational qualification and work experiences using this box.
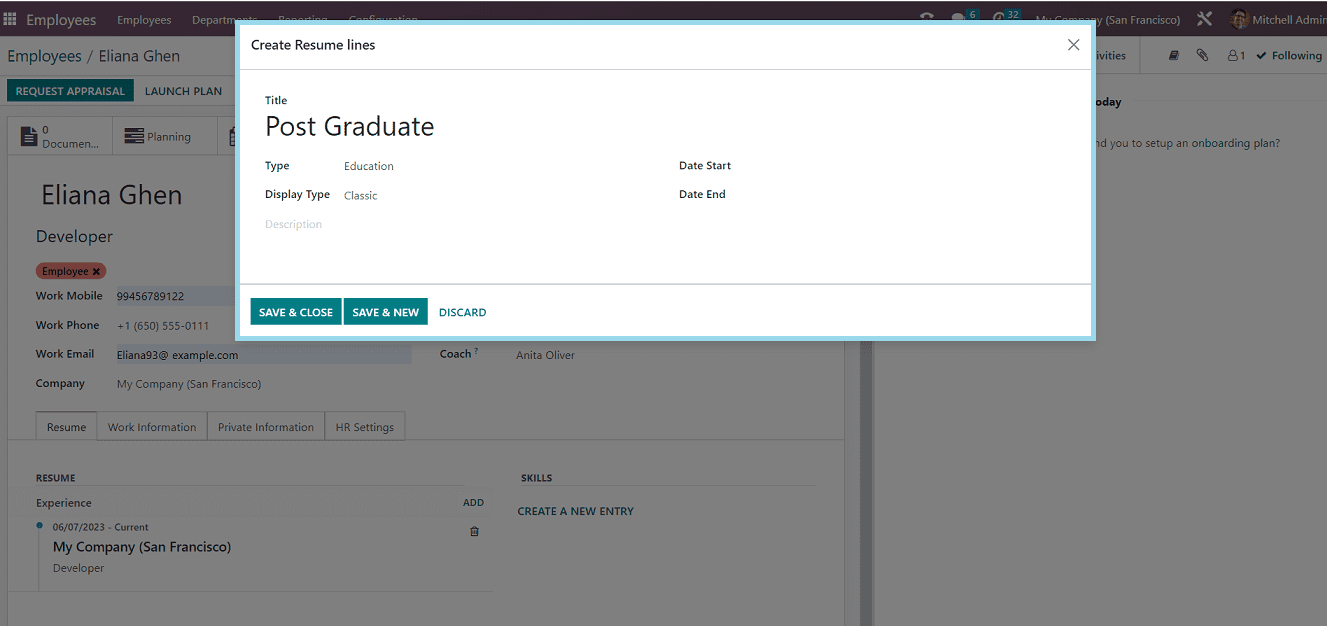
Here you can give the Resume Line Title as per your requirements, such as Educational Qualifications, Personal Information, Work Experience, Projects, Skills, etc.
Type: You can mention the type of the given Title by selecting from the drop-down list provided in the section or by creating a new type.
Display Type: You can choose the display Type from the dropdown list available in the field, whether it is a Certification, Course, or Classic.
Date Start: Mention when you start the course or the end of the previous job.
Date End: Mention the end of the course or the last working day of the previous job.
You can save the details using the “SAVE& CLOSE” button or add a new entry by the “SAVE&NEW” button, as you can see from the screenshot.
The “CREATE A NEW ENTRY” button located beneath the Skills sections also allows you to set up an employee skillset. This will bring up a pop-up window where you can configure the employee’s skills, as illustrated in the screenshot below.
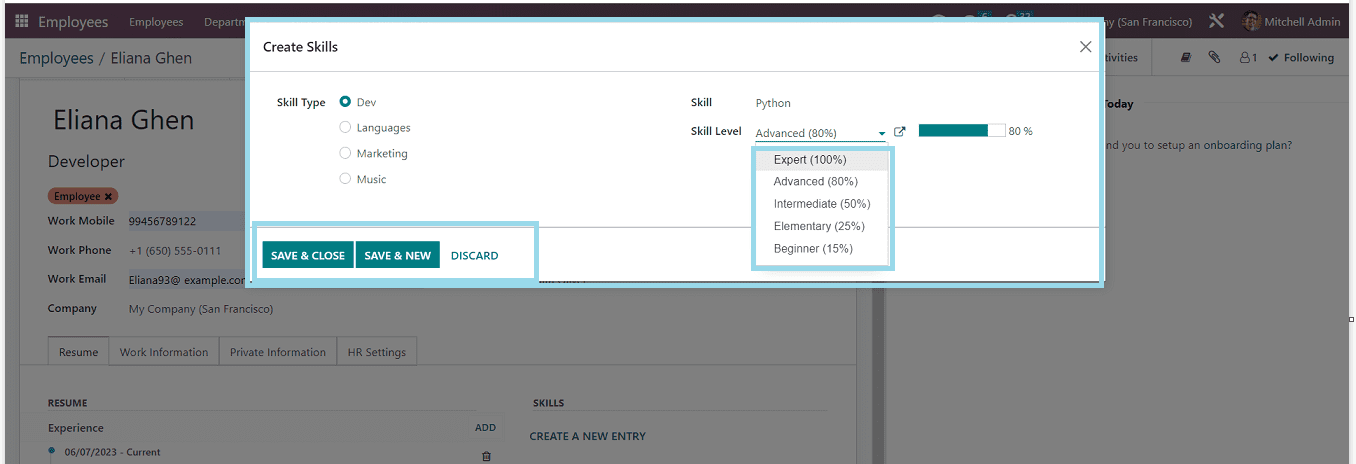
You can specify the skill type of the employee by choosing from the available alternatives, including developer, language, marketing, and musician. By choosing the relevant option from the drop-down list, you can then enter the skill’s name. You may also specify the skill level, such as Basic, Intermediate, Elementary, Advanced, etc. Additionally, this can be chosen from the drop-down menu. Only one skill can be created in a single form. The “SAVE & CLOSE” button can be used to store the details after the process is complete, or the “SAVE & NEW” button can be used to add a new skill. Here I just created a new resume section, as you can see from the screenshot below.
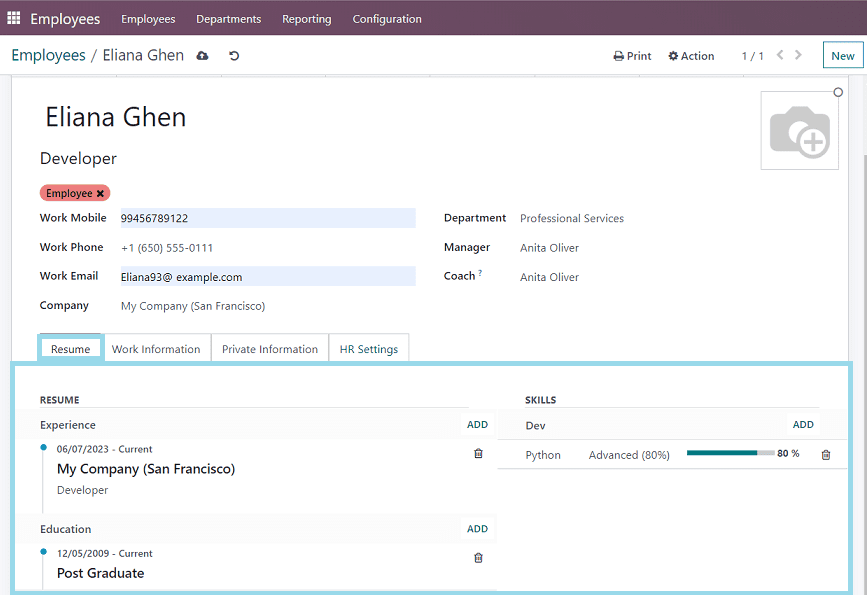
In the procedure previously described, users can continue to create multiple Resume categories and Skills.
2.Work Information
You can create the Employee’s Work Experiences in this section, as illustrated in the screenshot below.
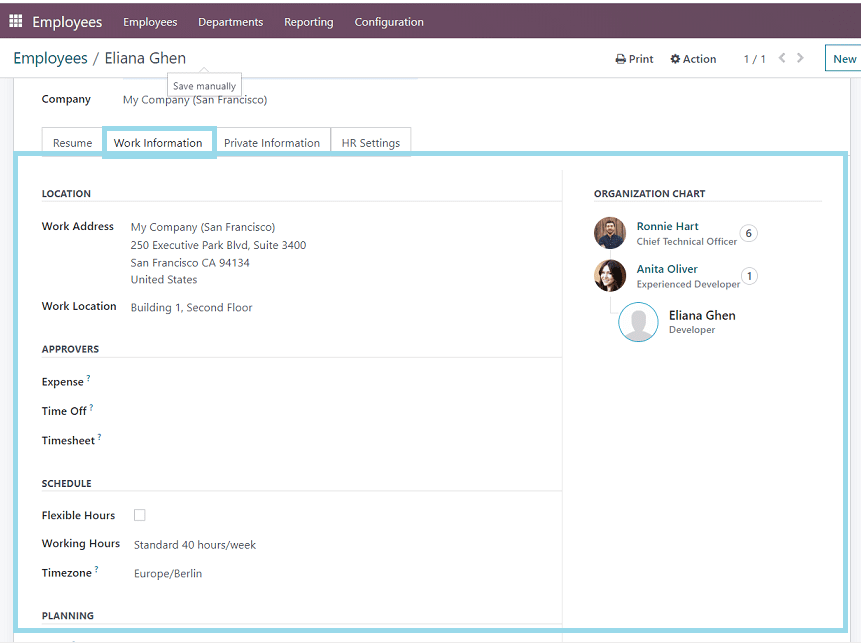
Mention the Work Address and Work Location in the Location section. The Approvers area can be used to list the approvers of this employee’s Expenses, Time Off, and Timesheet. The Schedule section will provide information about the employee’s work schedule. You can enable the Flexible Hours field if the employee is permitted to work flexible hours. Otherwise, you must include the employee’s working hours every week. Set the Timezone to specify which timezone the resources will function in.
3.Private Information
The Private Information tab is where you can enter information about your private contacts, family status, education, work permit, and citizenship, as depicted in the screenshot below.
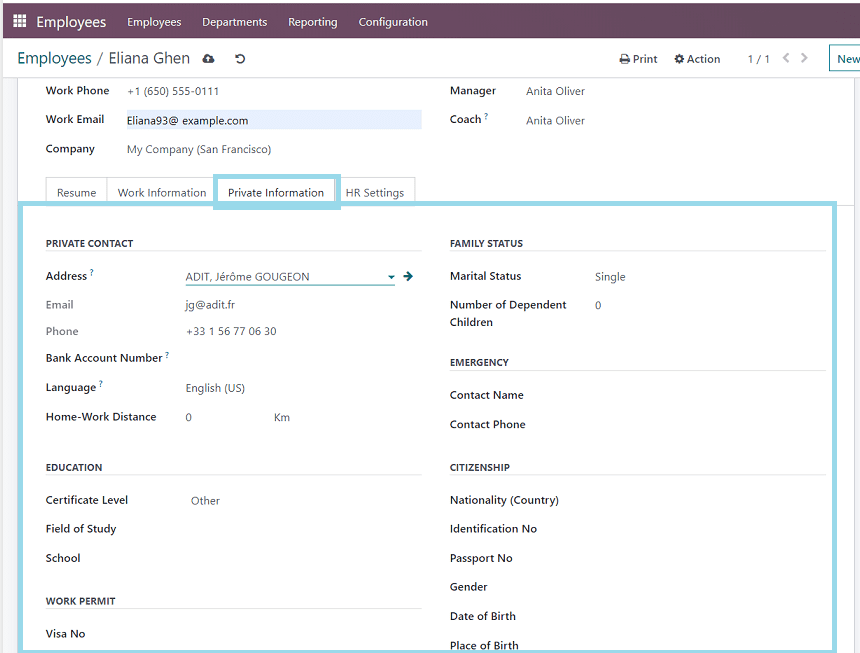
Private Contact: You can mention the employee’s private address, email, phone number, language, and home-work distance in the Private Contact section.
Family Status: You can enter the employee’s Marital Status, Number of Dependent Children in this data field.
Emergency: Provide the Emergency Contact Name and Contact Phone Number in this field.
Education: You can include information about the Certificate Level, Field of Study, and School in the Education section.
Work Permit: The Visa No, Work Permit No, Visa Expire Date, and Work Permit Expiration Date can be given in the appropriate fields of this Work Permit section.
Citizenship: Citizenship information includes nationality, identification number, passport number, gender, date of birth, place of birth, and country of birth can be included in this section.
HR Settings
The HR Settings tab is where you’re able to configure the Status, Payroll, Attendance/Point of Sale, and Application Settings, as you can see from the screenshot below.
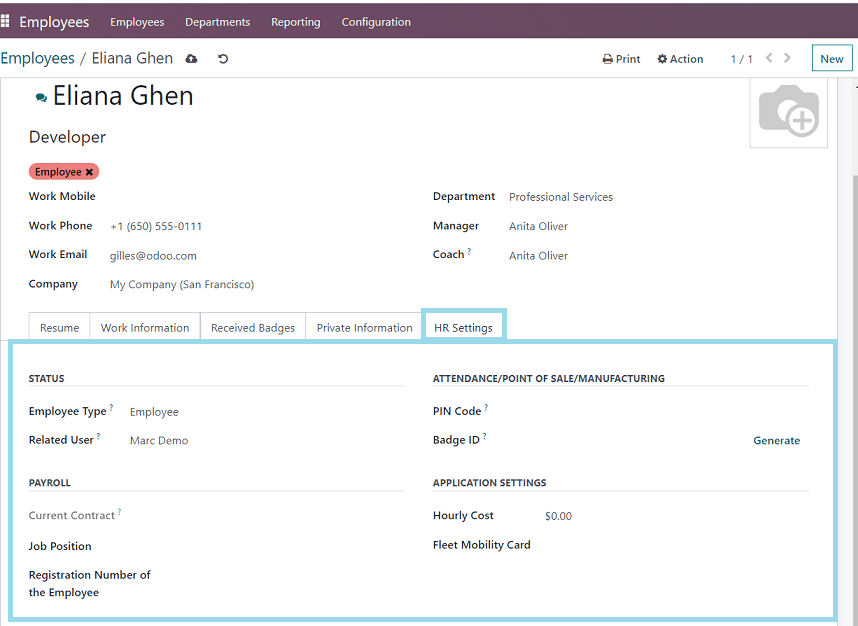
Employee Type: Employee, Student, Trainee, Contractor, or Freelancer are all options for the Employee Type
Related User: In the supplied area, you can enter a Related User name for the resource to govern its access.
Current Contract: You can provide the Employee’s Current Contract details.
Job Position: Current Job position.
Pin Code: To log in to Attendance, PoS, and Manufacturing, you can assign an employee a PIN Code and a Badge ID.
Badge Id: You can provide the Employee Badge Id in this field or generate a new id using the “Generate” button.
Hourly Cost: You can enter the Hourly Cost supplied to the employee.
Fleet Mobility Card: Provide the Fleet Mobility card details, which gives employees a travel budget that they can use for a number of transport options.
Save your Employee details after filling out the form by clicking the Save Icon in the top-left corner.
When you finish configuring the employee profile, you will see a number of smart buttons on the form view that will allow you to monitor the employee’s details. The Document button will display the employee’s associated documentation. If the employee has any equipment, you can handle it using the Equipment smart button; the Time Off button helps to check the employee’s time-off details based on any period of time; the Contracts smart button helps to gather the Employe contract details, the Work Entries button will give you the employee work entries based on datewise, etc.

We can see the newly created employee details from the Employees homepage,
Creating and managing the Employee Skill Type.
We have discussed how to add additional talents to the resume line while configuring an employment profile. When describing an employee’s skills, you will be asked to specify the skill type. The Skill Types option in the Configuration menu will allow you to define numerous skill types, as shown in the screenshot below.

The window will display a list of skill kinds, along with their names and skills. Click on the “NEW” button to add a new Skill Type. As seen in the image below, you will be presented with a new form view in which you can enter the name of the Skill Type.
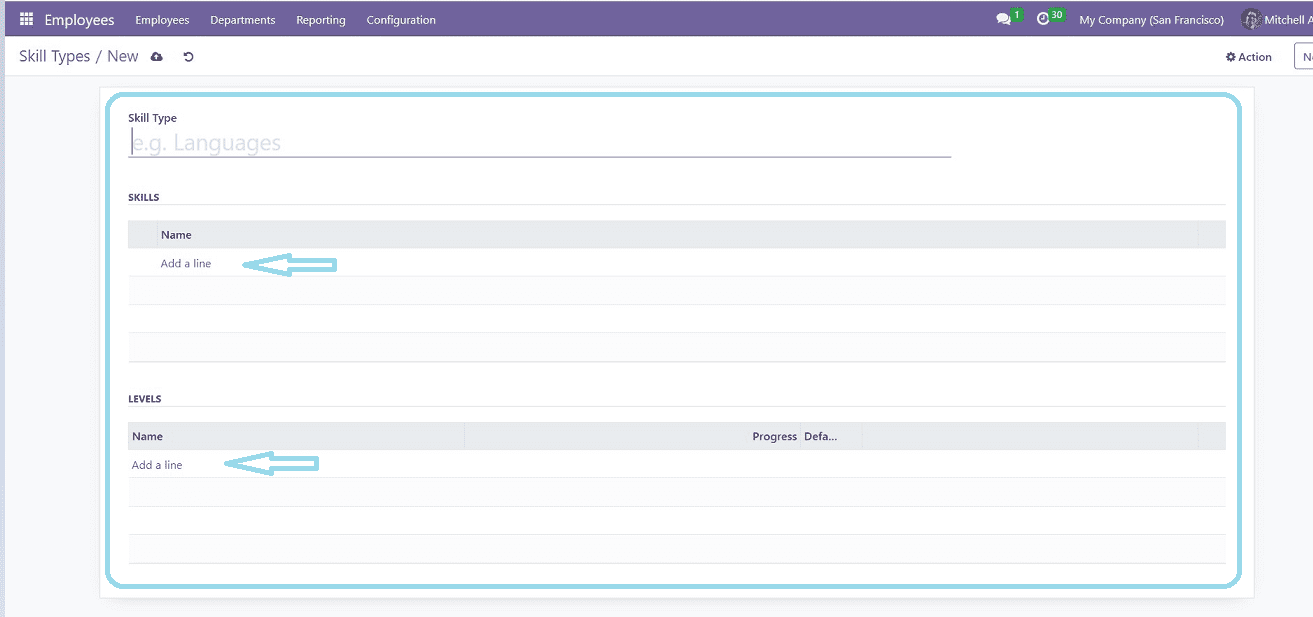
Now, use the Add a Line button to mention the Skills in the provided space. Under the Levels tab, you can assign several levels to the talent. Set multiple skill levels by clicking the Add a Line button. A new pop-up will appear, as illustrated below.

You can give the level a name and specify its progress level here.
You can assign several levels to the skill in this manner. You can make a specific level the default by activating the Default Level field for that level. Save your Skill Type using the Save Icon provided on the topmost part of the form. Here I am just creating a new Skill Type named “Data Analytics” with many Skills and Levels, as depicted in the screenshot.
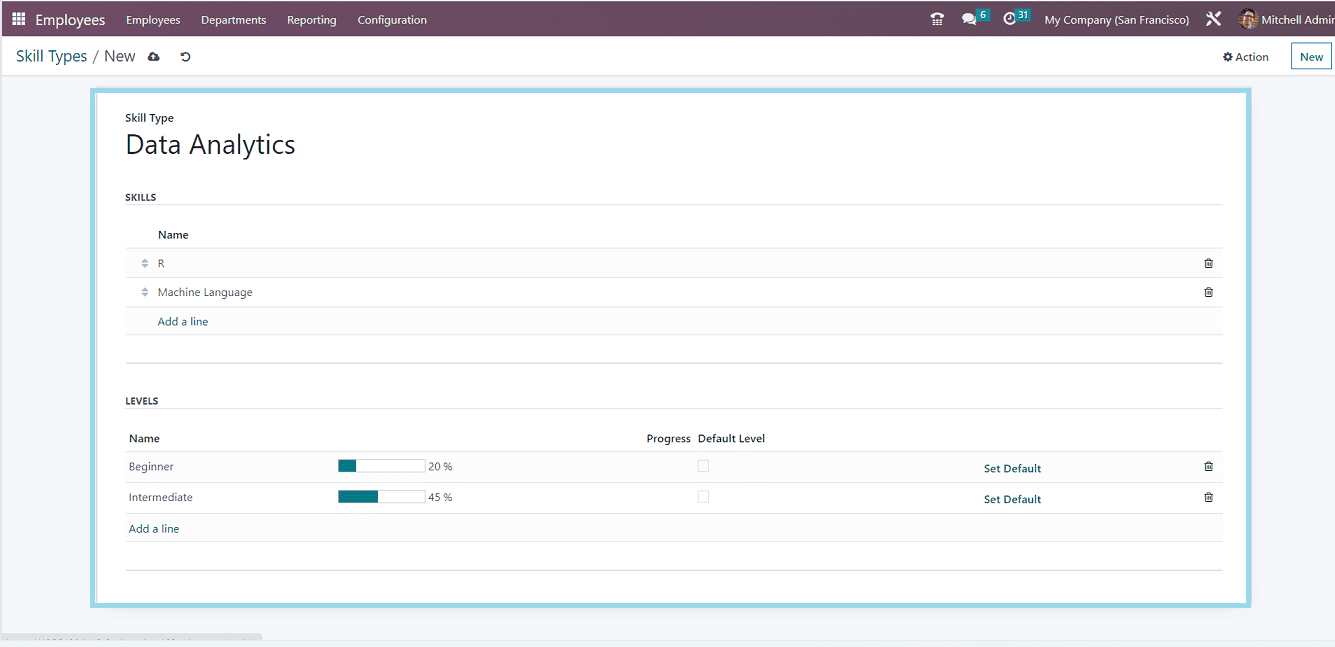
Now you can see our new Skill Type has been saved and added to the dashboard, as you can see from the screenshot below.

Using the Skill Type Configuration technique we just reviewed, you can manage all of your skill types.
Reporting in Employee Skill
The Odoo 16 Employees module makes sure to provide a suitable platform for analyzing the performance of employees based on certain criteria in addition to recording and managing personnel data in an organization. Odoo provides Reporting based on Employee Presence and Skills. Here, we can discuss Reporting based on Employee Skills. We can access the Reporting from the “Skill” Menu item available in the “Reporting” menu of the Employees Module, as you can see from the screenshot below.
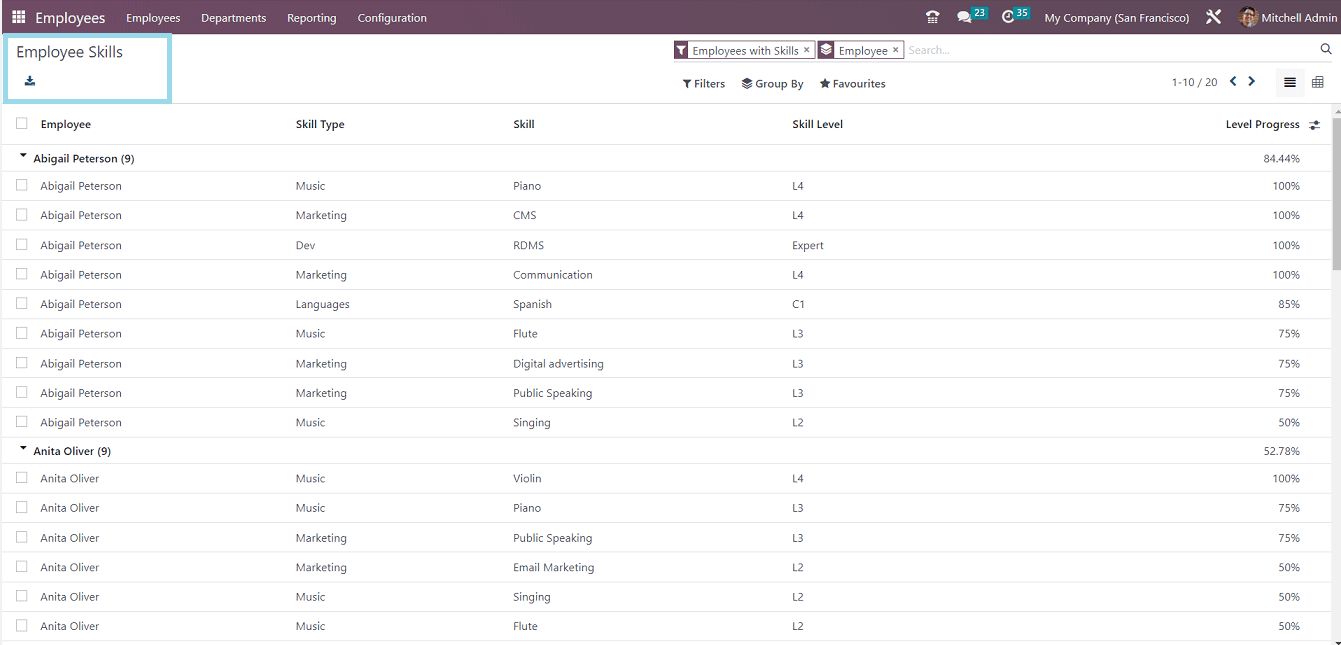
You can see that the Employee Skills have been organized according to the Employee Name, Skill Type, Skill Skill Level, and Level Progress in a list dashboard view. You can use the different Filter options provided in the interface to sort and filter the necessary skill-based report.
Odoo provides Filter, Group By, and Favorites options to filter the data.

The “Add Custom Filter” option, seen in the image above, allows you to add a customized filter choice. You can also utilize other filter options in the same way as previously mentioned. In the screenshot below, you can see that I have filtered different employee details according to their Public Speaking skills.

The Employee skill management procedure in the Odoo 16 Employees Module includes some of the features and capabilities listed above. Every type of business or organization can effortlessly manage its employee information with this ERP platform. As you can see from this article, Odoo offers a pretty straightforward platform packed with highly effective features.


