Odoo’s CRM (Customer Relationship Management) module is a comprehensive tool designed to help businesses manage and streamline their sales, marketing, and customer service activities. Odoo’s CRM module is a part of a broader suite of business applications, and its integration with other Odoo modules allows for a cohesive approach to managing various aspects of your business. It provides a user-friendly interface, and its flexibility makes it suitable for a wide range of industries and business sizes.
Managing access rights for the Customer Relationship Management (CRM) module in Odoo 17 is crucial for ensuring that only authorized users can view, edit, and perform actions within the CRM. Odoo provides a flexible system for managing access rights, so you can tailor it to your specific requirements and business processes. Access rights help ensure that sensitive or confidential data is only accessible to authorized users. This is crucial for protecting business-critical information from unauthorized access or tampering. Odoo’s access rights system is highly customizable. You can define specific permissions for different user roles, allowing you to tailor the system to your organization’s unique needs and processes.
Access rights in Odoo play a critical role in data security, compliance, data integrity, and overall efficiency. Properly configuring and managing access rights is a key aspect of maintaining a robust and secure information management system. This blog will help you to effectively manage access rights of the CRM module in Odoo 17.
Begin by identifying different user roles within your organization. Typical CRM roles may include sales representatives, sales managers, and administrators. Utilize Odoo’s access control lists to specify access rights for different records and modules. Assign appropriate roles to users based on their responsibilities. For example, sales representatives should have limited access, while managers and administrators should have broader permissions.
1. Define User Roles:
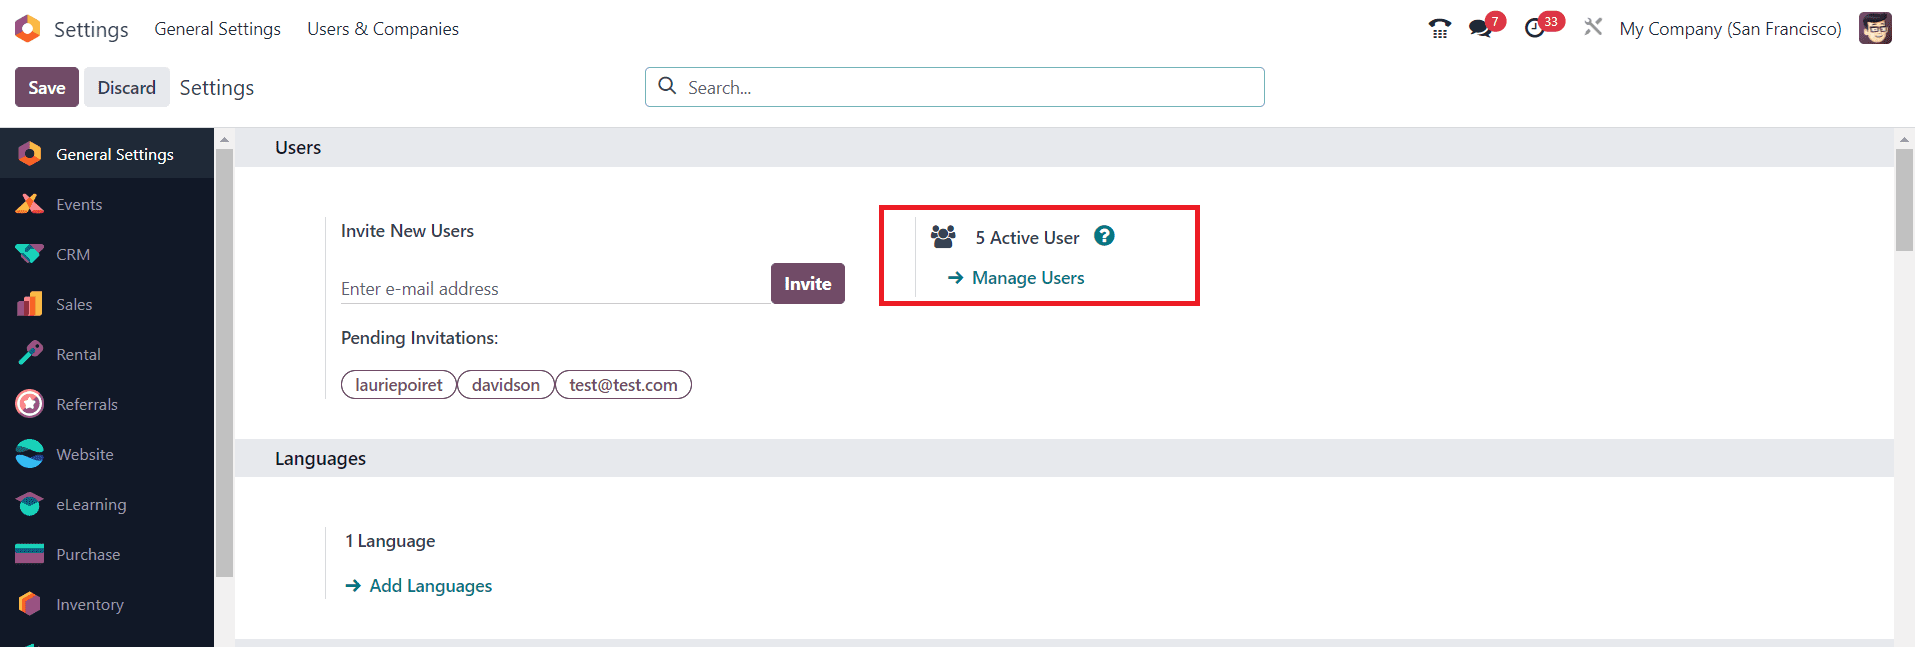
To define the access rights, you need to go to the General Settings of the Odoo. Here, you can find the Manage Users option, which will allow you to configure and manage the details of users.

You will get the list of users configured in the current database, as shown in the image below.

The New button can be used to configure the details of a new user. If you want to make changes in the configuration of any users, you can click on the name of the respective user and make the necessary changes.

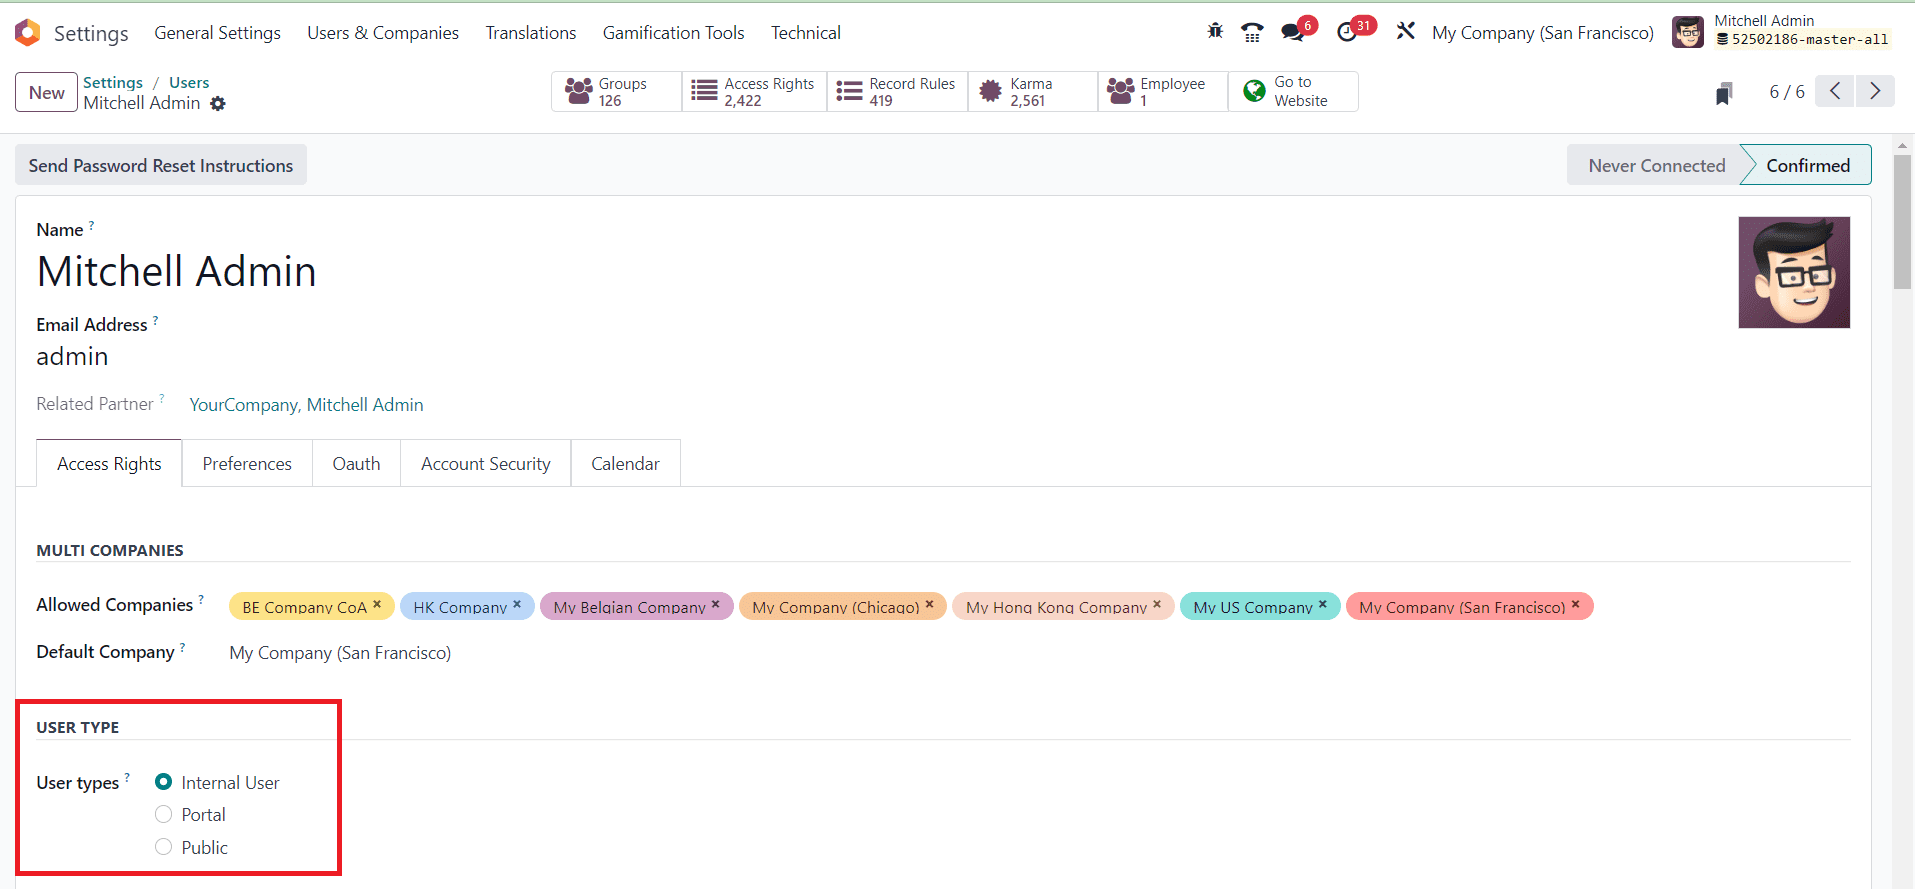
As you can see in the screenshot above, in Odoo, there are different types of users, each with varying levels of access and permissions.
Internal User: An internal user in Odoo is typically an employee or a member of your organization who uses the system to perform various tasks within the company. Internal users have access to various modules and features of Odoo based on their roles and permissions. These users are often the employees who work within your organization and need access to manage internal processes.
Portal User: A portal user is someone who is granted limited access to specific parts of the Odoo system, such as the customer portal or the supplier portal. Portal users can interact with your company through the portal interface, allowing them to perform actions like viewing invoices, tracking orders, or communicating with your company. They have limited access compared to internal users and are often used for customer or supplier interactions.
Public User: In Odoo, a public user, also known as a public user or website user, is someone who interacts with your company through the Odoo website. These users can view information on your website, access public content, and potentially interact with forms or blogs. Public users typically do not have login access or the same level of interaction as internal or portal users. They are often visitors to your website.
These distinctions help you manage and control access to your Odoo system and its various functionalities, tailoring the user experience based on the user’s role and needs.
2. Set Access Rights for CRM:
Control who can access specific CRM records. You can set access rights for each record individually, allowing or restricting access to specific users or roles.

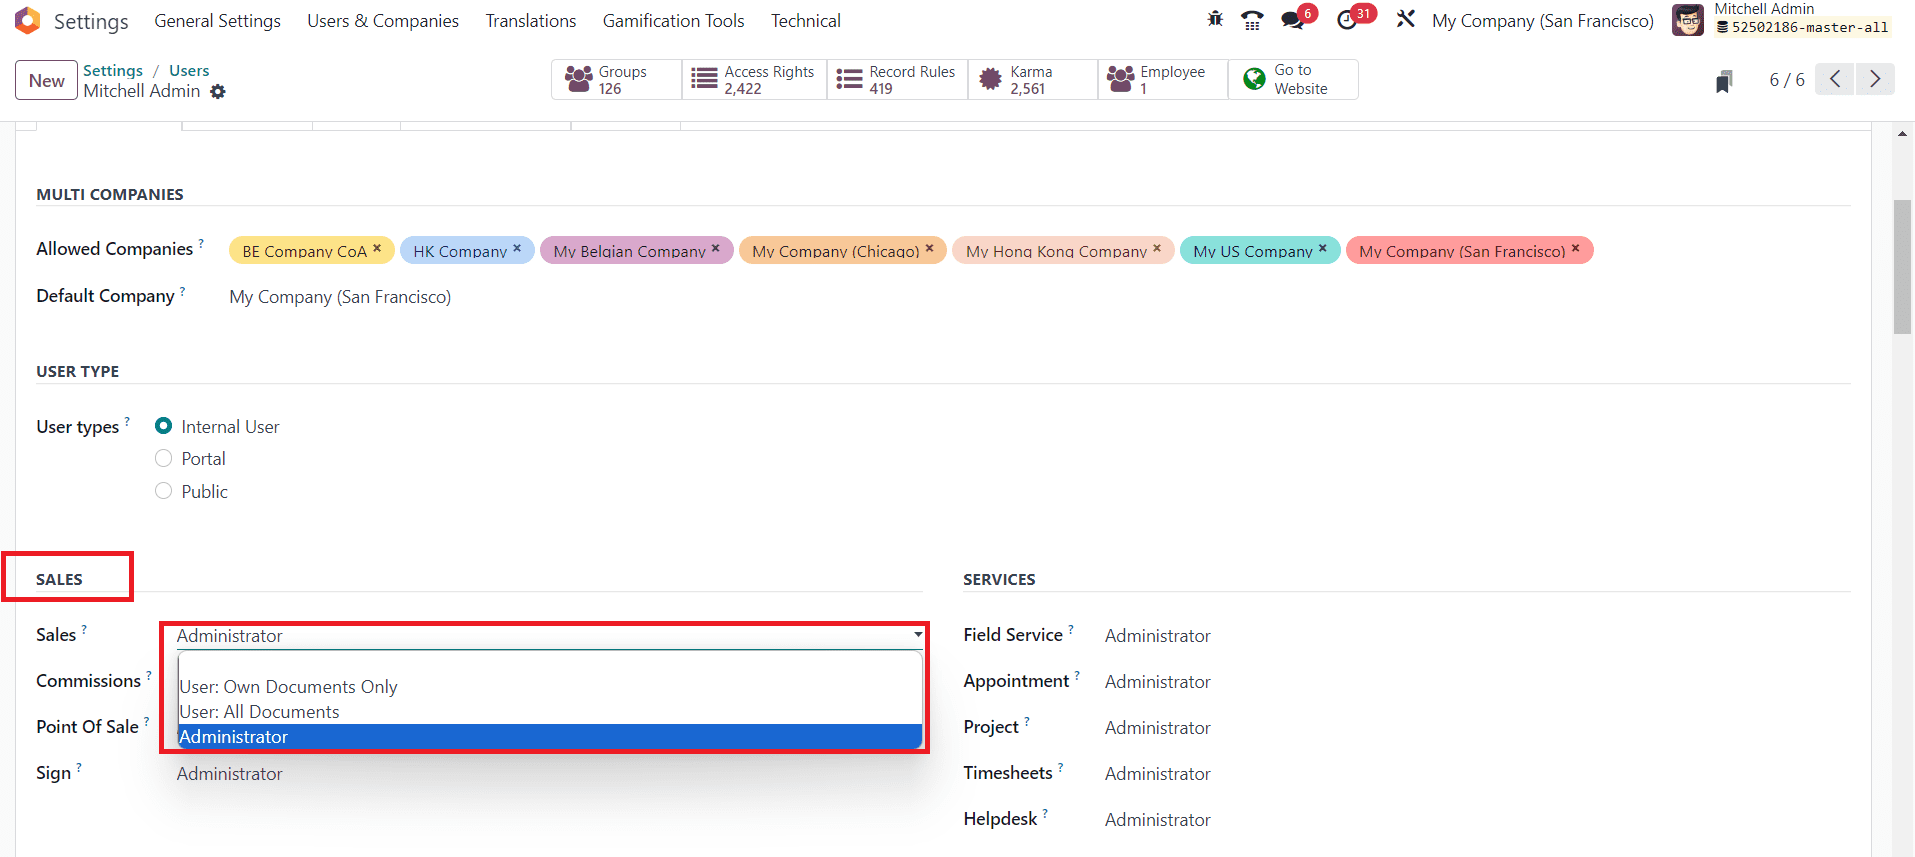
Now, if you want to manage the access rights for the CRM module, you need to set access rights for the Sales module. When you save the changes, you can find the reflections in the CRM module also. Here, you can set access rights as Administrator, Own Document Only, or All Document.
Administrator: A user with Administrator access rights has full control and permissions over the Sales module. They can create, modify, and delete sales documents, as well as manage settings and configurations within the Sales module. Administrators have unrestricted access to all sales-related records.
Own Document Only: With “Own Document Only” access rights, a user can only access and modify sales documents that they have created or are assigned to them. This access right is useful for restricting users to work only on their own sales records. They won’t be able to view or edit sales documents created by other users.
All Document: Users with “All Document” access rights can access and modify all sales documents within the system, regardless of the document’s creator or assigned salesperson. This level of access is suitable for users who need to work with all sales documents across the organization, such as sales managers or administrators.
These access rights help you tailor the permissions and control within the Sales module to match the roles and responsibilities of your users. You can assign these rights based on user roles and requirements to ensure that the right people have the necessary access to perform their tasks. These changes will be applicable to the CRM module also.
3. Define Allowed Companies and Default Companies for User
In Odoo, you can define allowed and default companies for a user by configuring their access rights and settings. Different companies often have separate data, customers, and leads. By defining allowed companies for a user, you ensure that they can only access and modify data related to the specified companies. This prevents data leakage and maintains data privacy. Users can only interact with the data associated with their allowed companies, reducing the risk of unauthorized access or data breaches. It enhances the security of your CRM system.
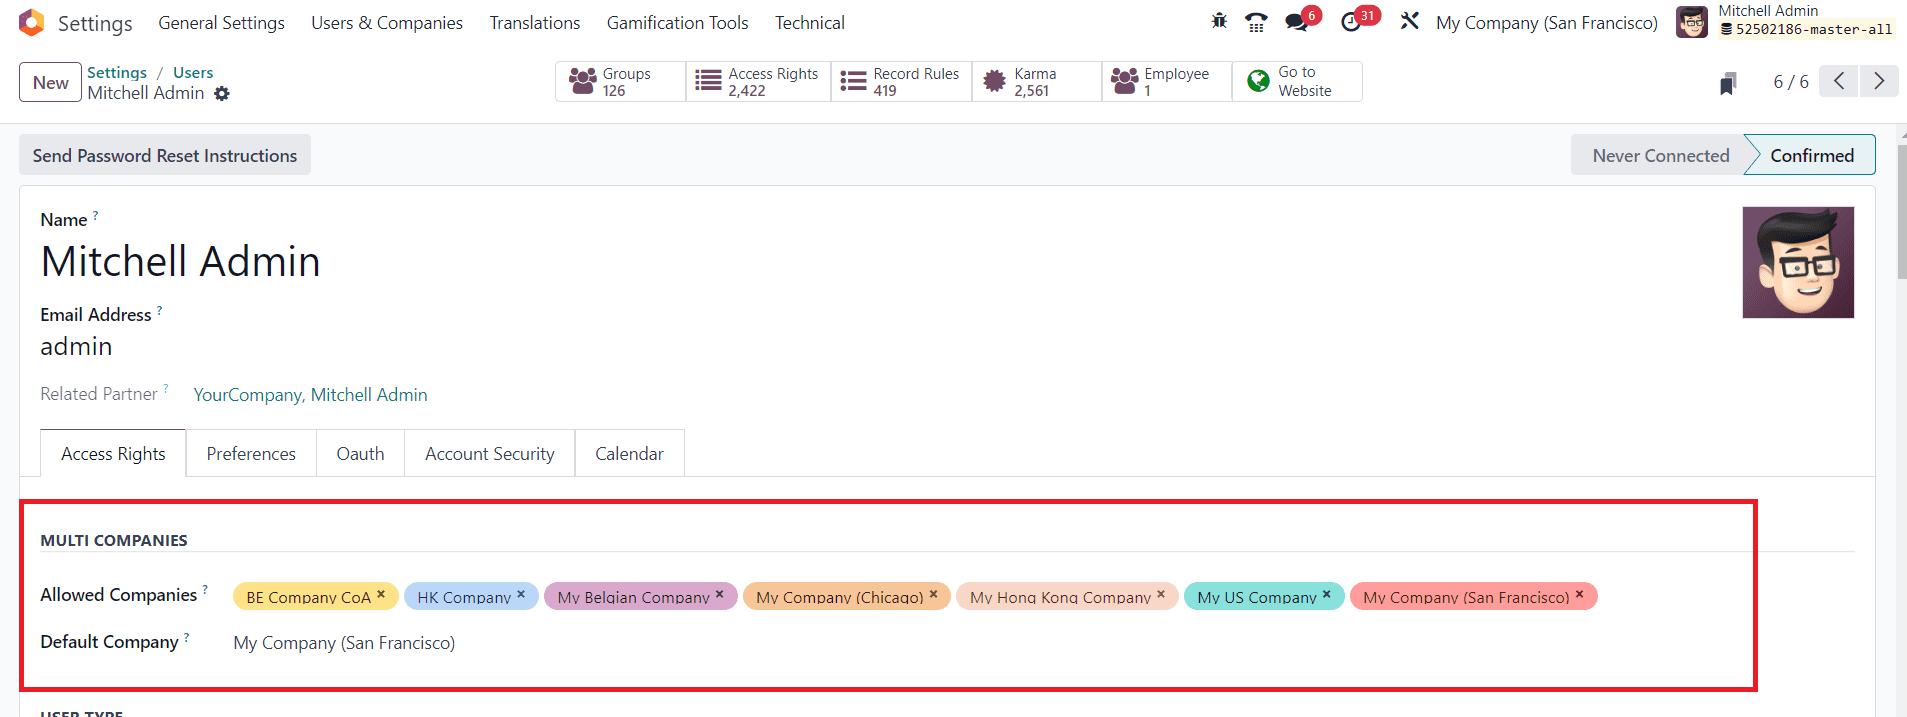
To define Allowed Companies, go to the user’s profile in Odoo by navigating to “Settings” > “Users & Companies” > “Users.” Select the user for whom you want to define allowed companies and edit. Inside the user’s profile, go to the “Multi Companies” tab. Here, you can specify which companies the user is allowed to access.

In the “Allowed Companies” field, select the companies to which the user should have access. You can select one or multiple companies, depending on the user’s role and responsibilities.
In the “Multi Companies” tab, you can also set a “Default Company” for the user. The default company is the one the user is taken to when they log in, and it’s automatically selected in various records and documents. Choose the default company from the list of allowed companies. Remember to save your changes after configuring allowed and default companies for the user. This setup allows users to access and work with specific companies within Odoo as per their assigned permissions and default settings.
By following these steps, you can effectively manage access rights for the CRM module in Odoo 17, ensuring data security, user productivity, and compliance with your organization’s policies.


