A business inventory system can be made faster and easier with the use of a barcode inventory system. Scannable barcodes on specific items are the basis of computerized inventory systems. The machine reads the information associated with the barcode after scanning it with an Odoo barcode scanner. Then, this data was managed by a particular computer system. You can enter the specific item number you require into your associated barcode printing software because barcodes are a simple way to communicate a limited quantity of item-related information. You can save a tonne of time using the inventory system’s barcode scanning functionality. Using barcode scanners will eliminate the need to enter the stock quantities manually. After that, the quantity for each item must be entered individually.
Applications with barcodes boost staff productivity and expedite the inventory process. Mobile computer scanners, Bluetooth, and USB scanners are the most common compatible barcode devices. All actions relating to inventory were simply managed by the barcode system. Product detection is enabled automatically when low-cost barcodes are used. Barcodes are intended to help users efficiently organize all actions linked to inventory. The user can track down the location of a product or item using a barcode. Within seconds, it enables the product to be tracked. Sales and other relevant activities are supported by barcodes as well.
Barcodes aid in error prevention and security management through careful data handling. Odoo 16 stock users are required to include barcodes on their items in both incoming and leaving delivery by the barcode scanning module. Using their barcodes and internal references, it offers searching for currently available products. Using the barcode feature, every item is entered into the inventory system.
Barcode scanning is supported by Odoo to streamline the management of product inventory activities. The barcode scanning method can be used to track and locate items in your inventory. If you wish to use the barcode scanner’s features for Odoo’s inventory management, make sure to install the Barcode module from the Odoo AppStore. After installation, you may visit the Inventory module’s Settings menu.

The Barcode Scanner option is located under the Barcode tab, as seen in the image above. This function can be turned on. You can choose suitable guidelines for the barcode’s development in the Barcode Nomenclature section. You can assign barcodes to products by selecting Configure Product Barcode when this functionality has been activated.

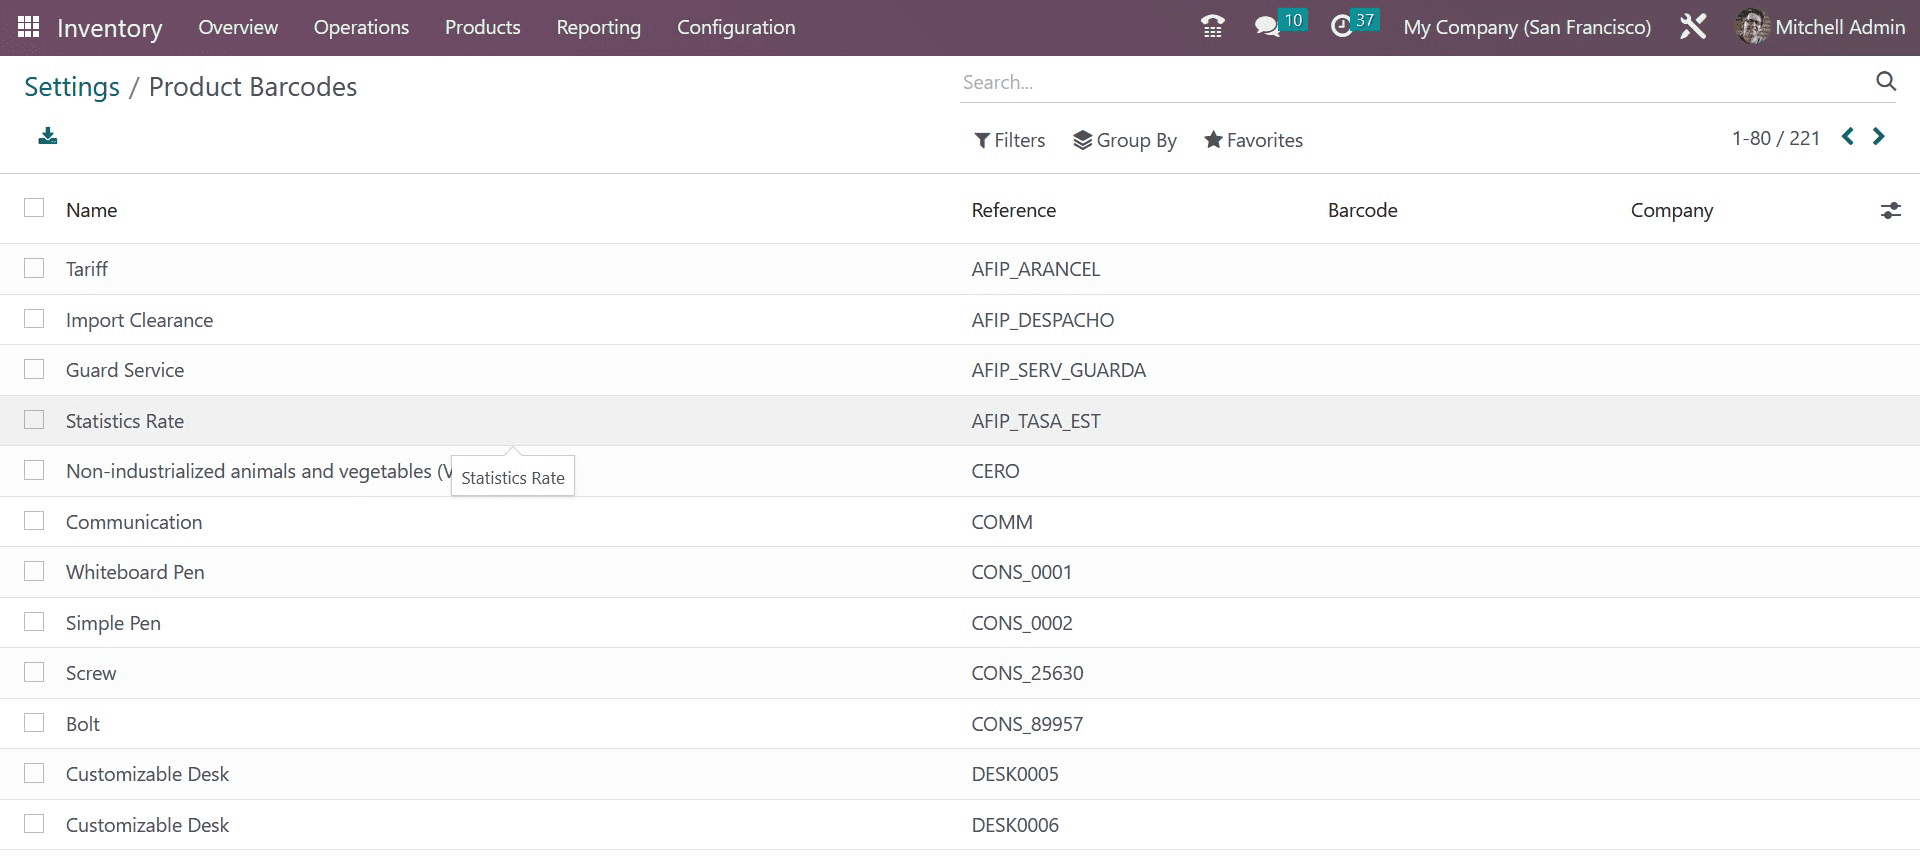
Odoo will direct you to a new platform where you can access a list of the products in your database that have already been configured. By selecting the Barcode field for each product, you can quickly add a barcode to it. Click the Save button once a barcode has been added to the product. This method allows you to assign barcodes to each product. With the use of a barcode scanner, you can use this barcode to locate products throughout various inventory processes.
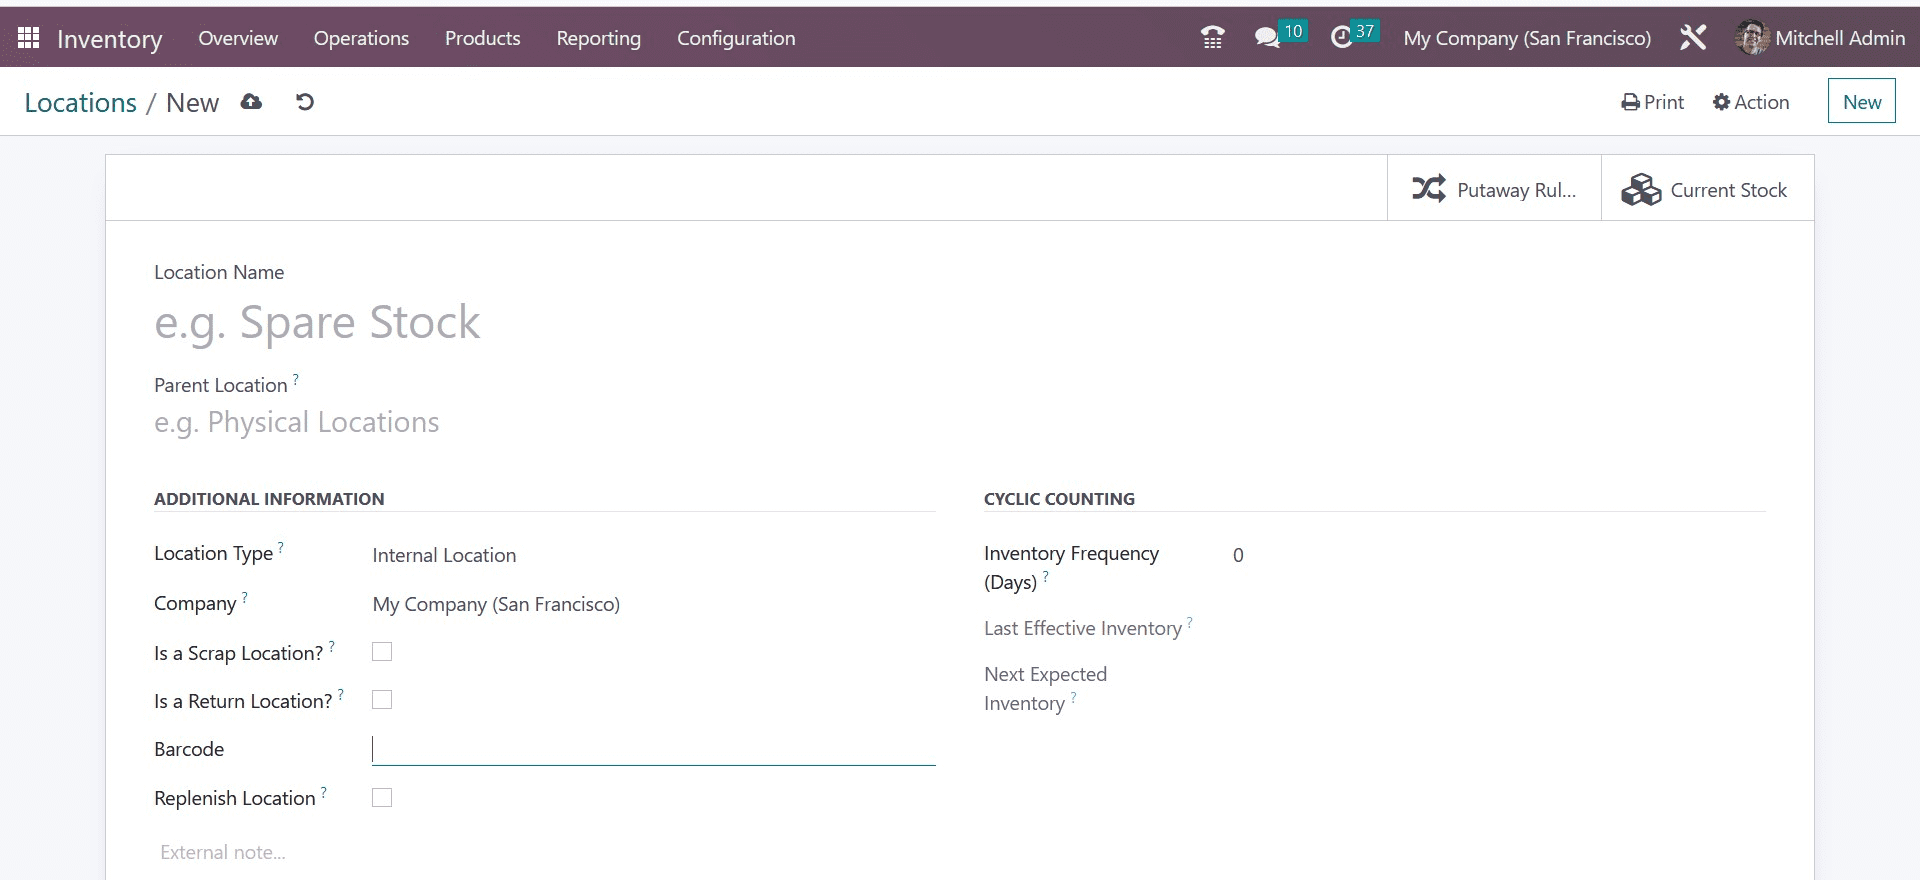
A barcode can also be made to indicate where something is stored. While configuring locations, you can set the location barcode in Odoo’s Barcode field, as seen in the image below.

With the use of the Barcode Nomenclature tool offered by the Odoo ERP system, you may establish certain guidelines for barcode production. Before you can set the barcode nomenclature in the Odoo Inventory module, you must enable development mode.
As seen below, once you switch to developer mode, the Barcode Nomenclature option may be found in the Inventory module’s Configuration menu.

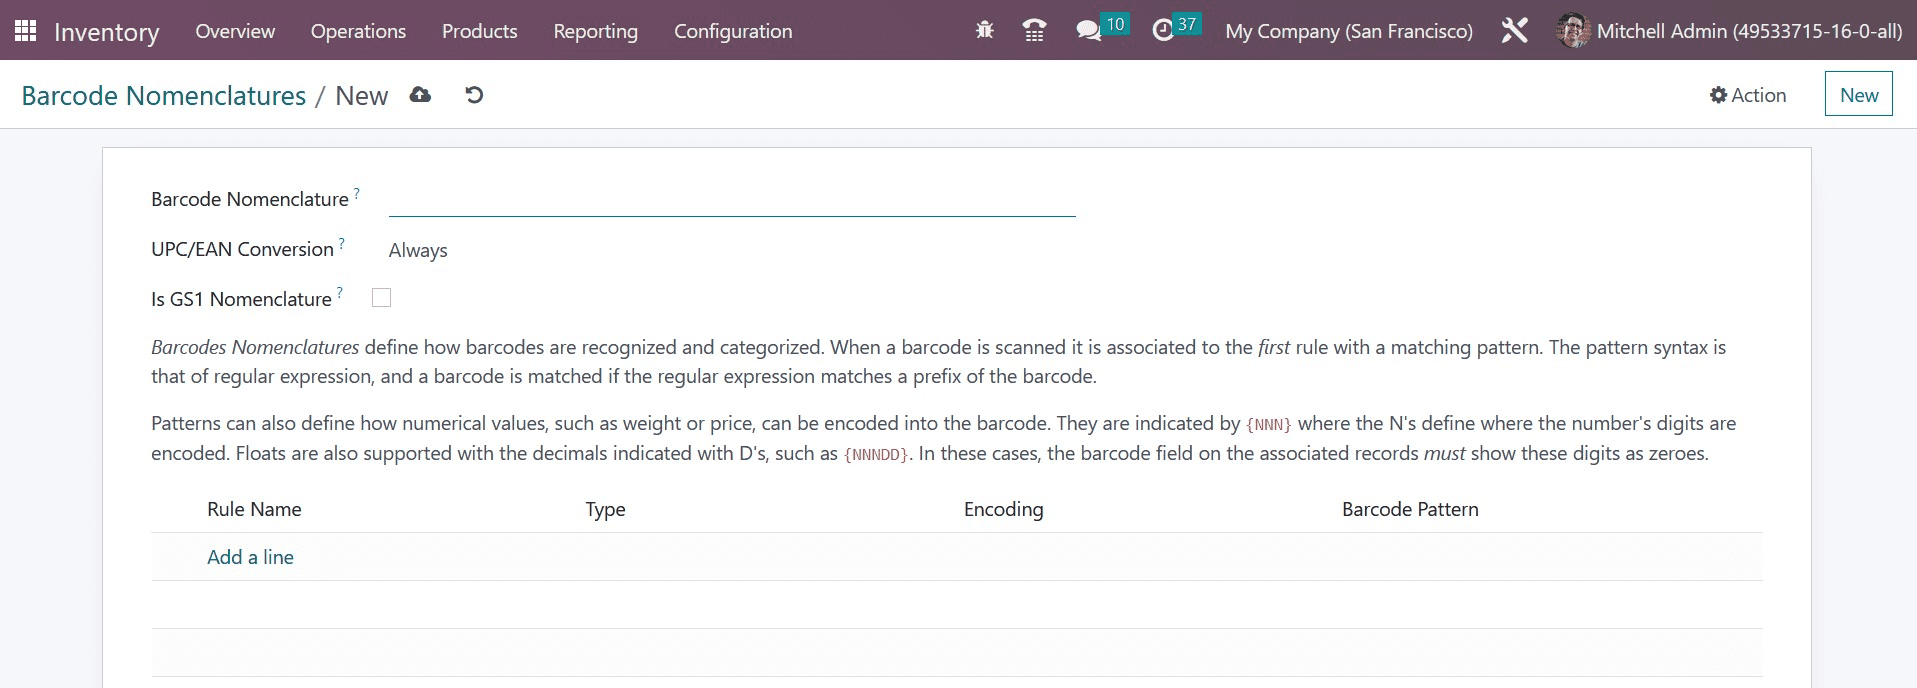
Let’s start by creating a new Barcode Nomenclature using the Create button.

You can enter a name for this barcode nomenclature’s internal identification in the Barcode Nomenclature box.
The UPC/EAN Conversion setting can be changed to Always, EAN-13 to UPC-A, UPC-A to EAN-13, or Never according to your requirements.
Adding a zero before the code can transform UPC codes to EAN codes. This parameter controls whether a UPC/EAN barcode should automatically transform in one direction or another when attempting to match a rule with the alternative encoding. This nomenclature follows the GS1 specification and only accepts GS1-128 encoding rules when the Is GS1 Nomenclature option is enabled.
The nomenclatures of barcodes determine how they are recognized and categorized. A matching pattern is used to link the first rule to a barcode when it is scanned. The pattern syntax matches the barcode if the regular expression matches a prefix of the barcode. The encoding of numerical values into the barcode, such as weight or price, can also be defined by patterns. They are denoted by the “N” string, where the Ns designate the locations where the number’s digits are encoded. The decimal symbols denoted by Ds, such as ND, also support floating-point numbers. In these circumstances, these digits must appear as zeros in the barcode field on the related documents.
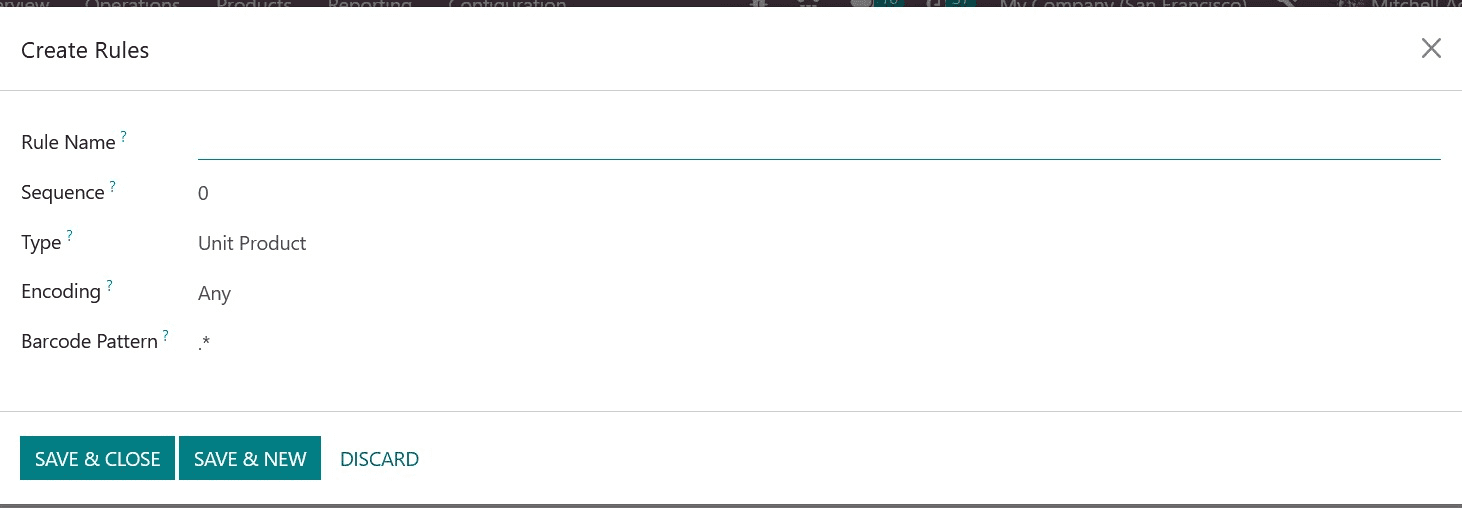
You can supplement this nomenclature with rules by clicking the Add a Line button. You can set each rule individually in the pop-up that will display, as shown below.

You can provide a Rule Name, Sequence, Type, Encoding, and Barcode Pattern here. The Sequence is used to rank rules so that those with a smaller sequence match first. By using this technique, you can modify the terminology and add new rules.

After configuring the Barcode Nomenclature, you can select the nomenclature that will be used when creating barcodes in the Inventory module from the Settings menu.
You can select the best option for your activity from a drop-down selection in the Barcode Nomenclature area.
This is how you can create a barcode and use the nomenclature option under the inventory module.
To read more about managing barcode naming in Odoo 16 inventory, refer to our blog How to Manage Barcode Naming in Odoo 16 Inventory


